
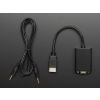


HDMI to VGA Video Adapter and 3.5mm Male/Male Stereo Cable
Available with a lead time
Expect dispatch between Aug 03 and Aug 05
Quantity Discounts:
- 10+ $32.94 (exc GST)
- 50+ $32.25 (exc GST)
If you have a computer or tablet or device with HDMI output but you want to connect it to a projector, monitor or display with VGA input, you have come to the right place! This nifty adapter cable has a classic HDMI plug connector at one end and at the other end a DB-15 VGA connector (it has hex nuts that you can remove if you are trying to mate it with a cable that also has hex nuts). There's also an audio jack on the side, this provides stereo headphone/line out (HDMI 1.3 cables carry both video and audio). You may also need a VGA DB15 male/male cable (not included but available in the shop) to connect this to your monitor.
Adafruit tried this out with a Raspberry Pi and an old VGA monitor Adafruit had and found the display output to be very crisp and vivid. The video works fantastic with a Raspberry Pi right out of the box. To enable the audio and customize the resolution, check the Technical tab for Adafruit's suggested /boot/config.txt The easiest way to do that is to insert the programmed Pi SD card into your computer and look for the config.txt file that is in the root directory of the SD card, edit it, and save it. The monitor will look best if you can set the HDMI output to the matching resolution so try that if you want a good looking display.
It also works with other kinds of computers and HDMI output devices, Adafruit plugged it into a an XBOX360 and then also a Windows box and it came up as a secondary monitor with adjustable resolutions (from 800x600 up to 1920x1080) in the Display panel.
Package comes with one HDMI to VGA adapter and one 3.5mm Male/Male Stereo Cable!
Technical Details
- Adapter body: 57mm x 40mm x 17mm
- Cable tail: 6" / 150mm long
- Standard HDMI plug
- Standard DB15 VGA socket
Here's Adafruit's known-good /boot/config.txt which will set the resolution to 800x600 and enable the audio out of the adapter. Adafruit have a couple other resolution options documented as well!
# uncomment if you get no picture on HDMI for a default "safe" mode #hdmi_safe=1 # uncomment this if your display has a black border of unused pixels visible # and your display can output without overscan #disable_overscan=1 # uncomment the following to adjust overscan. Use positive numbers if console # goes off screen, and negative if there is too much border #overscan_left=16 #overscan_right=16 #overscan_top=16 #overscan_bottom=16 # uncomment to force a console size. By default it will be display's size minus # overscan. #framebuffer_width=1280 #framebuffer_height=720 # uncomment if hdmi display is not detected and composite is being output #hdmi_force_hotplug=1 # uncomment to force a specific HDMI mode (this will force VGA) hdmi_group=2 hdmi_mode=87 # Put your VGA monitor resolution below # hdmi_cvt =# width width in pixels # height height in pixels # framerate framerate in Hz # aspect aspect ratio 1=4:3, 2=14:9, 3=16:9, 4=5:4, 5=16:10, 6=15:9 # margins 0=margins disabled, 1=margins enabled # interlace 0=progressive, 1=interlaced # rb 0=normal, 1=reduced blanking # For example, 800x600 @ 60 Hz hdmi_cvt=800 600 60 1 0 0 1 # or maybe 800x480 @ 60 Hz #hdmi_cvt=800 480 60 6 0 0 1 # or, 1024 x 768 @ 50 Hz #hdmi_cvt=1024 768 60 1 0 0 1 # or if you're not sure, nothing beats 640x480 #hdmi_cvt=640 460 60 1 0 0 1 # see http://www.raspberrypi.org/forum/viewtopic.php?f=29&t=24679 # uncomment to force a HDMI mode rather than DVI. This can make audio work in # DMT (computer monitor) modes ############################################################### ### THIS LINE IS WHAT ENABLES THE AUDIO OUT OF THE ADAPTER! ### hdmi_drive=2 ############################################################### # uncomment to increase signal to HDMI, if you have interference, blanking, or # no display #config_hdmi_boost=4 # uncomment for composite PAL #sdtv_mode=2 #uncomment to overclock the arm. 700 MHz is the default. #arm_freq=800 # for more options see http://elinux.org/RPi_config.txt
Exact shipping can be calculated on the view cart page (no login required).
Products that weigh more than 0.5 KG may cost more than what's shown (for example, test equipment, machines, >500mL liquids, etc).
We deliver Australia-wide with these options (depends on the final destination - you can get a quote on the view cart page):
- $3+ for Stamped Mail (typically 10+ business days, not tracked, only available on selected small items)
- $7+ for Standard Post (typically 6+ business days, tracked)
- $11+ for Express Post (typically 2+ business days, tracked)
- Pickup - Free! Only available to customers who live in the Newcastle region (must order online and only pickup after we email to notify you the order is ready). Orders placed after 2PM may not be ready until the following business day.
Non-metro addresses in WA, NT, SA & TAS can take 2+ days in addition to the above information.
Some batteries (such as LiPo) can't be shipped by Air. During checkout, Express Post and International Methods will not be an option if you have that type of battery in your shopping cart.
International Orders - the following rates are for New Zealand and will vary for other countries:
- $12+ for Pack and Track (3+ days, tracked)
- $16+ for Express International (2-5 days, tracked)
If you order lots of gear, the postage amount will increase based on the weight of your order.
Our physical address (here's a PDF which includes other key business details):
40 Aruma Place
Cardiff
NSW, 2285
Australia
Take a look at our customer service page if you have other questions such as "do we do purchase orders" (yes!) or "are prices GST inclusive" (yes they are!). We're here to help - get in touch with us to talk shop.
Have a product question? We're here to help!
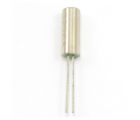
 Crystal Oscillator - 32.768KHzSKU: 002-815-AB38T-32-768KHZ Brand: Core ElectronicsGreat for use with the DS1307.
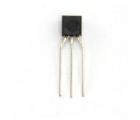
- LM35DZ Temperature SensorSKU: CE05264 Brand: Core ElectronicsLinear analogue output Temperature Sensor.
-
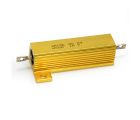
- 120 Pack of Electrolytic Capacitors (12 types, 10 of each)SKU: CE05130 Brand: Core ElectronicsThis pack of Electrolytic Capacitors includes 12 types, 10 of each.
Videos
View AllGuides

Video Looper with Raspberry Pi 4 Model B

Dual Monitors with Raspberry Pi 4 Model B or Raspberry Pi 400

The Maker Revolution
Projects

The Rats Nest VCC Desktop Power Supply

Remote-Controlled Mars Rover

FlipperMate: Hands-Free Pinball

Makers love reviews as much as you do, please follow this link to review the products you have purchased.
Product Comments