In this guide, we will be exploring YOLOE, a computer vision model that allows you to create custom object detection models through prompts - no training processes required! We are going to be learning how this vision model works and how to use it to create and run your own custom object detection on a Raspberry Pi 5. YOLOE is one of the most mind-blowing YOLO models to be released. It's incredibly practical for many maker projects and is just a great deal of fun to play around with. Let's get into it!
This guide will use a few Python scripts, so ensure you download the zip file containing them.
This guide will also need you to have the YOLO Ultralytics package installed and updated. If you do not already have it, you can follow our guide using Conda.
Contents:
How YOLOE Works
First of all, why is YOLOE so incredible? To answer this question, we first need to know how we would traditionally use YOLO models.
Without YOLOE, you would download a vision model onto a Pi, maybe YOLO11 or YOLOv8, fire it up and start detecting objects just fine. You can detect a person, a chair, a keyboard - all these things work perfectly because the model has already been trained to identify them. But what if you wanted it to identify a custom object, like a specific tool from your workshop or something like a Pokeball? Well, we would need to train it to do so.
This traditional training process is a tad involved. You'd start by taking hundreds of photos of the object from different angles, then go through the process of annotating those images and using them to train YOLO to detect this new object. And you would need to do this on a decently powerful computer - even with a high-end gaming GPU, this process can take hours or longer, depending on the complexity. Once it's finished, you would put that newly trained model back on your Pi 5, and it would start detecting the custom object. If you changed your mind and wanted to detect another object, you would need to repeat that entire time-consuming process again.

Now let's look at how we would do this with YOLOE. If you wanted to train a model to detect a Pokeball, you would change one line of code:
names = ["Person", "Pokeball"]
Run that Python script, and then 5-10 seconds later you would have the model ready to go. This is the magic of promptable vision models.
How does YOLOE work, though? How is it able to detect an object from just a prompt? Well, YOLOE is built upon other standard YOLO models, but there is one major difference. Instead of being trained on specific objects, it has been trained on visual concepts and ideas. So it might have been trained on an image of a horse, but instead of being told "this is a horse, learn what a horse looks like," it might have instead been taught the visual concepts that make up a horse. It has 4 legs, it's brown, it's furry, has a long face, is a mammal, etc.
Because it understands these visual concepts and ideas, it can identify things it's never seen before, if you ask it nicely through text prompts. Let's say it's never seen a zebra, but I prompt it to identify one anyway. It starts by breaking that prompt down into visual ideas that it knows. It might break the word "zebra" down into: 4-legged, striped, black and white, furry. It knows what all these visual concepts look like, so it uses these concepts to recognise the zebra.
And because it's equipped with these more general-purpose visual concepts, it can identify a lot of things out of the box. Regular YOLO models come by default trained to recognise about 80 specific objects. Now we are just guessing here, but YOLO-E could likely be used to recognise easily 5,000, probably somewhere in the tens of thousands of different objects, without any lengthy training processes.

Now this isn't a magical solution and the end-all, be-all of computer vision – it does have its limits. For example, really obscure or uncommon words or items that don't have well-defined visual concepts, chances are, it can't identify them reliably. For example, the 3D printed Minecraft copper golem in the image on the right. We can't just type "Minecraft Copper Golem" as YOLOE doesn't know what Minecraft is, nor what a copper golem is, so you would struggle to find a text prompt to identify this unique object.
However, YOLOE has another mode that we've omitted till now. You can prompt YOLO-E not just with text, but also with an image. You can show it an image of that golem, it breaks the image down into visual concepts, then identifies similar objects based on those concepts. We'll explore this image-prompting feature later in the guide. So in summary, YOLO-E can be prompted to identify nearly everything (that's what the "E" stands for - "Everything"), it can be prompted with either text or images, will probably meet 70 to 80% of your custom detection needs, and it runs about as fast as regular YOLO models. I think you can see why this is such an exciting advancement in computer vision models for makers.

What You Will Need
To follow along with this guide, you will need a:
- Raspberry Pi 5 - Either a 4GB, 8GB, or 16GB model will work here. Although this could technically be done on a Pi 4, it is far slower than the Pi 5 and would not be a nice experience, and for those reasons, we haven't tested on a Pi 4.
- Method of cooling the Pi. For the Pi 5, we have never been wronged by the active cooler.
- Pi Camera - We are using the Camera Module V3.
- Adapter Cable - The Pi 5 comes with a different-sized CSI camera cable, and your camera may come with the older, thicker one, so it's worth double-checking. The Camera Module V3 WILL need one.
- Power Supply
- Micro SD Card - At least 32GB in size.
- Monitor and Micro-HDMI to HDMI Cable
- Mouse and Keyboard
Connecting the Camera
Connect the wider side of the cable to the camera, and the thinner side to the Pi 5. These connectors have a tab on them - lift them up, then insert the cable into the slot. Once it is sitting in there nicely and square, push the tab back down to clamp the cable into place.
Just keep an eye out as these connectors only work in one orientation, and they can be fragile, so avoid bending them tightly (a little bit is okay).

Running YOLOE in Prompt-Free mode
Before we begin, ensure that you have followed our Ultralytics installation guide. This package is what allows us to download and run YOLO models, so ensure you have it installed and Thonny is set up ready to use - all of this is covered in that guide.
If you haven't already, go ahead and download the zip file containing all of the Python code we will be using. Extract it to a file in a handy place. We created a file on our desktop and put all the scripts in there. The following process will generate new files and can get very messy, which is why it is important to contain them all in one file.
To begin with, open up the file YOLOE Run Model.py in Thonny. As you can see, there is not much code required to run a YOLO model with the Ultralytics library. The code starts by importing all the required libraries, then uses picamera 2 to initialise the camera. Here you can set the resolution of the camera (which is 800x800 by default). Note: Lowering this will not increase your processing speed. This is the resolution of the image being captured, and that's it. We will look at model resolution (does affect processing speed) in a bit:
import cv2
from picamera2 import Picamera2
from ultralytics import YOLO

# Set up the camera with Picam
picam2 = Picamera2()
picam2.preview_configuration.main.size = (800, 800)
picam2.preview_configuration.main.format = "RGB888"
picam2.preview_configuration.align()
picam2.configure("preview")
picam2.start()
Then we load the model we wish to use. Leave this at default for now, we will be changing this later on though:
# Load YOLOE prompt-free model
model = YOLO("yoloe-11s-seg-pf.pt")
Next we enter into our while true loop. The code starts by getting an image from the camera, then runs it through model.predict() which will get our YOLO model to analyse it. Then we use results.plot() to overlay detection information on the camera feed. This has two options, boxes and masks. Boxes are the typical detection bounding boxes you will see in object recognition, and masks is an overlay which highlights and fills the detected object. You can enable or disable either of these as your project calls for.
while True:
    # Capture a frame from the camera
    frame = picam2.capture_array()

    # Run YOLOE model on the captured frame
    results = model.predict(frame)

    # Output the visual detection data
    annotated_frame = results[0].plot(boxes=True, masks=False)
And that is actually all that is required to run the model. The next few lines of code are optional and are just used to calculate the FPS and overlay it ontop of the preview window:
    # Get inference time
    inference_time = results[0].speed['inference']
    fps = 1000 / inference_time  # Convert to milliseconds
    text = f'FPS: {fps:.1f}'

    # Define font and position
    font = cv2.FONT_HERSHEY_SIMPLEX
    text_size = cv2.getTextSize(text, font, 1, 2)[0]
    text_x = annotated_frame.shape[1] - text_size[0] - 10  # 10 pixels from the right
    text_y = text_size[1] + 10  # 10 pixels from the top

    # Draw the text on the annotated frame
    cv2.putText(annotated_frame, text, (text_x, text_y), font, 1, (255, 255, 255), 2, cv2.LINE_AA)

    # Display the resulting frame
    cv2.imshow("Camera", annotated_frame)
And finally, we end every loop by checking if the "q" key is pressed. If it is, we will break out of the while true loop, and close all windows. This is how you can safely exit the code while it's running:
    # Exit the program if q is pressed
    if cv2.waitKey(1) == ord("q"):
        break

# Close all windows
cv2.destroyAllWindows()
Go ahead and run that code! The first time you run one of these scripts, it may take a minute to get going as it will download the model specified, as well as any additional packages or dependencies it needs. Be patient during this initial setup - subsequent runs will be much faster.
And with that, you should have YOLOE detections up and running!
What on earth are we looking at though? Where are our custom prompts? Well, we are currently running something called "prompt-free mode." Essentially, it is a mode where YOLOE tries to detect everything it can in an image, similar to how a regular object detection model works. Think of this as YOLO-E showing off what it knows without any specific guidance from you (it is working off a list of about 4,800 things).
You may also be getting some rogue and weird detections - this is normal at this stage. We can fix this and increase the FPS (frames per second) by converting it to a more suitable model format. This is also how we will implement our custom prompts.

Increasing Performance with Model Size, Resolution, and ONNX
Go ahead and open the file called Prompt-Free ONNX Conversion.py. This script is going to take in a model we specify, and convert it to a specified model format in a specified resolution. Let's work our way through and explain each of these things along the way.
First up, let's talk about model formats. By default, YOLO models come in PyTorch format with a .pt file extension. If you look at the code we ran previously, we were telling our code to run "yoloe-11s-seg-pf.pt" - this is a PyTorch model. When we tell YOLO to use a model, it will start by looking in the file we created to see if it already exists - if not, it will download it from the web. It is also worth knowing that our code can only download PyTorch models from the web. While these models work well, there are model formats that are designed to run more efficiently on ARM devices like the Pi 5.
The two main formats we can convert to are ONNX and NCNN. ONNX (Open Neural Network Exchange) is a widely supported format that tends to run efficiently across different hardware platforms. NCNN is another optimised format that can work well on ARM processors like those in the Raspberry Pi. In our testing, we found both formats perform similarly on the Pi 5, but ONNX tends to be slightly more reliable, so we'll stick with that for this guide. In the following line we specify that we wish to export our model as the ONNX format:
model.export(format="onnx", imgsz=640)
This line is also responsible for setting the processing resolution of the model, which determines how many pixels the model analyses - by default, it is 640x640 pixels. In the main YOLOE Run Model.py script, we set the resolution of the camera. The code will get the image at this resolution and downsize it to the resolution the model processes at. This is why camera resolution will not affect processing speed, and instead, it is this model resolution that will. If we lower the resolution it processes at, there are fewer pixels to be analysed per frame, resulting in more frames per second.
You can set this resolution to anything from 32x32 to 640x640 as long as it is a multiple of 32. So 320x320 is a valid resolution, but not 300x300. By lowering it quite a bit (say to 128x128), you can get some incredibly high FPS. This isn't a free performance boost though, and comes at the cost of effective detection distance. In the image on the right is an example of this. At the full 640x640 resolution, it can detect the phone at the back of the studio. But when set to 128x128, it struggles to identify it more than a meter away.
Your project will likely need you to tune this number to balance processing speed and detection distance. The following line is an example of setting the resolution to 224x224:

model.export(format="onnx", imgsz=224)
The final thing we can change is model size. In the conversion code, we are telling it to convert the "yoloe-11s-seg-pf.pt". The model comes in 3 different sizes, and we are telling it to use the small version, hence the "11s". The model also comes in a medium version ("yoloe-11m-seg-pf.pt") and a large version ("yoloe-11l-seg-pf.pt"). You can choose a model size you want to convert by inputting it into the conversion code (or really any code).
But what does changing the model size do? Well simply put, larger models are more powerful in their recognition capabilities - but slower, and smaller models are faster in their processing - but less powerful in recognition. Larger models have more parameters, which can be thought of as the "knowledge" stored in a neural network (YOLO is a neural network). These extra parameters may be more points of data that it can use to analyse or a better understanding of the data it already has. Because of these extra parameters, the model is larger in disc space (the large model is about 55 mb and the small about 25 mb), but can detect more objects with greater accuracy thanks to its improved "thinking". If you are struggling to recognise an object, or it isn't as reliable as you'd like, maybe try a larger model - it will be slower, but could make or break a project.
Model format, resolution, model size... how do you choose all these correctly? The truth is that there isn't a one-size-fits-all combination, and every project will likely need these to be tuned to its needs. However, here are some good rules of thumb to help you decide:
- To start with, use the ONNX format. Maybe give NCNN a go if you like, but ONNX will be a safe bet.
- Then select the model size that will detect your object at a level you are happy with. Really common objects like cups, people, chairs, desks, etc., will most likely work with the small model. More complex or uncommon objects may need a medium or large model.
- Once you have the model size that works, find the lowest resolution that reliably works for the range you will be detecting at. If you are scanning for keyboards really close to the camera, you can likely drop that resolution really low and get great fps. If you are trying to detect a dog in a large backyard, you might need to use the full 640 resolution and deal with the low FPS. If your project doesn't care about FPS at all, it might be best to leave it at the full 640 for maximum performance.
Once you are happy with all your settings, run the script, and it will export a file likely called "yoloe-11s-seg-pf.onnx" to the folder the script is in. To run this new model format, simply go back to YOLOE Run Model.py and change the model you want to run to this new one:
# Load YOLOE prompt-free model
model = YOLO("yoloe-11s-seg-pf.onnx")
Run the script, and you should now have the prompt-free mode working with improved performance. If you have the time, play around with model size and resolution to see the impact they have. How many FPS can you get and still detect a phone, and at what range?
You may also be realising now that this prompt-free mode has its limitations. If you search for an image of a tiger on your phone and point it at the camera, you may see it detected as a dozen other things, but not a tiger. Let's fix this issue with a well defined and prompted model.

Custom Object Detection with Text Prompts
Now that we have our optimised model running smoothly, it's time to dive into the real magic of YOLO-E: custom text prompts. This is where YOLO-E truly shines and sets itself apart from traditional object detection models. Instead of being limited to the 80 or so objects that standard YOLO models can detect, we can now prompt YOLO-E to look for nearly anything (or at least try to).
There's one important technical detail we need to address when working with YOLO-E on the Raspberry Pi. Normally, when working with YOLOE, you would use the PyTorch format. When working with the Pytorch format, you would specify your text prompts in the main detection script (which would be our equivalent of YOLOE Run Model.py), and everything would operate out of that script. If you wanted to change the prompts, you would stop the code, change the prompts, and then run the code again.
However, when we convert the model to the ONNX format, it loses its ability to be prompted on what to look for. Instead, we must feed it prompts in the conversion process. Think of it like hardening a clay object. You mould it to how you like (give it prompts), then you bake it, and it is stuck in that shape. If you want another shape (different prompts), you will need to make another one.
Go ahead and open up Text-Prompt ONNX Conversion.py, which is a script that will allow us to bake in these prompts during the conversion process. This is nearly identical to the previous ONNX conversion script, with a few changes. First of all, we are NOT using the prompt-free model, as you can see with the removal of the "-pf" from the model name:
model = YOLOE("yoloe-11s-seg.pt")
There is also a line where you can punch in the prompts you want. If you follow the syntax, you can enter as many objects as you want. Here are some examples:
# Define your specific prompts that you want to bake into the model
names = ["tiger", "pizza", "beard", "pokeball", "pink keyboard", "yellow and purple cup"]
Go ahead and put in some prompts you wish to test, ensure you put in your model size and resolution you desire and run the code to export the file. This will create another file named something along the lines of "yoloe-11s-seg.onnx". Before you run it, you may want to change its name. If you use this script to export another model, it will likely export with the same name and overwrite it. You can prevent this by changing the name to anything you want as long as it ends with "-seg.onnx". For example, if I wanted to call the model "tiger", I would call it "tiger-seg.onnx". Changing it is optional, its just worth knowing how to prevent your models from being accidentally overwritten.
To run the model, once again open YOLOE Run Model.py and change the model to the name of the one you just exported.
And with that, you should be up and running with custom detection models that you can change on the fly, in a matter of seconds. Hold up objects or images that match your prompts and see how well the model performs, try out different prompts, specific prompts - just have a play around with it. You'll quickly get a feel for what types of prompts work well and which ones might need refinement.

Also try and get creative. One of the coolest features of YOLOE is its understanding of colour. It is trained on the concepts of colours, so it is entirely possible to differentiate between the same objects based on colours alone. Using the following prompts:
# Define your specific prompts that you want to bake into the model
names = ["brown box", "blue box", "clear box"]
We were able to accurately detect the differences between them as demonstrated in the image below.

Be aware of its limits though. Sometimes you'll encounter objects that seem like they should be easy to detect but prove surprisingly difficult. Take a yellow LEGO minifigure head, for example. You might prompt for "yellow LEGO head" and get detections, but the model might actually be responding more to the "yellow" part of the prompt than truly understanding what LEGO or "head" means in this context. The image on the right shows a LEGO head and a yellow box being detected as one.
This is where experimentation becomes valuable. Try different variations of your prompt: "yellow plastic head", "round yellow object", or "toy head". Sometimes, a more generic description works better than a very specific one.
If you're struggling to get good detections with text prompts, or you're not getting confidence ratings that you're comfortable with (the number between 0 and 1 next to the object name), you have a couple of options. You can try switching to a larger model size, or you can try an image prompt.

Image Prompting a Custom Model
While text prompting is the best and most reliable method of using YOLO-E and should always be your first approach, you might occasionally find objects that are very difficult to detect with text alone. This is where image prompting may come to the rescue.
Image prompting is particularly useful for highly specific or unique objects that don't have easily describable visual concepts. For example, that 3D printed Minecraft copper golem we mentioned earlier - there's really no combination of text prompts that would reliably identify this custom object. The model doesn't know what "Minecraft" means, nor what a "copper golem" specifically looks like, since these are very niche concepts.
However, image prompting allows us to show YOLO-E an example of exactly what we want to detect. The model breaks down the image into visual concepts it understands - perhaps the metallic texture, the humanoid shape, the specific proportions - and then looks for similar visual patterns in the live camera feed.
It's worth noting that image prompting can be a bit hit and miss. Some objects work incredibly well with this approach, while others don't respond reliably. The success often depends on how distinctive the visual features are and whether the model can extract meaningful concepts from your reference image. Always try text prompting first, and if that doesn't work, give image prompting a go - you might get lucky and find it's the perfect solution for your specific detection challenge.
The first step in image prompting is getting a good reference photo of the object you want to detect. You can either use an existing photo or capture one specifically for this purpose using the provided script.
Open up Image-Prompt Capture.py. At the top of the script, you'll find a setting for the filename that the photo saves as. Change this to something descriptive - I'm going to change mine to "golem.jpg".
Run the script and you'll see your camera feed appear. Position your object in good lighting and press the spacebar to capture the photo. The script will save the image to your project folder with the filename you specified.
If you already have a good photo of your object taken with another camera or downloaded from somewhere else, you can simply copy that image file into your project folder instead of using the capture script. Just make sure the image shows the object clearly with good contrast and lighting.
Next, we need to tell YOLO-E exactly which part of the image contains the object we want it to learn. This is crucial because everything inside the box we draw is what the model will try to break down into visual concepts.
Open up Image-Prompt Draw Box.py and change the image path to match the filename of the photo you want to use. In my case, I'll set it to "golem.jpg" to match the photo I just captured.
Run the script and you'll get a window displaying your image with a drawing tool. You want to draw a tight, precise box around your object. This is really important - the tighter and more accurate your box, the better the model will understand what specific visual features to look for. If you include too much background or other objects in the box, it will confuse the model about what exactly it should be detecting.
Use your mouse to click and drag a rectangle around your object. Try to get as close to the edges as possible without cutting off any important parts. Once you're satisfied with your box, the script will output some coordinates in the shell. Copy these coordinates because we'll need them in the next step.

Now open up Image-Prompt ONNX Conversion.py. This script is where we tell the model what image to learn from and exactly where in that image the object is located. Paste in the coordinates you just copied from the box-drawing tool. The script allows you to train multiple different objects if needed - you can add more image references and their corresponding coordinates by copying and pasting the pattern. However, for our example, we're going to focus on just one object, so you can delete any extra template entries.
Since image prompting can be more challenging than text prompting, I might choose to use the larger model here to get more accurate detections. The large model is more powerful and better at understanding subtle visual differences, which can be important when working with custom or unusual objects. Let's run the conversion script and export our model. I'm going to call this model "golem-seg.onnx" so we don't accidentally overwrite any of our previous models and can easily identify what this model is designed to detect.
Now go back to your YOLOE Run Model.py script and change the model name to point to your newly created image-prompted model. Run the script and test it out with your object.
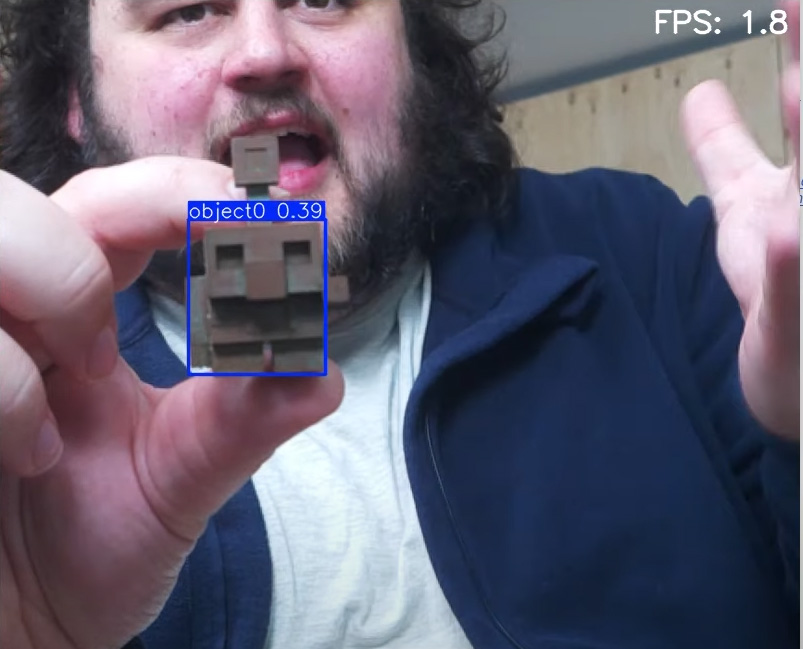
You'll notice one important difference with image-prompted models: instead of showing the name of the object, the detection boxes will display "object 0". If you had trained a second object in the same model, it would show up as "object 1", a third would be "object 2", and so on.
This means when you write your own custom code using image-prompted models, you'll need to keep track of which number corresponds to which object. It's a good idea to maintain a simple reference list or comment in your code, noting that "object 0 = copper golem" or whatever objects you've trained.
Counting Objects and Getting Object Locations
We are now on the home stretch, so let's look at how to actually use these detections in practical applications and your projects. The core detection is just the beginning - most projects need to "do something" with that detection data. Included in the code download are two demo scripts that serve as excellent starting points for your own projects. These demonstrate the most common use cases we see in maker projects: counting specific objects and tracking object locations on screen.
Demo Object Counter.py
At the top of this script are some variables that you can fill out. This will let you choose the object you wish to count, how many of them you want to count before your project "does something", and what confidence do you require for them to be counted:
TARGET_OBJECT = "hand"        # What object to look for (e.g., "person", "bottle", "cup")
TARGET_COUNT = 1              # How many of that object should trigger the action
CONFIDENCE_THRESHOLD = 0.2    # Minimum confidence score (0.0 to 1.0)
Then the code sets up the camera, loads the model, and runs inference (analysing the image) just as before. Then it reaches a section where it cycles through all the detected objects and counts how many of your specified objects have your specified confidence level. At about line 53, you will find an if statement that checks if the number of confident detections is reaches your target. In this section, you can place your custom code to "do something" in your project.
    if object_count >= TARGET_COUNT:
        print(f"Target number of objects detected! ({object_count} confident {TARGET_OBJECT}(s))")
        for i, obj in enumerate(confident_objects):
            print(f"  {TARGET_OBJECT} #{i+1}: {obj['confidence']:.3f} confidence")
        # ADD YOUR CUSTOM ACTION HERE
        # Examples:
        # - Send a notification
        # - Control a servo motor
        # - Log data to a file
        # - Trigger an LED
        # - etc.
Demo Location.py
This code is similar in that it lets you specify an object and a confidence rating:
TARGET_OBJECT = "hand"  # What object to look for (e.g., "person", "bottle", "cup")
CONFIDENCE_THRESHOLD = 0.2  # Minimum confidence score (0.0 to 1.0)
But it instead tracks the location of this object on screen and gives you the x and y coordinates of it. These coordinates are relative and range from 0 to 1.0. The x-axis runs from the left side of the image to the right with 0 being the left, 1.0 being the right, and 0.5 being the middle point. The y-axis runs top to bottom, with 0 being the top and 1.0 being the bottom. On the y-axis, 0.25 would be one quarter from the top of the screen. The code outputs these variables and you can do as you like with these positions. By default, we track if a hand with a confidence of at least 0.2 moves to the bottom right of the screen:
        if location['x'] > 0.5 and location['y'] > 0.5:
            print(f"HIGH CONFIDENCE {TARGET_OBJECT} detected in top right corner! (Confidence: {confidence:.3f})")
            # ADD YOUR CUSTOM ACTION HERE
            # - Trigger an alarm
            # - Move camera to center on object
            # - Take a photo
            # - Send notification
            # - etc.
Where to From Here?
We have achieved quite a lot in this guide. Not only have we gotten YOLOE running, we have learnt a system of creating entirely unique, custom object detection models in mere moments from a text or image prompt, learnt how to convert the models to an efficient format for the Pi, explore model size and resolution, and also looked at how we can practically apply this in a maker project.
As we said before, this is not magic, and you may have objects that can't be detected to the quality you may like. If this is the case, you may want to check out the process of training your own YOLO11 model the "old-fashioned way". It is a little involved, but entirely possible, and Ultralytics have some great guides. However, for 70% - 80% of projects, this will provide you with a solution that is suitable enough. Given how quick and easy it is to experiment and iterate, this is a great first point of contact for any computer vision projects.
If you want to speed up the processing speed on the Pi, YOLO will directly benefit from some overclocking. Just be aware, you may run into system instabilities, and can shorten the life of your Pi if you run it hot for long periods.
If even an overclock doesn't bring you the performance you are after, you may want to check out some dedicated AI hardware for the Pi 5, like the AI HAT. We have a guide on how to use it, and you can expect an increase in FPS anywhere from 10x to 50x. It does have a completely different setup and usage method required (we have a guide on how to do that), and you will need to convert the ONNX file to the HEF format, which the HAT runs on. Luke Ditria has a great guide on how to do that.
If you need a hand with anything we covered in this guide, or you just wanna show off something cool you made with this project (or something wild you managed to detect), feel free to drop a post in the forum below. We are all makers and happy to help. Until next time, happy making!

