 Variable resistors come in all shapes and sizes, and they all do the same basic job. They allow you precisely control voltage/current flow within a circuit. The most common type of variable resistor we see in DIY electronics is the Potentiometer, or we call them pots for short. You have seen them everywhere, even if you do not realize it! Anytime you use any control knob there is a good chance that you are using a pot. It is awesome how we can add a potentiometer on to alter the signal within a circuit.
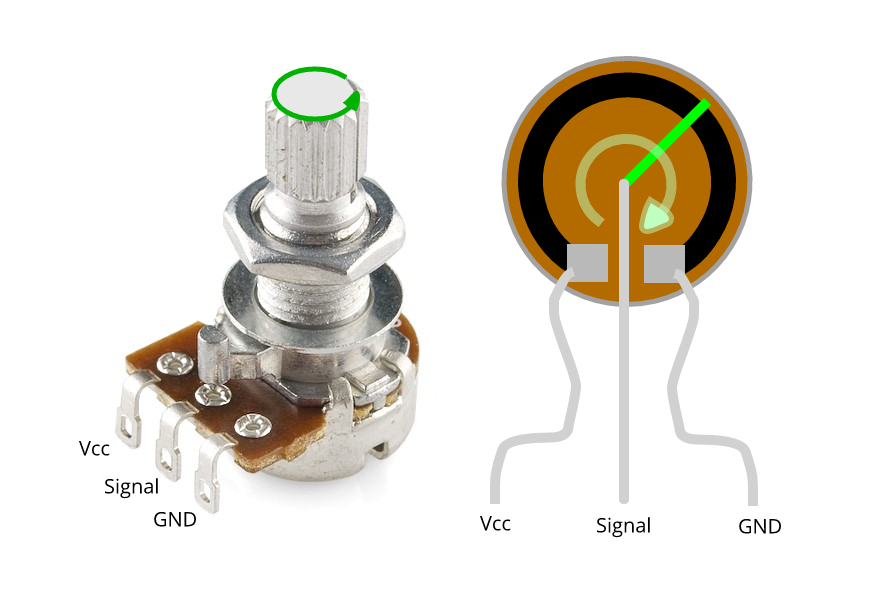
Potentiometers change their resistance by their rotary position. The typical three-leg configuration is key here; one leg connects to Vcc, one leg connects to ground, and the other goes to a reference pin (this is our ‘output’). Essentially the rotary position of the pot’s shaft defines the position of the internal wiper; this wiper connects to a resistive element, typically made of carbon. The carbon element tends to have either a linear or logarithmic taper of resistance, so as you move the wiper through its rotation, the resistance applied to the Vcc voltage will reflect the taper of your pot. Your pot will divide the voltage of your circuit down (per the pot’s position & taper) to relevant values between the GND-Vcc voltage levels.
Potentiometers are handy components to be using; we are going to look at interfacing an Arduino to read the value of a pot and reflect it in a circuit today! We get a few types of the potentiometer, and apart from linear/logarithmic taper differences, there’s one that seems to confuse some people.
 Trim pot vs. Pot
 Trim pot vs. Pot
Electronically, these are identical components. The real difference being a trim pot is typically seen as a set and forget component, we used a trim pot to control LCD contrast options in our LCD and Arduino tutorial; we made it so we could read our screen clearly; then we could ignore it essentially. A regular potentiometer is something you would typically see panel mounted with a plastic knob for ease of access and more frequent adjustment. I am glad we got that key difference out of the way, though, it can be a bit of a trap for unsuspecting victims.
Other Variable Resistor Types
In addition to the same-but-different trim pots and regular pots, there are a couple of other components we can use to control the resistance of a signal.
Slide pots are another very similar component, instead of a rotary shaft they use a linear slide that defines the resistance.
Force-sensitive resistors are a little different, instead of using a control knob to control resistance, they use the force applied to their contacts to dictate the level of resistance.
Thermistors are thermally sensitive resistors that can either increase their resistance with temperature or decrease it; the Temperature Coefficient dictates this relationship.
Photoresistors are another type of variable resistor, these being sensitive to light changes striking their surface.
The Setup
 Today we will use a linear potentiometer to control the speed of a DC motor; we will use the Analog read function alongside our potentiometer and the Arduino Uno. Sparkfun have a fantastic collection of potentiometers and variable resistance sensors available too, check out their range.
Grab the following components if you would like to follow the process:
#define MOTOR_PIN 3 //define motor control pin as pin 3
#define POT_PIN A0  //define potentiometer signal pin to read as Analog pin 0

int pot_reading = 0;

void setup()
{
 pinMode(MOTOR_PIN, OUTPUT);
 pinMode(POT_PIN, INPUT);
}

void loop()
{

  pot_reading = analogRead(POT_PIN);          //Analog Read of POT_PIN will return value of 0-1023

  analogWrite(MOTOR_PIN, pot_reading / 4);      //Write a pot_pin value to motor_pin, divide by 4 to reduce value in between 0-255 to the pin

}
Once you've uploaded this sketch to your arduino, you should be able to control the speed of your motor according to the position of your potentiometer! I hope you've enjoyed this tutorial, let us know in the comments below!

