Introduction
Let's play tones and melodies on a PiicoDev® Buzzer Module with a Raspberry Pi. This guide will cover connecting the hardware, running an example to make sure everything works, and playing simple melodies.
To follow along, it's best to have:
- A Raspberry Pi (model 3, 4, Zero W) This tutorial will use a Raspberry Pi 4, Model B
- A PiicoDev Buzzer Module
- A PiicoDev Adapter for Raspberry Pi
- A PiicoDev Cable (100mm or longer is best for Raspberry Pi)
- (Optional) A PiicoDev platform helps secure everything together.
If you prefer not to use the Expansion Board for Raspberry Pi Pico, there are other connection options in our PiicoDev Connection Guide.
Contents
- Connections
- Enable I2C
- Install/Upgrade PiicoDev
- Download Example
- Example Code - Play Tones
- Melodies
- Conclusion
- Resources
Connections
Mount the PiicoDev Adapter on your Raspberry Pi and plug connect your Buzzer the Adapter with the PiicoDev cable.
This article and video features the older v10 buzzer. The new v20 Buzzer features four ID switches - so there's no need to check the back side of the v20 design (no solder jumpers).
Ensure both ID switches are OFF, and both ID jumpers (on the back side) are OPEN.
If you're unfamiliar with connecting PiicoDev "Smart" Modules, read the PiicoDev Connection Guide before proceeding.
Enable I2C
Power on your Raspberry Pi. Open the Raspberry Pi Configuration Menu, select the Interfaces tab and ensure I2C is enabled.
You only need to do this step for your first PiicoDev project - from here on you probably won't have to repeat this step when using PiicoDev hardware.
Install/Upgrade PiicoDev
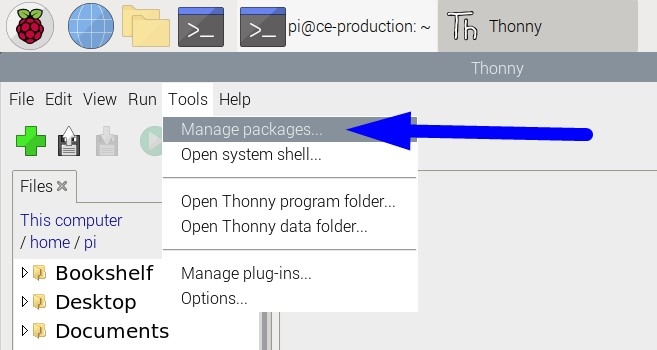
Open Thonny (Pi Start Menu > Programming > Thonny IDE) and open the Manage Packages menu (Tools > Manage Packages)
 |  |
|---|
Search for 'piicodev' and install or upgrade if necessary.
 |  |
|---|
Download the Example Script
Download this example script: main.py (right-click, "save link as")
Save this file wherever you like to keep your programming projects. For this tutorial, I'll save mine in /home/pi/PiicoDev. You might like to change the name of your script for some context eg.buzzer.py
Open Thonny, navigate to your working directory and open the script.
Click Run (Keyboard shortcut, Ctrl+R) and you should hear some tones play from your Buzzer Module.
This script initialises the Buzzer at the loudest volume and plays two tones. Then, the volume is reduced to the lowest setting, and the two tones repeat. tone() accepts up to two arguments - the first is the frequency in Hz, and the second is tone-duration in milliseconds. If no duration argument is given, the tone will sound continuously. This is the case for the second pair of tones, which omit the duration argument: In this case the tone will play continuously until buzz.noTone() is called. Here, the duration is set by the delay, sleep_ms(). buzz.volume() accepts a 0, 1 or 2 - 0 is the quietest and 2 is the loudest.
Melodies
It's possible to play simple melodies on a Buzzer Module. In the following example a Python Dictionary notes defines musical-note names with their corresponding frequencies (Hz). Then, a 2-dimensional list melody defines the sequence of notes to play in note-duration pairs. For example, the first note is E, played for 500ms. The 10th note is an F, played for 250ms.
Finally, a loop steps through the melody list, extracts the note/duration data, and plays that tone.
Take this example for a spin! Replace the code in main.py with the following and run the script.
# PiicoDev Buzzer melody example. Define a melody as a combination of notes and durations.

from PiicoDev_Buzzer import PiicoDev_Buzzer
from PiicoDev_Unified import sleep_ms

# Define some note-frequency pairs
notes = {'C4':262,
         'Db':277,
         'D' :294,
         'Eb':311,
         'E' :330,
         'F' :349,
         'Gb':370,
         'G' :392,
         'Ab':415,
         'A' :440,
         'Bb':466,
         'B' :494,
         'C5':523,
         'rest':0, # zero Hertz is the same as no tone at all
         }

# define a melody - two-dimensional list of notes and note-duration (ms)
melody = [['E',    500],
          ['D',    500],
          ['C4',   500],
          ['rest', 500],
          ['E',    500],
          ['D',    500],
          ['C4',   500],
          ['rest', 500],
          ['G',    500],
          ['F',    250],
          ['F',    250],
          ['E',    500],
          ['rest', 500],
          ['G',    500],
          ['F',    250],
          ['F',    250],
          ['E',    500],
          ['rest', 500],
          ]

buzz = PiicoDev_Buzzer(volume=2)

# play the melody
for x in melody:
    noteName = x[0] # extract the note name
    duration = x[1] # extract the duration
    buzz.tone(notes[noteName], duration)
    sleep_ms(duration)
Conclusion
We can now play tones and melodies at different volumes on our PiicoDev Buzzer Module! If you're looking for some inspiration, perhaps pair the buzzer module with a PiicoDev Capacitive Touch Sensor to create a simple 3-key piano.
If you make something cool with this starter project we'd love for you to share it on our forums! And if you'd like some help with this guide, start the conversation below - We're full-time makers and here to help!


