Resistors are the hardworking underdogs of the electrical circuit world. You have probably added a 4.7k or 330-ohm resistor into your circuit without thinking about why we use those values, let alone what the resistor is doing. We are going to have a look at the why and also what happens when you do it wrong.
Parts we need, most come in kits:
Power!
Power is important for any electrical component, not enough and it won’t do anything too much and you will “Let the magic smoke out”.
To demonstrate this I have built a 14 LED circuit with a single 4.7-ohm ¼ watt resistor. Each LED needs to draw about 30mA ( 0.030A) to give full brightness because we have 14 in parallel the resistor will have 420mA (14 x 30mA) in it. This will result in the resistor absorbing at least 1.26W (Just a little over the ¼ watt the resistor is rated too ).

So that we don’t waste parts we can use Ohms law and the Power Equation to work out how much power a resistor is absorbing.
Power (Watts) = Voltage (Volts) × Current (Amps)
We can make the 14 LED circuit work without smoking out the office by using a power resistor that is able to deal with the extra power. These resistors are typically ceramic or have heat sinks to protect them. In a lot of high power applications, we will actually use transistors as they waste a lot less power as heat, but they are a little more difficult to use.

Current Limiting
Now we are going to look at using resistors to limit the current in other electrical devices, there are two things we need to know:
- The maximum current the device can take (or we will let the smoke out!),
- The maximum current our supply can provide (It may not work or smoke from the supply!).
We’re going to be using LEDs they typically have a 30mA operating current (This is engineering talk for the current that is the best trade-off between component life and in an LEDs case light out.). Other devices will tolerate different ranges of current, you can usually find it in the datasheet, you can also slowly turn up the current until it pops but this gets expensive and smells so bad.
We are using a bench supply that can provide 30A (30,000mA!) so I don't have to worry about connecting too many LEDs, but if we connected the LED to a Raspberry Pi's GPIO pin we cannot draw more than 16mA or we can damage the Pi.
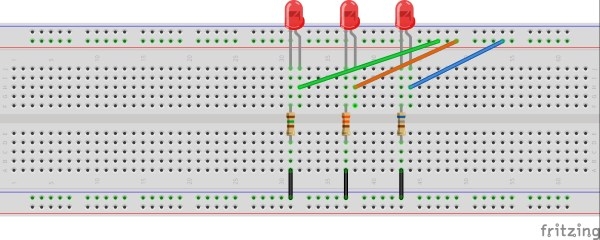
We have chosen a 5V power supply (The same voltage as an Arduino pin) and put three different valued resistors (165 (2 x 330ohm in parallel), 670, 2.2k) in series with each LED.
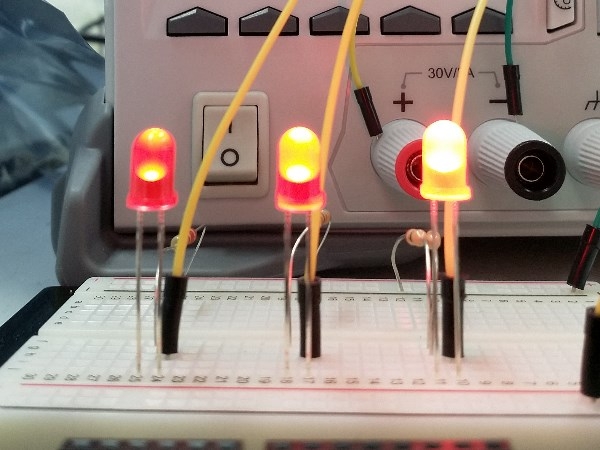
We can see that as the resistance increases the brightness of the light decreases. We can choose the current level that we want by applying Ohms law to the voltage across the resistor. To find this voltage we take the supply voltage minus the forward voltage of the LED and divide by the current we want. (We have a tutorial on LEDs if you aren’t sure what forward voltage is.)
Resistor= Voltage/Current= (5V-2V)/.010A
Reducing Voltage
Now we are going to look at reducing a voltage to the desired level. There are a lot of applications for this but we are going to look at using it for 1 way communication between a Raspberry Pi(3.3V) and an Uno (5v). We are going to use the blink example on the Uno to save time programming and the following python script.
 from gpiozero import Button

import time
import os

stopButton = Button(21, pull_up = False)
count = 0
while True:
    if stopButton.is_pressed:
        print("hello from Arduino "+str(count))
        count += 1
    time.sleep(0.125)
For a Pi and an Arduino to talk to each other you need a Logic Level converter, but we are going to use a voltage divider so that the Arduino can send a message to the Pi. This will not let the Pi send a message back. We need to know what the current limits are, in this case, an input pin on the Pi cannot go above 0.5mA.

If we use the same resistor calculation as before with the voltage being the difference between the Uno and the Pi (5V-3.3V = 1.7V) we need a resistance of at least 3400 ohms. As this is the maximum we will go up from there to 4.7Ohms. We can then work out what we need Resistor 2 From the voltage divider equation.
Resistor 2=(Voltage Pi×Resistor 1)/(Voltage Uno-Voltage Pi)= (3.3V×4700)/(5V-3.3V)
Now if we run the script we made earlier on the Raspberry Pi we will get a message saying hello from the Arduino.

All done! Hopefully, you now have a better understanding of resistors and how to choose them! If something didn’t work quite as you expected or you want to know more about resistors, get in touch with us and ask the questions. We’re here to help!

