What good is a robot if it can’t interact with the environment around it? Sensors are the backbone of almost every electronics project as they allow your program to make decisions based on external stimuli. We’ve got sensors for all kinds of applications such as light, colour, sound pressure, temperature, and heaps more. However, one of the big stumbling blocks for a lot of people is which sensors are going to work for them, and how to use them in their project.
So today I’m going to take a hands-on approach to getting started with some of the most common sensors and modules that we have. This tutorial isn’t going to be focused on using a specific platform such as Arduino, Raspberry Pi, Teensy, or any other platform, we're going to look at the actual sensor, how it works, why I like it, and why you would use it in your project.
The sensors I’ve chosen are a collection of popular options which have a diverse range of technologies and data interfaces so you can easily apply the same approach with one sensor to other sensors with the same technology. If you’re after specific information on using any of the sensors here, we’ve created individual tutorials on getting them up and running, so be sure to check those out!
Waterproof Temperature Sensor - DS18B20

When it comes to measuring temperature, there are many different technologies and sensors out there, however, most applications don’t require any crazy high-tech, ultra-precise sensors. A simple digital sensor is usually sufficient, and in this case, one of the most widely used digital temperature sensors is the DS18B20. It’s a digital sensor which means you’ll either need a library, or a deep understanding of the 1-wire interface that it uses, however, once its setup, it’s amazingly easy to get accurate measurements. It’s also super affordable, which is perfect for makers and hackers.
The DS18B20 ranges from -55 to 125o C which makes it suitable for almost any environment, and it also comes in a waterproof variant which makes it incredibly versatile. It offers +-0.5oC accuracy across most of its operating range, and that’s available with selectable 9-12 bit resolution over the Dallas 1-wire interface. Oh, and it’ll work between 3-5.5V which is pretty cool.
So as far as taking readings from the sensor goes, it’s quite easy, and we’ve got tutorials on using 1-wire devices across multiple platforms, so I won’t get into it too much here. A single 4.7K resistor is all you’ll need to get the temperature sensor up and running, and the 1-wire interface only requires (you guessed it) a single line for data. As I mentioned earlier, to get started with it, you’ll most likely want to use a library, and in the tutorial mentioned above, there are links to 1-wire libraries you can use.
I definitely recommend going with the waterproof version of the DS18B20 as it’s got a nice stainless steel probe, and durable, rubberised strain relief. The only downside to this form-factor is that the wires are designed to be soldered, or connect to a screw terminal, so you’ll find it a little tricky to breadboard with unless you pre-tin them.
However, for compact projects, the DS18B20 is also available in a TO-92 package which is smaller, and easier to breadboard with (but not waterproof).
Soil Moisture Sensor
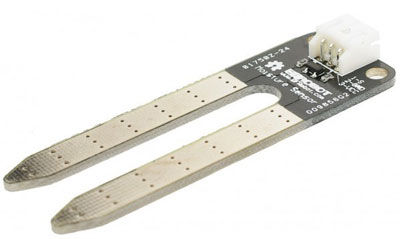
Up next is something a bit less common, but still a great piece of gear, particularly for smart-home enthusiasts. The Soil Moisture sensor from DFRobot is fairly low-tech, consisting of 2 plated prongs which insert into the soil you’re measuring and detect how much current is conducting across the prongs. When there is more water/moisture in the soil, it will become a better conductor of electricity, and when the soil is drier, its resistance increases, conducting less electricity.
With a simple circuit, you can measure the voltage on the signal pin with ground and VCC (supply voltage) connected as well. Any microcontroller with Analogue input pins or an external ADC can read this voltage and use it to alert you when your plant needs watering.
I like using it for data-logging projects, and there’s a huge potential to transform a standard garden into a connected, smart-garden. You may even end up saving water!
Ultrasonic Distance Sensor - HC-SR04

One of the biggest stumbling points that I see a lot of DIY’ers hitting is creating basic collision detection or proximity sensors for their project. Whilst getting millimetre accurate distance measurement can be tricky and expensive, detecting objects with reasonable accuracy in the centimetre range can be done fairly easily with a $5 sensor: HC-SR04.
The HC-SR04 is an ultrasonic sensor which detects how far away an object is by sending out an ultrasonic pulse and waiting for the corresponding echo. By calculating the time it takes for the echo to return, you can work out how far away something is (sound travels at approximately 340m/s through air).

Getting started with the HC-SR04 is extremely easy. There are libraries available for almost every popular platform, and all you need is the echo and trigger pins connected to any digital pins on your microcontroller, along with power and ground.
Whilst they’re not recommended for taking precise measurements, the HC-SR04 is especially great because of the low cost and ease of use. For example, it’s quite easy to create an array of them to implement a 360o object detection system, so they’re definitely a favourite of mine.

Precision Real-Time Clock - DS3231
Microcontrollers are fantastic devices until they’re disconnected from power. Because their internal clock relies on power, they have no way of maintaining timing specific projects such as time and date, counters, scheduled events etc. So a device known as a Real Time Clock (RTC) is required. It’s got an onboard oscillator and time-keeping circuit that’s powered by a small coin cell battery. The circuit draws such little power that a single coin cell battery can power the RTC for years!
There’s an abundance of RTC chips and modules out there, however, the dividing factor is how precise they are. The reason I love this particular RTC module is that not only is it incredibly precise (it even has onboard temperature compensation for the oscillator), but it’s super easy to use. It communicates with your board via I2C, and like any Adafruit product, it’s got an excellent software library to back it up which makes using it a breeze.
Whilst it’s maybe not what first comes to mind when you think of a ‘sensor’, being able to measure date and time is incredibly valuable for many projects.
DS3231 RTC Tutorial (Arduino Workshop)
Raspberry Pi Camera Board v2

Rounding out our list today is the Raspberry Pi Camera Board v2. Like the RTC module I talked about earlier, it’s perhaps a little different to a traditional ‘sensor’, however, it’s definitely worthy of the title and it’s a pretty nifty bit of gear for a few reasons.
Even now, with quite a few projects under my belt, I can be fairly hesitant when dealing with complex tech such as cameras, as there is so much to think about as far as software and hardware integration. So, one of the reasons that I love the Pi Camera Board so much is that it’s so easy to use. You just attach it to the CSI ribbon socket on your Pi and use the Pi Camera library, and in a couple of lines of code you can take pictures, videos, add filters, and process images in a way that is mind-blowingly simple, especially for the technology that is going on underneath.

The Pi Camera board is an 8-megapixel camera which can take photos at a resolution of 3280x2464, along with capturing video in various resolutions and frame rates up to 1080p at 30 fps. That’s mind-blowing when you look at how far technology has come, and that you can integrate that with a Pi using some fairly straightforward processes.
So, as the song goes, these are a few of my favourite things, sensors that I love to work with and use in quite a few of my projects. Feel free to get the conversation started below if there’s a sensor you’d like to see some hands-on time with or you’ve always been curious about. We'll be updating this tutorial with more sensors that we're using and loving, so be sure to check back regularly.

