Ever thought it would be cool if your Raspberry Pi could see the world like you do? You’re in luck, camera support is an integral part of the Raspberry Pi hardware, it comes with a built in CSI connector for connecting camera modules to. CSI stands for Camera Serial Interface, and is an industry standard in mobile computing for camera connectivity.
The folks over at the Raspberry Pi Foundation have made it incredibly easy to take photos and videos using the Raspberry Pi.
The Raspberry Pi Camera Board is a fantastic piece of hardware that features a 5 megapixel sensor which supports 2592 x 1944 pixel static images, along with 1080p30, 720p60 and 640x480p60/90 video.
The camera board is supported by a fantastic software module which gives access to all of the basic features plus advanced functions including image rotation, filters and effects, time lapse, and resolution controls. But in this tutorial we’re going to be sticking the basic features to create a motion sensitive surveillance camera using the camera board, and a PIR sensor.
What you will need
- Raspberry Pi (we recommend the Pi 3)
- Raspberry Pi Camera Board
- RGB LED
- 2x 220 Ohm Resistor (we recommend the Sparkfun Resistor Kit)
- 1x 3.3K Ohm Resistor
- 2x 1K Ohm Resistor
- PIR sensor
If you don’t already know, we love the Pimoroni Pibow Coupe cases for the Raspberry Pi, and while not essential, they make using the GPIO pins incredibly easy.
The Goal
Have you ever gotten to the end of your day, and you’ve been looking forward to enjoying that delicious cupcake that you set aside, only to find that a dastardly co-worker/friend/acquaintance or otherwise has eaten it? That all ends today.
We’ll be using a PIR sensor which detects infrared motion to take a photo of the subject area using the Raspberry Pi Camera board.
Raspberry Pi Board Setup
As usual, before starting anything, you'll need to make sure that you're running the latest build of Raspbian. To do this, open a new Terminal window and type:
sudo apt-get update
Follow the prompts, and then type:
sudo apt-get upgrade
Your Raspberry Pi board should now be running the latest version of Raspbian.
Because the Raspberry Pi is designed to work with camera boards, the only thing we need to configure in Raspbian is enabling camera use. To do this, simply go to Menu -> Preferences -> Raspberry Pi Configuration, go to the Interfaces tab and select ‘Enabled’ next to the Camera option.
 The Circuit
 The Circuit
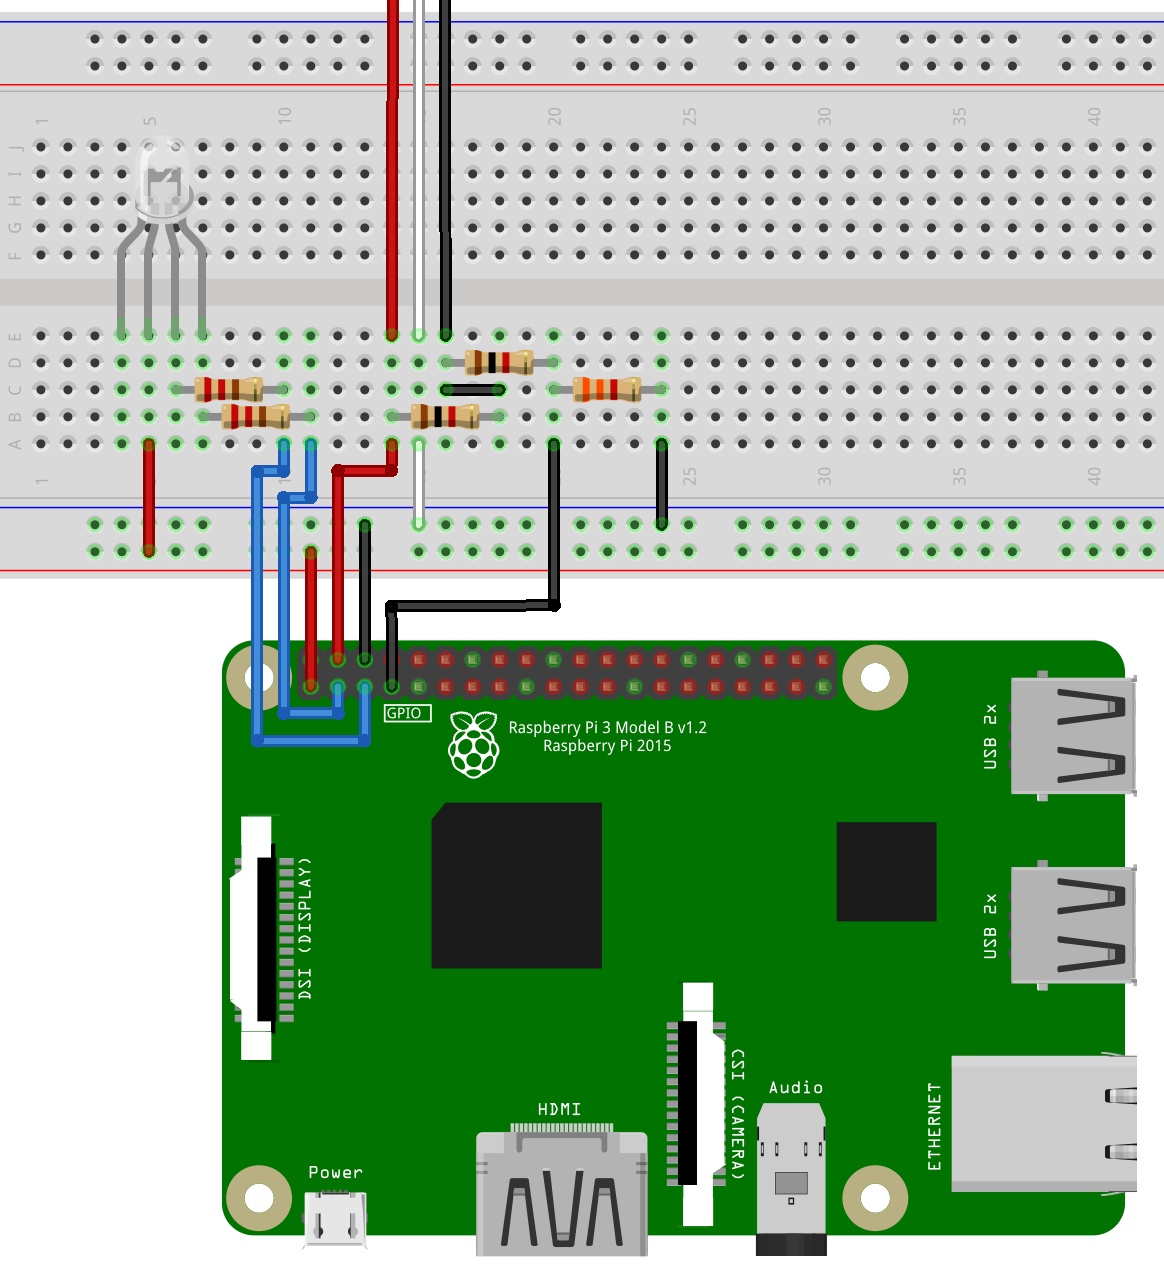
Our supporting circuit is going to be super simple. As always, make sure that your Raspberry Pi is unplugged from power before connecting anything to the GPIO pins.
First off we’re using an RGB LED, but we only need the Red and Green pins on it. The 220 Ohm resistors limit the current that the LEDs can draw, protecting our LEDs and Pi board. Because the PIR sensor works off 5 Volts, we need a voltage divider circuit to convert the 5V output to a 3.3V (max) output to work with our Raspberry Pi GPIO pins. The PIR sensor is an open collector output which means that its output pin is left floating until it detects motion, and then it is pulled low. To get readable data from it, we need to tie the output pin high using the other 1K Ohm resistor.
*Note that the wire colours on the PIR sensor we used are slightly counter-intuitive. The White wire is ground, and the Black wire is the output. Red of course connects to 5V.*
The Raspberry Pi has a CSI connector located in between the AV jack and the HDMI port. To connect the Raspberry Pi Camera board, use a small, flat-head screwdriver to release the catch on the ribbon connector socket, and carefully insert the ribbon cable into the socket (don’t force it), then gently push the socket closed so that it holds the ribbon cable in place.


Our PIR sensor had a JST connector on the end, however because we’re connecting it directly to a breadboard, it was easier to cut the connector off, strip the ends of the wires, and tin them with solder to make a reliable insert into the breadboard. We've connected it to the breadboard where the Red, White and Black wires are shown.
The Code
Take a look at the code below and read through the comments to understand how it works, then write the code into your Python 3 script editor. To do this go to the Menu -> Programming -> Python 3 (IDLE), then go to File -> New File.
#import modules
import RPi.GPIO as GPIO
import time
from picamera import PiCamera

camera = PiCamera()

#pin declaration
ledR = 2
ledG = 3
movePin = 4
button = 5

#variable declaration
moveState = 1

#pin setup
GPIO.setmode(GPIO.BCM)
GPIO.setwarnings(False)
GPIO.setup(ledR, GPIO.OUT)
GPIO.setup(ledG, GPIO.OUT)
GPIO.setup(movePin, GPIO.IN)
GPIO.setup(button, GPIO.IN, pull_up_down=GPIO.PUD_UP)

GPIO.output(ledR, 1)
GPIO.output(ledG, 1)

#initialise
time.sleep(2)
print("PIR initialised")
GPIO.output(ledG, 0)
print("nothing to see here...")

#main loop
try:
    while 1:
        moveState = GPIO.input(movePin) #read PIR input
        if moveState == 0:  #if motion is detected
            print("Motion Detected!")
            GPIO.output(ledR, 0)
            GPIO.output(ledG, 1)
            camera.capture('/home/pi/Desktop/%s.jpg' % time.time()) #capture image and save to desktop
            time.sleep(5)
            print("Nothing to see here...")
            GPIO.output(ledR, 1)
            GPIO.output(ledG, 0)


except KeyboardInterrupt:   #when Ctrl   C is pressed, exit the program cleanly
    GPIO.cleanup()
    print("Program Exited Cleanly")
Give it a run and see what happens. When there is no motion detected, the LED should be green, and when motion is detected, it changes to red, and waits while the camera takes a photo of the thief! This program saves images to the desktop by default, and gives the image name a string of numbers generated by the time the program has been running. This gives each image a unique, if slightly unreadable file name. You can play around with this line to change the save location and name if you like.
The Raspberry Pi Camera board is capable of much more than just taking images, it can record video, annotate images, add filters and more. Using these features is as simple as looking up the python commands for each function from the PiCamera documentation.
What Now?
Cool bananas, now that your lunch is protected against would-be thieves you can take this concept and great other events based off the motion detection. For example, you could connect a piezo speaker and play an alarm tone which it is triggered, or you could 3D print a case for your project to make the ultimate surveillance system. Let us know what awesome projects you create using this concept.

