If your utilizing a correctly set up Ultimaker S5 3D Printer you should have no issues with first layer printing. So long as there are print profiles available on Cura, which most likely it will, with a correctly set up 3D printer you will be able to produce excellent first layer results even when using a 3rd party filament material. First layer results are crucial to the success of a 3D printed component and sometimes a single-layer print is all that is desired. There is a lot you can do with single-layer prints and an example of this is the intricate interlocked lamp models seen below. In this case, Cura settings can be altered to produce the best possible single-layer model.
A sign of success when it comes to first layers is a model with a shiny and flat bottom surface. Furthermore, success is a model that is rigid and dimensionally correct without any excess or peculiarly placed build lines. Now if the initial layer is not firmly set to the build platform it will end up as a failed print, with the best result being a warped misshapen product, and that is why perfecting the printed first layer is so important. Quick links for the contents of this guide is seen below.
If the bottom layer of your print is producing large issues it is very likely that your build platform is levelled incorrectly. Ultimaker 3D Printer Build Platform Calibration is a great guide for Ultimaker 3D printers to successfully level a build platform. Another great guide dive into if your models cannot stick correctly to the build platform is Improving 3D printed models – Ultimaker Cura. Inside this guide, the section Improve Build Platform Adhesion and Stop Warping will be particularly valuable. This will help you make the nozzle and build platform temperature just right and introduce you to different build platform adhesion methods. These are important to get right to print sweet perfect first layers.
There is also an Ultimaker Cura Overview Guide which is a great reference point if this is your first time encountering Cura and you want to hit the ground running. Put simply Ultimaker Cura is a software which allows you to turn the computer file of your design into a recipe for a 3D printer to follow. It is available online and is a completely free software used by over a million users worldwide.
If you like what you see here give our Instagram post on Why Your 3D Prints Aren't Perfect a look too. As always if you have got any questions, queries or things you'd like to see added please let us know your thoughts!
Initial Layer Speed
Speed kills good prints. Cura provides the ability to slow the first layer speed using the setting Initial Layer Print Speed and Initial Layer Travel speed. The print speed is how fast the extruder head will move when printing and layer travel speed is how fast the extruder head will move when not printing. An Initial Layer Print Speed of 20 mm/s is a great speed to get excellent first layer prints. An Initial Layer Travel Speed of 20mm/s will minimise vibrations and help ensure the filament is extruding out reliably. It is an advantage for 3D printing single layers to use the same print speed for both these settings.
To make these settings visible in Print Settings Menu go to |Top Tool Bar > Settings > Configure Setting Visibility| then find these settings in the list and click on the Checkboxes. Now Initial Layer Print Speed and Initial Layer Travel Speed can be accessed under the Speed Heading in the Custom Print Settings.
Combing in Relation to the First Layers
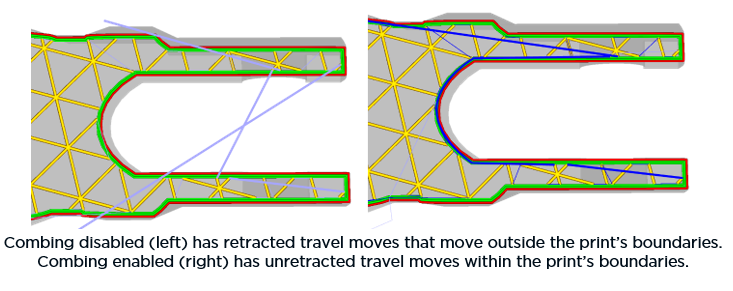
Combing is a method used in 3D slicing software to minimise stringing and dribbling effects. Combing causes the print head to move inside the perimeter of the part instead of travelling across a void. Stringing is a blemish on a 3D printed component that looks like whiskers or hairs coming off the surface. This occurs when the filament is incorrectly under pressure causing it to ooze incorrectly out of the print nozzle. This usually occurs at locations where combing and retraction occur. Combing is when the feeder stops movement. Retraction is when the feeder pulls the filament away from the nozzle. Retraction will also normally cause a Z-Hop. A Z-Hop is when the distance between the build platform and the heated nozzle is increased. This is done so extruder head travel will not cause the nozzle to hit the printed model thus preventing scratches or blob blemishes.
Retraction will not occur when combing is occurring. Furthermore, combing makes any dribbles or stringing from the nozzle end up deposited internally inside the part. This is not a problem as these locations are normally covered. This feature really helps with materials that are prone to oozings, such as PETG or TPU 95A. If the geometry of the model causes long combing distances it can lead to under-extruding issues. This is because the pressure in the print nozzle will be lower as excess material has dribbled out.
When printing single layer prints combing will be easily seen as a defect, presenting itself as ugly lines on the bottom layer. Preventing combing will fix that and allow prints to be printed faster. Settings related to combing with a focus on printing the best single-layer model are below.
- Combing Mode. Off, All, Not in Shell, Within Infill. For an optimal single layer print set to Not in Shell. This means combing will never occur in areas that are inside the perimeter.
- Maximum Comb Distance with No Retract. Millimetre Value. For optimal single layer prints set this value at 10mm. This means any time the print head moves more than 10 mm when travelling it will force retraction to occur. This stops lines being printed on the bottom layer.
To access these setting in Cura start by making them visible in the Print Settings Menu by going to |Top Tool Bar > Settings > Configure Setting Visibility| then find the settings in the list and click on its Checkbox. These settings can be accessed under the Travel Heading in the Custom Print Settings.
Perfecting Initial Squish

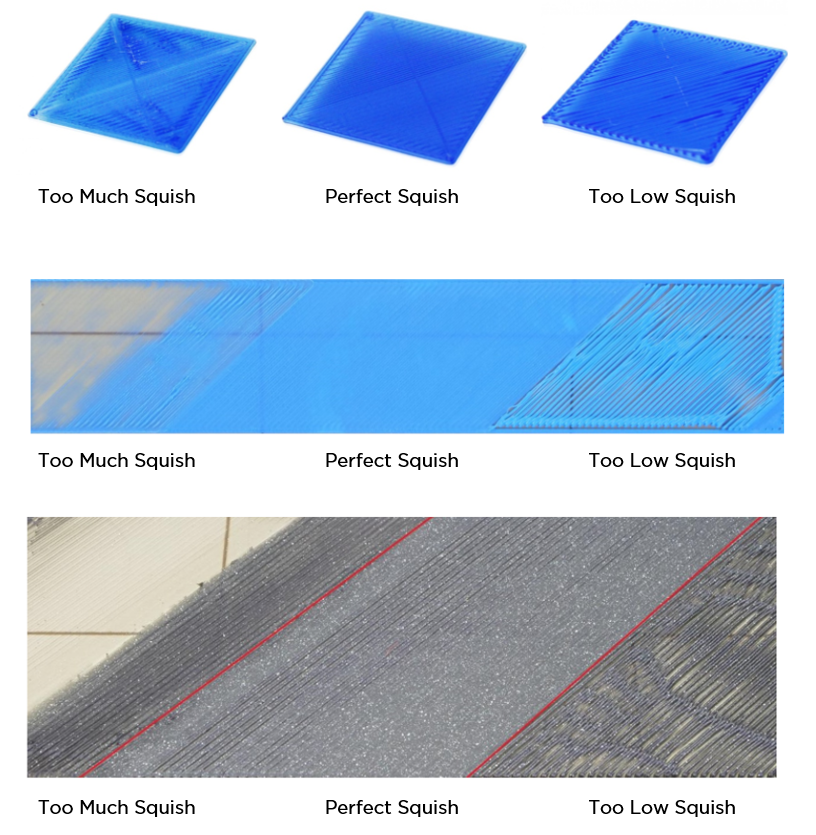
If the nozzle prints too close to the build platform lines will overlap causing the material to build up, producing raised ridges between strings of filament. An even closer nozzle will prevent the plastic from escaping from the nozzle properly. Pressure will build up in the nozzle and eventually the plastic will power-squirt out causing ugly blobs. This can also cause the feeder to grind your filament and the nozzle to scratch the build platform surface. A low squish amount occurs if the nozzle prints too far away from the build platform. It will produce lines with empty gaps between them and will likely cause the print to warp away from the build platform. Imagine back to when you first made fettuccine pasta and had to dry it out, lining them up next to each other on the kitchen table with gaps in between. It will look just like that except on a smaller scale.
Initial squish amount can be altered manually by adjusting the bed height, but the initial squish amount can also be altered utilizing Ultimaker Cura. The settings related to initial squish amount are talked about below.
- Initial Layer Height. Millimetre Value. This is by default a 0.2mm on Ultimaker Print Profiles. If you want a more mirror-like surface for the top and bottom of the single-layer component use a 0.3mm layer height. A 0.1mm layer height is possible but will require a very accurate calibration of the bed platform.
- Initial Layer Line Width. Percentage Value. This is by default 120% on Ultimaker Print Profiles. By increasing this percentage value, you will enable more material to be initially laid down on the bed. Would recommend 140%. This can improve adhesion and improve blending between lines.
To access these setting in Cura start by making them visible in the Print Settings Menu by going to |Top Tool Bar > Settings > Configure Setting Visibility| then find the settings in the list and click on its Checkbox. These settings can then be accessed under the Quality Heading in the Custom Print Settings.


