Ever wanted to know exactly what bird is near you by only the sound but simultaneously have zero ideas about birds? Fear not, here is the solution for you! A fully fletched Bird Call AI System that runs completely on a Raspberry Pi Single Board computer. All thanks to the BirdNET-Pi Project.
This system can run 24/7 non-stop. It records, tracks, and displays each recognised bird call. You can also access the data and the audio live stream through any locally connected computer/device. It even saves the best recordings so you can listen to them later.
If you want to participate in some citizen science then this is the project for you. As you read this around the world there are many Raspberry Pis around the globe running BirdNet Pi right now. Some have even been specially set up you can tune into them from anywhere in the world.
To illustrate the above point, here is a BirdNET-Pi set up in the Nijmegen Netherlands, here is one in Tyresö Sweden, and here is one in Louisiana the Land of the Free. Tune in and listen out for those Hoopoes, Eurasian Blackbirds, and Cardinals. With enough of these devices set up in a city or country, the potential to figure out the flight paths and migrations of bird species in real-time would be right at our fingertips.
Ah AI, you’ve done it again. The contents of the Bird-Net project can be seen below.
- Parts Used
- Project Build
- Acknowledgement
- Where To Now
If you are interested in other Machine Learning and Raspberry Pi project/guides we have a whole bunch on our website! From Face tracking with Raspberry Pi, Object and Animal Recognition with Raspberry Pi, Speed Camera With Raspberry Pi, QR codes with Raspberry Pi, Hand Recognition Finger Identification, Pose Estimation/Face Masking with Raspberry Pi, or Face and Movement Tracking with a Pan-Tilt System. You may note all those AI systems analyse data provided by cameras, this here is my first foray into a machine learning system that only analyses sound waves. Seen below are a running BirdNET-Pi system, a MagPi, and a 3D printed case.

We are always keen to answer questions and queries so if you want to build one yourself and want to ask questions please do so. Also, if you have ideas to add please let us know your thoughts!
Parts Used
The part list below is those used on the final design. No solder needed!
· A Powerful Raspberry Pi Single Board Computer (I have used a Raspberry Pi 4 Model B 2GB but this system can run on the Raspberry Pi 3B+ running the Raspberry Pi OS Lite (64-bit) Version.
· USB Microphone (This Mini USB Microphone will work and here is an Omnidirectional Microphone option)
· Micro SD Card flashed with Raspberry Pi OS (64-bit)
· Heatsinks for Raspberry Pi (Any case with adequate passive/active cooling is perfect to use too, like the Argon One V2, Flirc Case, or Pi Hut Modular Case. If you are in a particularly hot environment I would recommend using active cooling)
Worth mentioning here, I tried to run this system with an overclocked Raspberry Pi Zero 2 W but with no success. Perhaps altering my swapfile to increase the RAM size would help. Check here for some tips to potentially make it work with this board.
Project Build
The first step is to set up the Raspberry Pi Single Board computer as a desktop computer. Check this guide here if you need a hand doing this. Make sure to flash the Micro-SD card with the 64Bit version of Raspberry Pi OS. Plug in your Micro-SD card to a computer (you may need an adapter) and open the Raspberry Pi Imager (download location for Raspberry Pi Imager can be found here). Look at the image below for the process of using the Raspberry Pi Imager correctly for this set-up, you must click | Raspberry Pi OS (other) | to find and select the | Raspberry Pi OS (64-bit) | version. Then select your connected Micro-SD card and start the flashing process by clicking Write. This should take less than 5 minutes to complete.

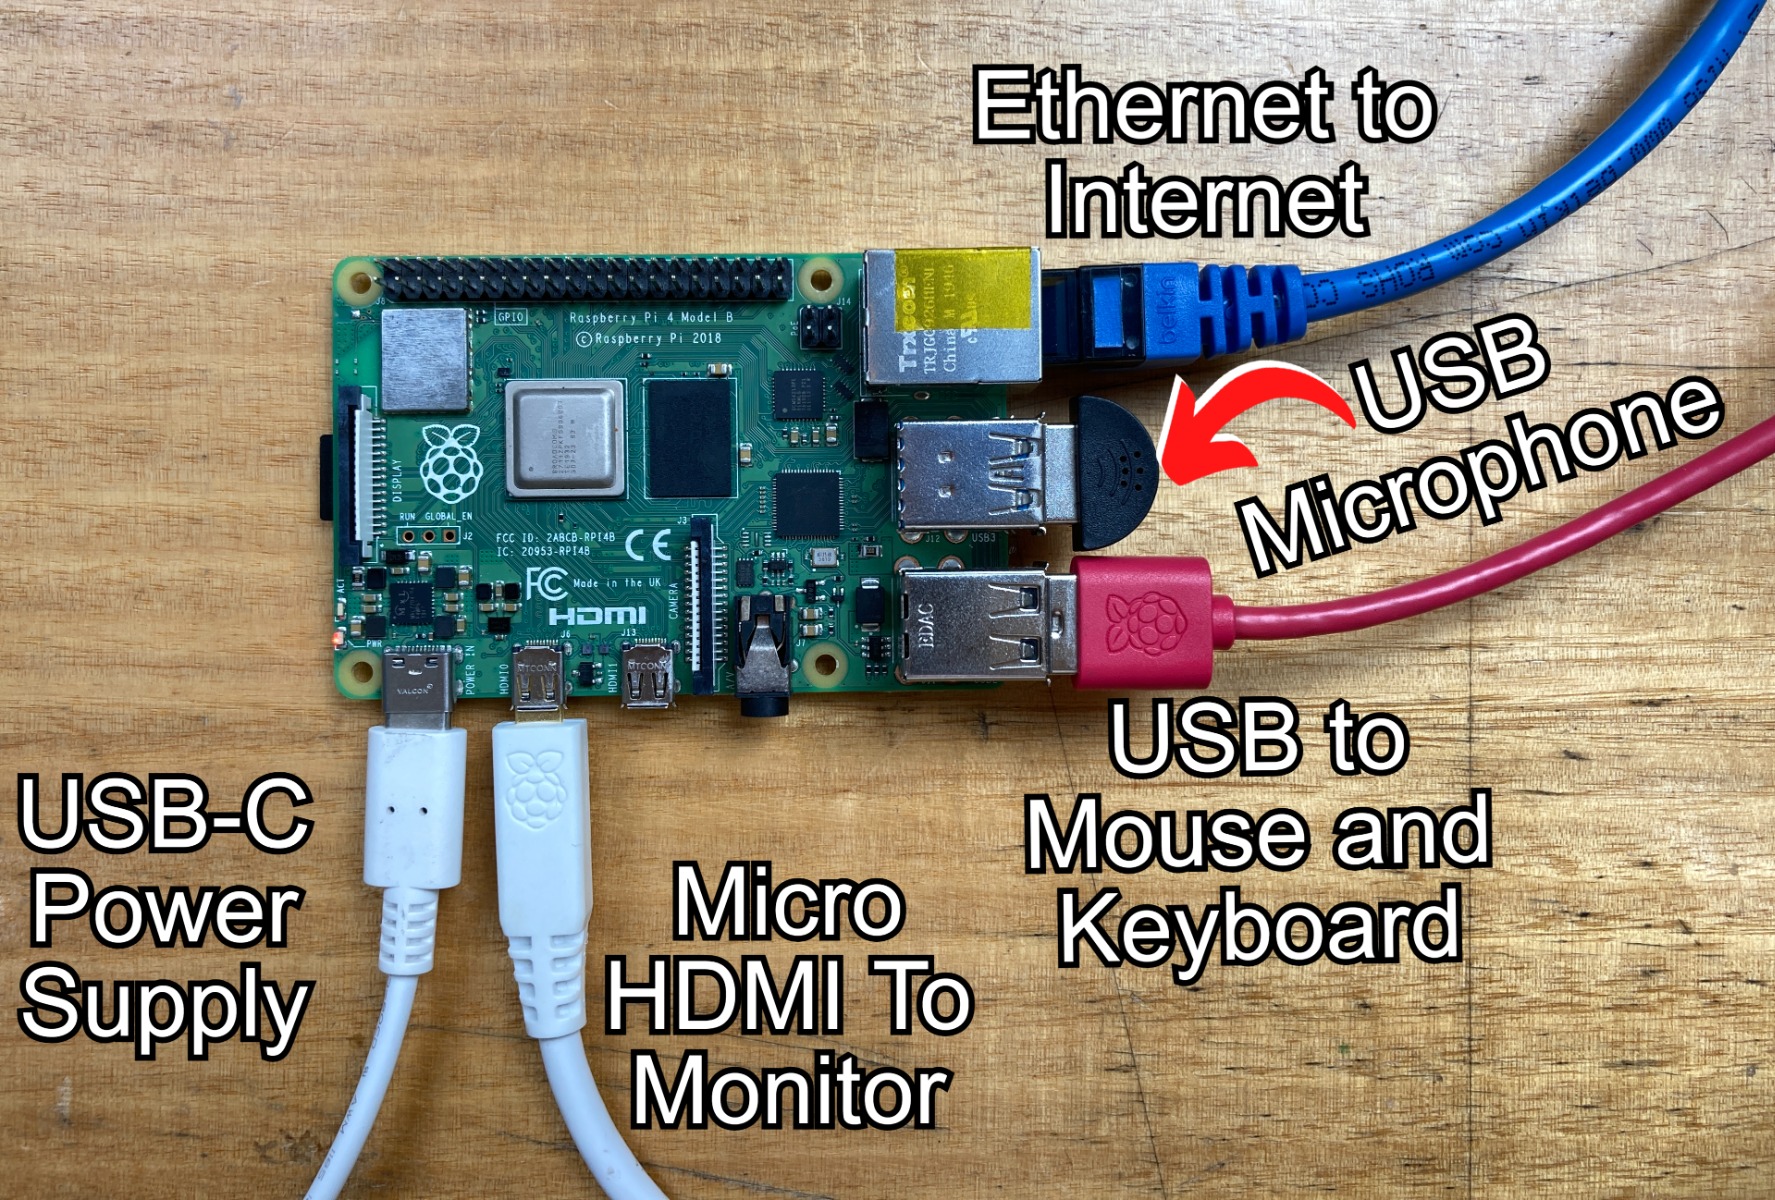
Next, attach a USB microphone to the USB3.0 port on the Raspberry Pi. This is what will listen to the ambient noises around. When our system is set up the Raspberry Pi will use the information captured by the microphone to determine whether the ambient noises are background or a bird. If it decides it is a bird it will identify it and record the information. Also attach a heatsink to the top of the Raspberry Pi, like in the image below, so that it stays cool. Connect your flashed SD card, keyboard, and mouse into the system as well. To save us supplying WIFI details to this Raspberry Pi I will also connect an internet-connected Ethernet cord. See below for an image of the setup all connected.
So with power to the system, you will be welcomed by the Raspberry Pi Desktop (or straight to a terminal console if you're running a Lite Version of Raspberry Pi OS on a Raspberry Pi 3+ Model).
Now to grow our AI Brain inside our Micro-SD card. To do so you will need to type and enter the following line into a new terminal window. Open this by pressing the black button on the top left of the screen. This command will install all the required packages for our Bird Call identifying and recording system. If ever prompted by the terminal with the question | Do you want to continue? (y/n) | press Y and then the Enter key to continue the process.
curl -sL https://coreelec.io/birdnet | bash
This command will take some time (around 10 to 15 minutes) but will do everything that is necessary. Once complete your Raspberry Pi OS will re-boot itself. If the installation hangs or says installation completed successfully reflash your Micro-SD card and try again. See this command about to be entered into the terminal and the installation complete in the image below.

Demonstration
So with everything set up and with power to the system let's pull up the Birdnet Local Website that the Raspberry Pi automatically creates upon boot up.
To access this type and enter the following into an Internet Browser (Chrome or Firefox are good choices) on any local network-connected device (this includes the Raspberry Pi that is running our BirdNET system). You can see this URL typed and entered below along with some annotations.
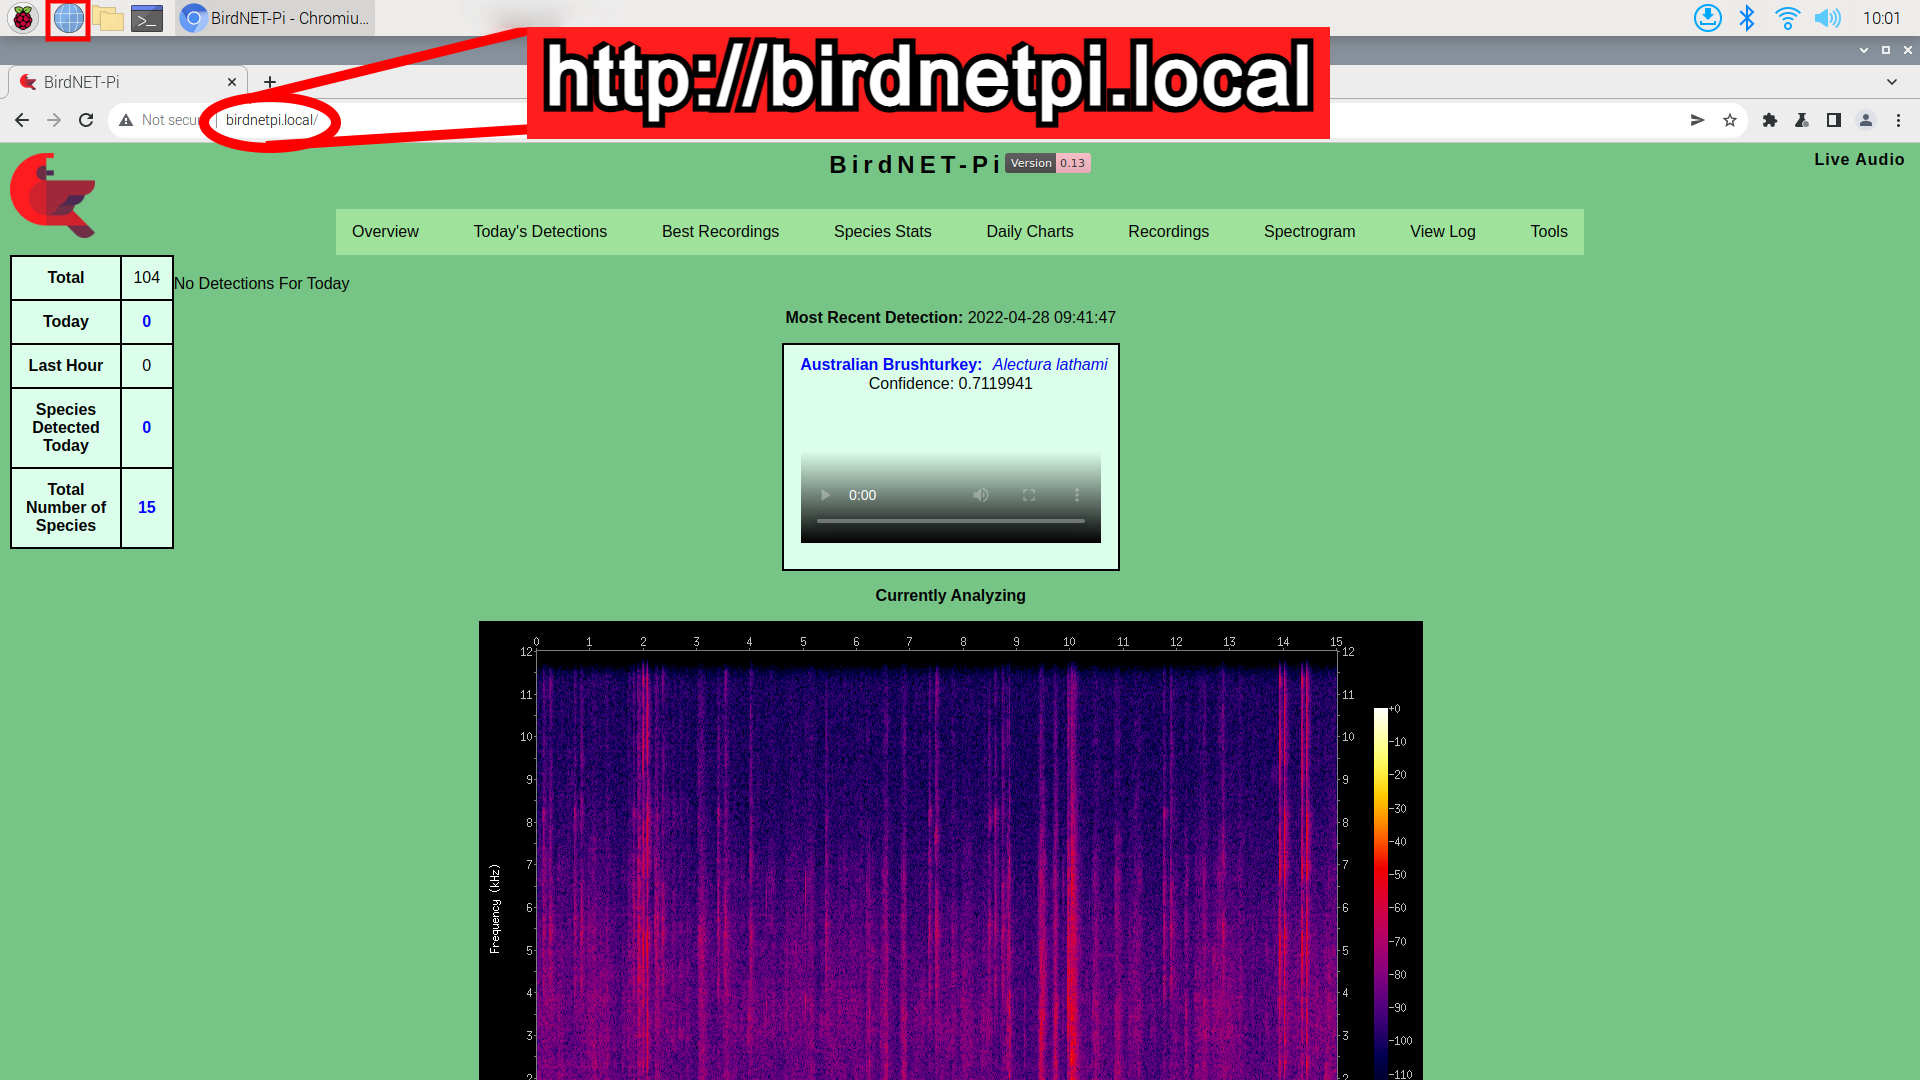
Once here just have a look at all the pages and data you can access (you can also see this in the image below). The time of day the bird call happened, the identified bird call recorded, a spectrograph of all sound, images of the identified species, tables, charts it is really all there! Certain sections may require a Username and Password. By default the Username is | birdnet | and leave the password empty (you can change these as well if desired). Right-click the below image and select open with a new window to see the below in full size. Keep in mind I had been running my Bird-NET Pi system for only two days when these images were taken. I was playing to it some bird calls from YouTube videos just to check that everything is as it should be. You can also set up your Raspberry Pi to send out its identifications to the outside world for some real citizen science.

Worth mentioning if you only want a single species or if you want to exclude species from being identified you can do so using the Tools. This way if you don't want to track certain species (or only a single species) your system will be easy to customise and good to go quickly. You can also exclude certain species that are producing too many false positives. Check out these options in the image below.

Acknowledgement
This is all possible thanks to everyone who has worked on anything BirdNet related. Importantly for this project, a huge thanks to Patrick Mcguire and everyone in the community who put hard yards in and made both installing and running this system so effortless on a Raspberry Pi Single Board Computer. A lot of this effortlessness is thanks to his perseverance, incredible enthusiasm, and determination. Now, this software is all open-source, so if you feel like some features are missing there is nothing stopping you from adding it. Go check out the Github for BirdNET-Pi and the BirdNET-Pi Website.

Another huge thank you goes to the BirdNET team that originally created this machine-learned intelligent system. The Tensor Flow Lite version of BirdNET is the machine-learned heart of the Raspberry Pi system. GitHub for BirdNET-lite is located here. This was created by a team from Cornell Lab of Ornithology and Chemnitz University of Technology, Stefan Kahl, Shyam Madhusudhana, and Holger Klinck. These are the people who asked the question can a computer learn to recognise birds from sounds and got it successfully working. There are other great community projects that have sprung about recently that utilise this technology, like HAIKUBOX, Birdweather, and ecoPi:Bird. Birdweather is a great example of citizen science at the grassroots stage, see the website in the image below. Just check out that blossoming around the world coverage. All the data you can see is for the last 24 Hours so a detection count of over 180000 is very admirable, particularly considering the BirdNET AI system only became a working reality in 2021. The live identifications that update non-stop onto the top right of the screen have probability and confidence factors attached to them as well which is brilliant. The plan is to have my Raspberry Pi system feed into this as well however the above explained installation of the system won't automatically do this by default. Learn how to here.

Where To Now
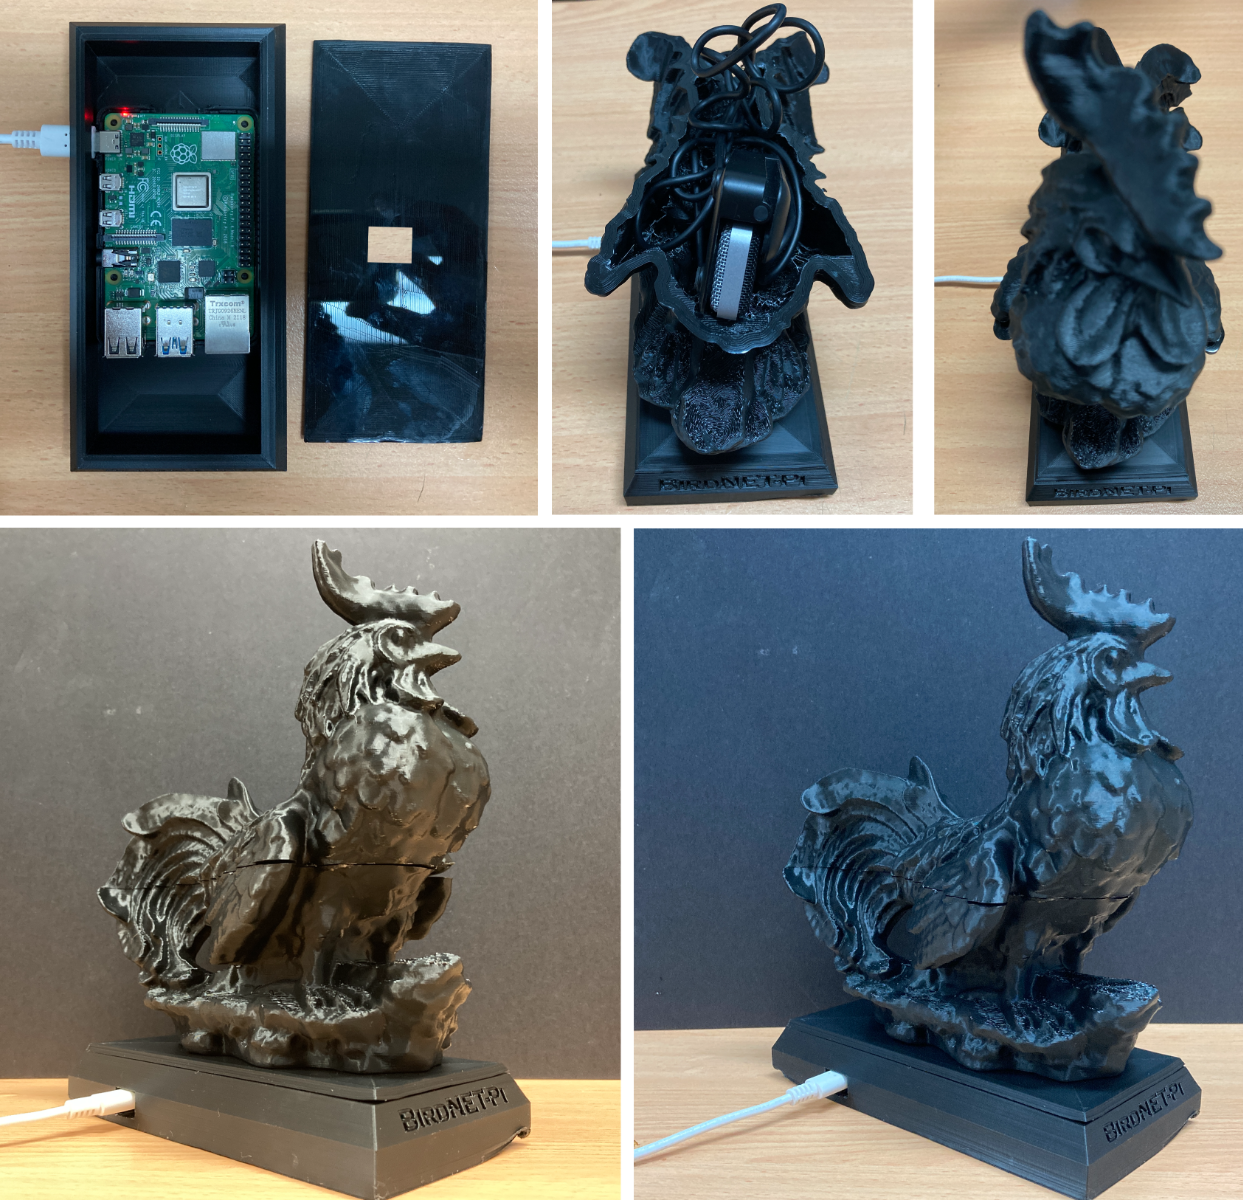
I also 3D printed a Case that disguises the setup in the form of a Garden Rooster. The Raspberry Pi and an Omnidirectional USB Microphone tuck into it nice and safely inside. I was concerned the birds would figure out I’m tapping into their conversations. Birds are smart and they've been around a while, they used to be dinosaurs after all. They could see a microphone from miles away (particularly if they are White-bellied Sea Eagles). Thus to aid successful identifications I have disguised the Raspberry Pi AI system as one of them, a Garden Rooster. This also provides some much-needed semi-waterproofing for outdoor placement. You could power the Rooster with a battery (and even solar panels!). However for today I’ll give those birdies a small chance of detecting my detection device and utilise wall power. See the print process for the Rooster below.

See the build and assembled case below. With the compromise of having it powered through a wall plug, you can see I have the USB-C power cord sneaking out the side of the base. There are also some holes drilled into the case so the audio waves can still get to our AI system through the connected USB Microphone. A bit more post-processing on my behalf and the parts will connect seamlessly.
In my life, I had mates that could tell me exactly what planes were what by only the sound as they flew overhead. They could identify the difference between a 747 flying by and an Airbus like it was nothing. It would be incredible if I could customize this learned system to do the same. Turn what I considered a superpower into a machine! Also, imagine if you could track how much rainfall is going on only by the sound of it falling. The system could figure out the BPM or the loudness of the rainfall and then interprets that as a value. To achieve this I would utilise Edge Impulse to create and train up the machine learning aspect of the system. I am also aware of Frog AI identification through sound as well however I am yet to see one run completely on a Raspberry Pi.
I have also had some interesting false positives. For instance, my hustle and bustle in my office room (deep within the walls of progress, with no windows for birds to gaze in or trigger the Pi) was identified quite quickly as the going about of an Australian Brushturkey. Either I'm too dumb to realize a Turkey snuck into my room or my Raspberry Pi is calling me names. Nevertheless, false positives can be quickly investigated as each detection is recorded and captured. So I went back, listened to the audio of that detection, and can confirm that it was the Raspberry Pi insulting me. I quite like Brushturkeys so I'm not too upset. I am not without limits though. If it calls me a city-slicking Australian White Ibis there's going to be a reflashing of a Micro-SD.

