
 Have you ever heard people talk about how amazing the Internet of Things is and how you can leverage the power of the internet by creating IoT devices, but not really known how to get started? This tutorial is for you! We’re going to look at how we can use these things called ‘webhooks’ to get data from the world wide web to make decisions in our application.
What are Webhooks?
It’s a good question, formally classed as ‘user defined HTTP callbacks’, they can seem confusing a complicated a first, however let’s take a look at what a webhook really is.
Think of a webhook as a bit of code that sends out a ‘message runner’ to the website you want to get data from. Now it will take a certain amount of time for our ‘message runner’ to get to the website, get the data, and get back to our program. We could spend all of our resources on the lookout for this ‘message runner’, waiting for him to get back with our precious data, or we could simply go about our business, and trust that the message runner will let us know when he gets back with the data we sent him to get.
In a more practical sense, most web services designed for integration with development tools will provide an API which is a URL you can request data from. We send out a request for the data we want, then the web service replies with said data, and we can then process it however we want.
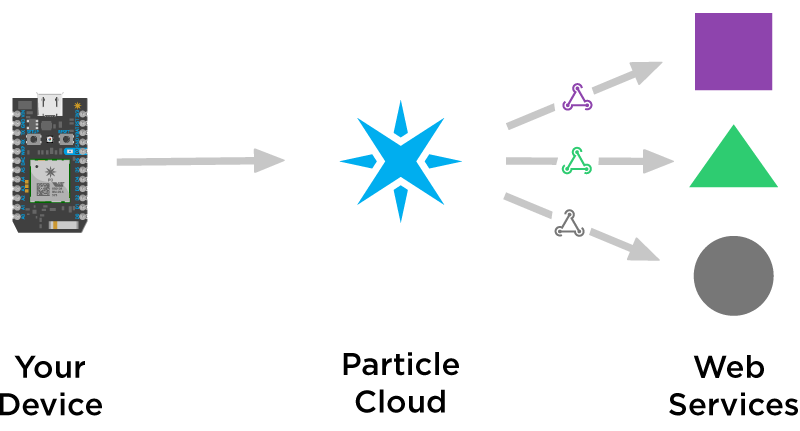
Fortunately, once again, Particle have come to the rescue and made it extremely easy for us to integrate webhooks into our code and leverage the power of the internet. If you’re just getting started with Particle, definitely go and check out the rest of our Particle tutorials to get a good understand of how to work with the Particle platform first.
How do we use Webhooks in Particle.io?
There are two Particle functions that we’ll be using to integrate webhooks into our code: Particle.subscribe and Particle.publish. There are lots of different ways you can use webhooks however we’ll be sticking with something fairly simple to demonstrate their use.
The easiest way to learn about how these two functions work is to check them out in the firmware documentation on Particle.io. It runs through the parameters required for each one, and how they communicate with the Particle.io cloud. Anyway, enough talk, let’s dive in a look at using webhooks in our own app.
The Goal
Today we’re going to create an LED weather station using the API from weather station provider Weather Underground. We’ll be using the Particle Internet Button for this, and showcasing many of the functions available on it. If you haven’t already, check out our Getting Started with Particle Internet Button tutorial which walks through getting started with the libraries and specific functions.
 The Gear
 The Gear
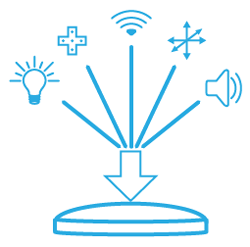
As mentioned before, we’ll be using the Particle Internet Button for this tutorial, most of the magic is happening on the cloud and in the code so we don’t need any external hardware beyond this.
Configuring Weather Underground
Before we can do anything, we need to go to Weather Underground and get a useable API. To do this, you’ll need to make an account (they have a free plan with all the features you’ll need), request an API key, and then it will generate your API URL that you can use to request data from. You can actually just take that API URL and copy it into your browser and it will return a whole bunch of data. We won't be using all of this, but in our webhook integration, we'll filter the data using a JSON template for exactly what we want. The best way to help get your head around how JSON data works is to install a JSON viewer template. It'll make your life 1000x easier. Guaranteed.
Setting up our Webhooks
For this little project, we’ll be using two webhooks. One gives us the forecast conditions for the next few days, the other gives us the current conditions.
We could of course combine these into one webhook providing all the data at once, however, as you’ll see in the code, this requires more data to be fetched and received, which if you want to do this project with an Electron, or a limited Wi-Fi setup, is going to increase your data usage, and also increase the complexity of our data parsing.
**Parsing simply means to separate and process a bunch of data into more useable sections**
To create a webhook, go to your Particle console and navigate to the integrations tab on the left hand side of the window. Select ‘new integration’, ‘webhook’ and change to the custom JSON view. If you’re not familiar with JSON, that’s ok, it’s a language which makes processing data like this really easy. You don’t need to understand all of what’s going on to follow this tutorial, although some extra reading through other examples will help you to understand how to modify the webhook for other data services.
Copy the following code into your text area:
{
  "event": "Event-Name",
  "url": "http://api.wunderground.com/api/YOUR-API-KEY/forecast/q/YOUR-CITY.json",
  "requestType": "POST",
  "headers": null,
  "query": null,
  "responseTemplate": "{{#forecast}}{{#simpleforecast}}{{#forecastday}}{{high.celsius}}~{{low.celsius}}~{{/forecastday}}{{/simpleforecast}}{{/forecast}}",
  "json": null,
  "auth": null,
  "mydevices": true
}
This is our webhook for the forecast data, now go through and repeat the process again, this time with the following code in the text area:
{
  "event": "Event-Name",
  "url": "http://api.wunderground.com/api/YOUR-API-KEY/forecast/q/YOUR-CITY.json",
  "requestType": "POST",
  "headers": null,
  "query": null,
  "responseTemplate": "{{#current_observation}}{{current_observation.weather}}~{{current_observation.temp_c}}~{{/current_observation}}",
  "json": null,
  "auth": null,
  "mydevices": true
}
You can name the events whatever you like, however to match what is in our code, name the events weatherFore and weatherCond. You can use the test button to check if your webhook is functioning correctly.
Now that we’ve got Weather Underground and our webhooks setup, let’s move on to the code and getting it all up and running.
The Code
Now that we’ve got our webhooks in place, and they’re up and running, let’s do something with them using our Photon.
Create a new app and add the Internet Button library, then copy the following code:
#include "InternetButton/InternetButton.h"

#define MED_BLUE 20,50,250
#define YELLOW 200,100,0
#define GREY 25,0,25
#define PURPLE 150,10,150
#define BLUE 20,10,250
#define LIGHT_BLUE 60,100,100
#define WHITE 150,150,150
#define RED 200,0,0
#define PEACH 150,10,5

#define LOW_BUTTON 2
#define HIGH_BUTTON 4
#define COND_BUTTON 3
#define OFF_BUTTON 1

InternetButton b = InternetButton();

int lastPublish;
int publishTime;
int riseTime = 150;
int highTemp;
int lowTemp;
int ledHigh;
int ledLow;
int minMax = 0;

void setup() {
    Particle.subscribe("hook-response/weatherCond", condHandler, MY_DEVICES);
    Particle.subscribe("hook-response/weatherFore", foreHandler, MY_DEVICES);
    b.begin();
}

void loop() {
    publishTime = millis();
    if(b.buttonOn(COND_BUTTON)) {
        if((publishTime - lastPublish) > 3000) {
            String data = String(10);
            Particle.publish("weatherCond", data);
            b.ledOn(6, LIGHT_BLUE);
            lastPublish = publishTime;
            delay(500);
            b.ledOff(6);
        }
    }
    if(b.buttonOn(LOW_BUTTON)) {
        if((publishTime - lastPublish) > 3000) {
            String data = String(10);
            Particle.publish("weatherFore", data);
            b.ledOn(3, MED_BLUE);
            lastPublish = publishTime;
            delay(500);
            b.ledOff(3);
            minMax = 0;
        }
    }
    if(b.buttonOn(HIGH_BUTTON)) {
        if((publishTime - lastPublish) > 3000) {
            String data = String(10);
            Particle.publish("weatherFore", data);
            b.ledOn(9, PEACH);
            lastPublish = publishTime;
            delay(500);
            b.ledOff(9);
            minMax = 1;
        }
    }
    if(b.buttonOn(OFF_BUTTON)) {
        if((publishTime - lastPublish) > 1000) {
            lastPublish = publishTime;
            b.allLedsOff();
        }
    }
}

void condHandler(const char *event, const char *data) {
    String str = String(data);
    char strCondBuffer[125] = "";
    str.toCharArray(strCondBuffer, 125);

    String description = strtok(strCondBuffer, "~");
    int currentTemp = atoi(strtok(NULL, "~"));
    int ledCurrent = map(currentTemp, 0, 45, 1, 11);
    b.allLedsOff();
    for(int c; c <= ledCurrent; c++) {
        b.ledOn(c, PURPLE);
        delay(riseTime);
    }
}

void foreHandler(const char *event, const char *data) {
    int h = 0;
    int l = 0;
    String str = String(data);
    char strForeBuffer[125] = "";
    str.toCharArray(strForeBuffer, 125);

    highTemp = atoi(strtok(strForeBuffer, "~"));
    lowTemp = atoi(strtok(NULL, "~"));

    ledHigh = map(highTemp, 10, 45, 1, 11);
    ledLow = map(lowTemp, 0, 25, 1, 11);
    b.allLedsOff();

    if(minMax == 0) {
        for(l; l <= ledLow; l++) {
            b.ledOn(l, MED_BLUE);
            delay(riseTime);
        }
    }
    else {
        for(h; h <= ledHigh; h++) {
            b.ledOn(h, PEACH);
            delay(riseTime);
        }
    }
}
Basically this code detects which button has been pressed, lights it up for confirmation, then publishes the corresponding event, either weatherCond or weatherFore. Then when it receives the data back from the API, it goes through the function, and displays the min, max, and current temperatures using the LEDs as a graph. In the code there is a section where the temperature values get mapped against the number of LEDS (1-11) using the map() function. It's setup to provide fairly standard feedback for typical NSW weather, however you may need to adjust these to better suit your climate.
Feel free to customise the code to suit your own project, and play around with the functionality. You’ll notice a bunch of spare #define colours at the top of the code, they are there as different colours you can drop in, or even make your own.
What Now?
Now that you’ve learnt a bit about webhooks and how they work, go ahead and try creating your own webhooks from different web services to use in your own applications. Different web services may require a slightly different JSON template to the one we used here, but it should tell you what to include.

