In this guide, we will be learning how to add the RD-03D radar sensor to your Raspberry Pi single-board computer so you can detect and track humans in real time. We will be looking at how the sensor works and what you can expect from it, how to connect it to your Pi and read data from it, and we will also be building some cool things with it like a radar visualisation and a game of virtual air-hockey controlled by your movement. Let's get into it!
| We also have a version of this guide for an Arduino with C++ and Pico with MicroPython if you want to check those out! |
If you are coming from an external site and looking for the library zip file, you can download it here!
How the Radar Works and What Data it Outputs
The Rd-03D is a 24 GHz millimetre wave radar sensor, and it really is a testament to our current state of technology as it achieves a great deal of things for such an inexpensive device.
This sensor emits radio waves around the 24 GHz frequency and listens for the reflections that return, kind of like an ultrasonic distance sensor. However, this sensor is far more advanced. Not only does it use the time it takes for those radio waves to reflect back to measure the distance of a person (by the way those radio waves are travelling at the speed of light), but it is also listening for any shift in frequencies from the Doppler effect to measure how fast the person is moving. This is the same effect that causes a car to change pitch as it passes you and the greater the shift in pitch (caused by a shift in frequency), the the greater the speed of the car. This same principle works with radar waves bouncing off a human target. A very important note here is that this sensor will only be able to measure the speed of a target in the direction towards or away from the sensor.

On top of that, it also has 2 receiver antennas that are used to detect the angle of a target. If a radio wave is emitted it bounces off a human to the side of the sensor, as the radio wave returns to the sensor it will hit one of the antennas before the other and this is used to detect the angle of the sensor. With that radio wave travelling at the speed of light, there is less than 0.025 nanosecond between it hitting the 2 different receivers. The fastest human blink is 100,000 nanoseconds, yet it can take that incomprehensibly small time and accurately figure out the angle the person is at relative to the sensor.

But how does it only detect people (and maybe other animals that are large enough)? Well, this is really where this sensor does some magic. When it emits those radio waves, most of the objects in the room reflect - your chair, the wall, your computer, your phone, so how does it know what's human? A very streamlined explanation is that humans have unique patterns in the waves they reflect. Like how visible light (which starts at 400,000 Ghz) reflects differently on different materials, our 24 GHz radio waves reflect differently on humans. Humans are also constantly moving creatures, everything from your breathing to the slight movement in your arms creates micro-doppler shifts as they move toward and away from the sensor. Humans are a certain "brightness" to the radar and are a sea of micro-doppler shifts, and with the onboard processing, it uses these to figure out what and where a human is.
If you took this sensor back 40-50 years in time, the signal processing alone would baffle the smart people on Earth, and it would seem like magic to even a specialised radar engineer.
So with this sensor, you will be able to use 24 GHz radio waves to detect a person, how far away they are from the sensor (up to its 8-meter range), what angle they are relative to the sensor, and how far they are moving toward or away from the sensor. It should also be noted that this sensor has to be stationary - it cannot move around. We are not entirely sure why, but we guess that it runs some sort of room calibration to get a baseline reading. If you move the sensor, this calibration is thrown out of whack and it gives bad readings. Ensure that it stands still, we will talk more about mounting this later.
Now that you know how it works and what you can expect of it, let's learn how to use it!
What You Will Need
To follow along you will need a:
- Rd-03D Sensor.
- Method of connecting the Rd-03D sensor. There are contact pads that you can solder your own wire to, or you can grab a jumper wire adapter for the onboard connector. The board DOES NOT come with one of these.
- Raspberry Pi single-board computer. We are using a Pi 5, but we also managed to get this working on a Pi 4 with a slight library tweak (we will look at that later).
- Micro-SD card (at least 16 GB) and an adapter to plug it into a computer.
- Power Supply, mouse, Keyboard, monitor and micro-HDMI cable - the usual things needed to use a Pi.
Connecting it to the Pi
If you are using the jumper wire adapter, connect it to the Rd-03D. However, please note that the cable we have linked is a generic one and the colours may not match the board very well. For example, mine has red and black as the TX and RX pins, with green as the 5 Volt pin and yellow as the Ground pin. Don't rely on the colours of the cables too much here and always follow the pin label from the board instead.
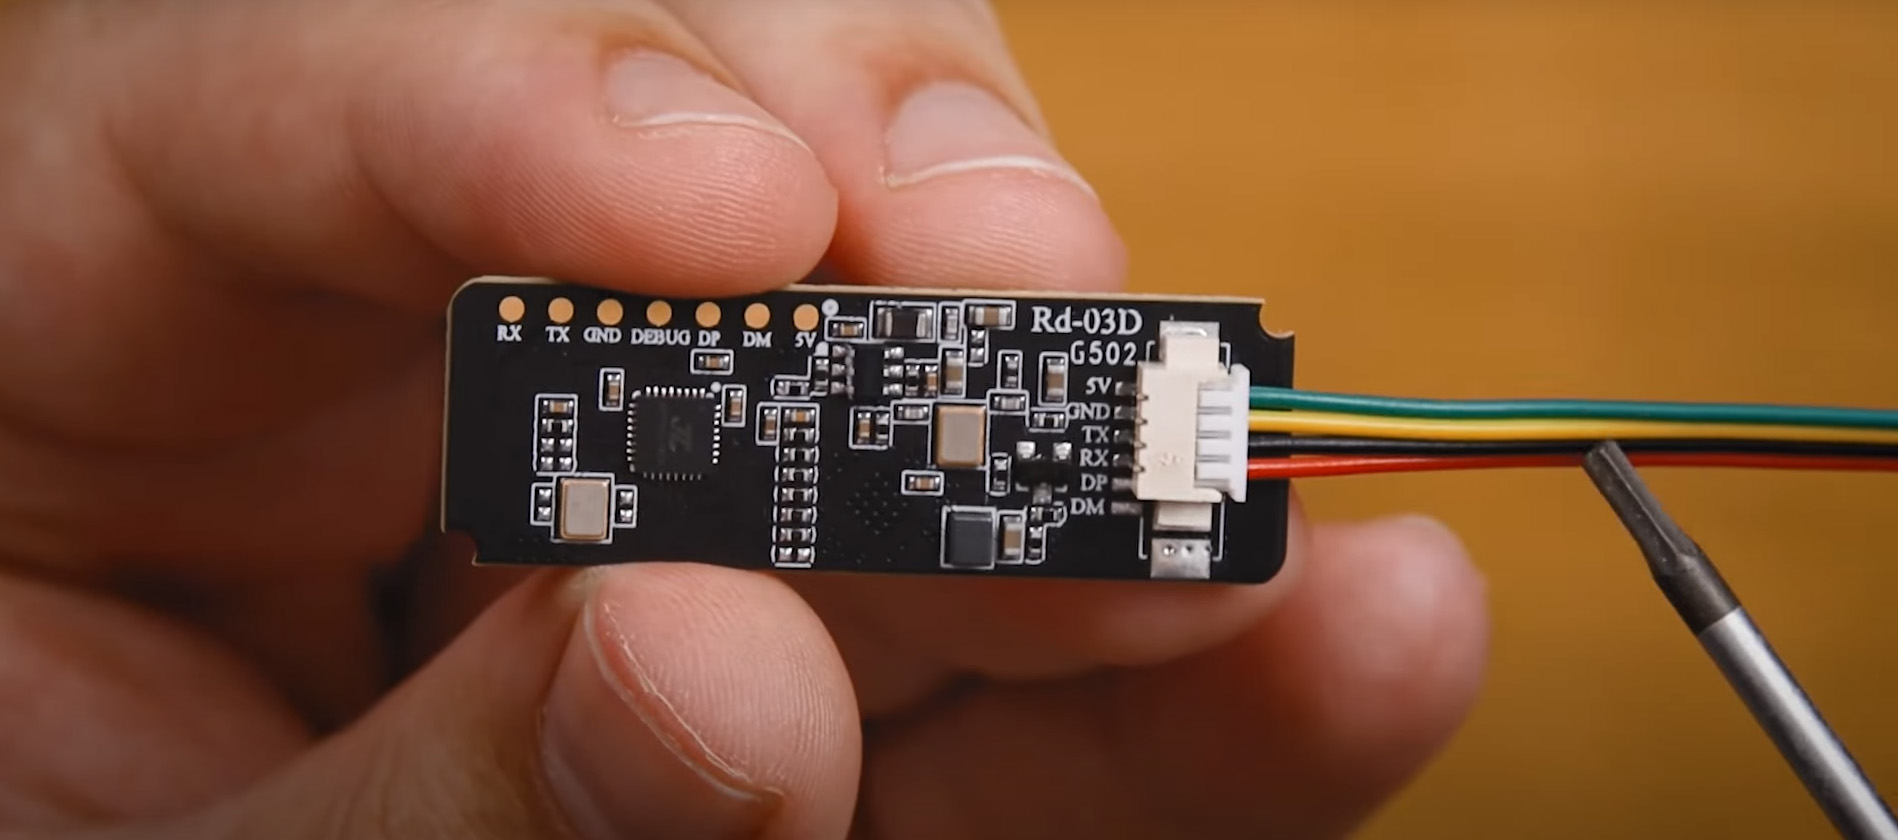
First, power the radar by connecting its 5 Volt pin to the Pi's 5 Volt pin, and the ground pin of the radar to one of the Pi's ground pins.
The radar outputs all of its data through UART so we will connect the radar's TX pin to pin 15 of the Pi (an RX pin). We will also be sending commands to the radar so connect the RX pin of the radar to pin 14 of the Pi (a TX pin). Remember, you transmit on a TX pin and receive on an RX pin so "RX to TX and TX to RX".
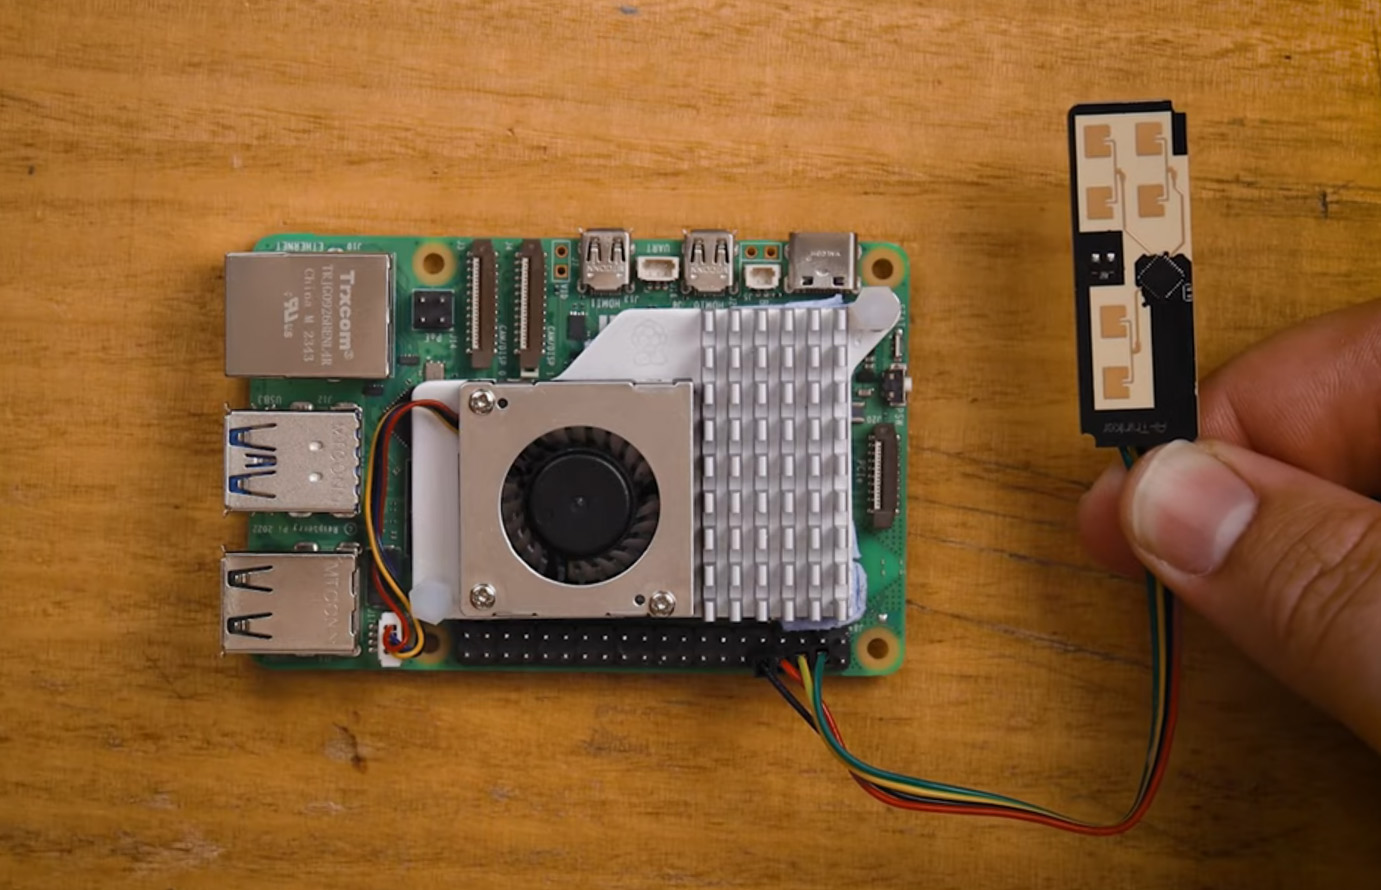
The image on the right is a correctly wired-up Pi, please remember the colour convention on your wires may be wrong.
Installing Pi OS and Enabling UART
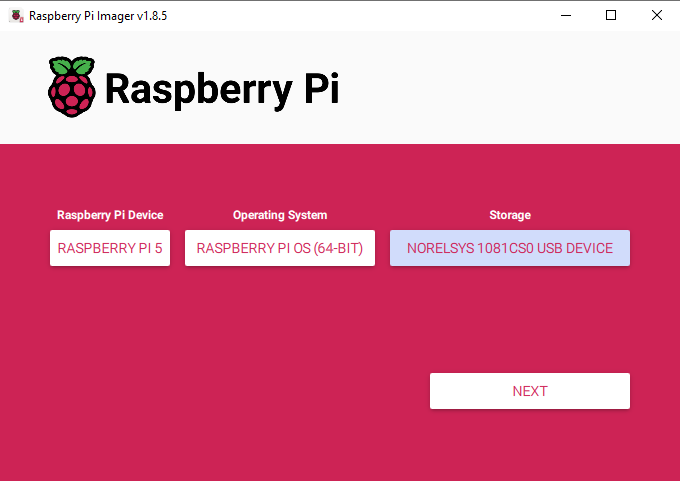
To start we will need to install Pi OS onto the microSD card. Plug your SD card into another computer and download the official Raspberry Pi Imager. Select the Raspberry Pi model you are using, 64-bit Pi OS as the operating system and then the microSD card as the device to install it on. This installation will then download the OS image (which is around 2GB) and after that, the installation should only take a few minutes.
Note: This installation will wipe any data on the SD card.
Once it's done, whack it into your Pi, plug in your keyboard mouse and monitor and run through the first-time installation process. There is nothing special you have to do here and you should set it up as you normally would any device.
Once you boot into your desktop environment, select Start menu > Preferences > Raspberry Pi Configuration. In this menu enable the Serial Port under the Interfaces tab and reboot your Pi (it will likely ask if you wish to do so).
This is going to tell our Pi to enable UART communication on its GPIO pins.

Library and Demo Codes
We have written a basic library that greatly simplifies the process of using the module and you can download the zip file for it here which also contains all the demo codes we will be using:
Download and unzip the file to a convenient location like your desktop. Before we begin, let's look at how to modify the script if you are not using a Pi 4 or another board. If you are using a Pi 5, you can skip this step.
Open up the Python file called rd03d.py - this is the library file. Towards the top, at around line 23, you will see the following line:
def __init__(self, uart_port='/dev/ttyAMA0', baudrate=256000, multi_mode=True):
This is a line that initialises UART communication with the sensor. The Pi 5 has a different method of initialising the UART pins compared to previous Pi models. You will need to change the section '/dev/ttyAMA0' to '/dev/ttyS0'. The line should look like this:
def __init__(self, uart_port='/dev/ttyS0', baudrate=256000, multi_mode=True):
Now we are ready to read our sensor data. Open up the file rd03d_demo_usage.py. This is a very basic script that demonstrates how to use all of the functions of the library. Starting off, it imports the library that you may have just modified:
from rd03d import RD03D
import time
If you wish to import the library into any script, the library must be placed inside the same folder as it.
After that we create an instance of of the radar and also have an initialisation option for whether we want to use it in single-target mode or multi-target mode:
radar = RD03D()  # Uses /dev/ttyAMA0 by default

radar.set_multi_mode(True)   # Switch to multi-target mode
Multi-target mode can track up to 3 targets at once but it can be a bit hit and miss sometimes, especially when people are close to the sensor. It also opens up a world of false detections from reflections. The radar's waves can bounce off walls, TVs, or any large flat surfaces to create a false reading, almost like there being a mirror on the wall and seeing the same person twice. Single-target mode will always pick up the strongest and most likely target, which will eliminate a lot of reflections as they are weaker. For reliability, single-target may be the go-to, but it's worth trying if multi-target will work in your set-up.
With the radar now set up, we can call radar.update() which will tell the library to pull the next reading from the sensor and hold onto it for us.
while True:
    if radar.update():
        Do what we want with the code in here...

    else:
        print('No radar data received.')
It will hold onto that reading until we call the update command again. When the library does this it will also return true if it gets a valid reading, or false if something goes wrong (like if it gets a corrupt UART reading or a wire is loose). In the demo code, we have this command inside an if statement which means it will only do what we nest inside if it gets a valid reading. This is just some nice and condensed error handling - if we got an incomplete reading and tried to print it out, our Pi may crash.
With the information waiting in the library, all we need to do now is grab it and do whatever we need to do with it. The code below demonstrates how we can get data for each of the 3 targets that can be detected. If you try to get information for target 3 in single-target mode, or if it doesn't detect a 3rd person, it will just give you zero for all the data points.
        target1 = radar.get_target(1)
        target2 = radar.get_target(2)
        target3 = radar.get_target(3)
Each target variable now has a few bits of information stored in it with something called a structure. To get the individual bits of information out of it we just need to use a full stop and then the name of the information. Below is an example of printing out all the data points stored in the variables:
        print('1 dist:', target1.distance, 'mm Angle:', target1.angle, " deg Speed:", target1.speed, "cm/s X:", target1.x, "mm Y:", target1.y, "mm")
        print('2 dist:', target2.distance, 'mm Angle:', target2.angle, " deg Speed:", target2.speed, "cm/s X:", target2.x, "mm Y:", target2.y, "mm")
        print('3 dist:', target3.distance, 'mm Angle:', target3.angle, " deg Speed:", target3.speed, "cm/s X:", target3.x, "mm Y:", target3.y, "mm \n")
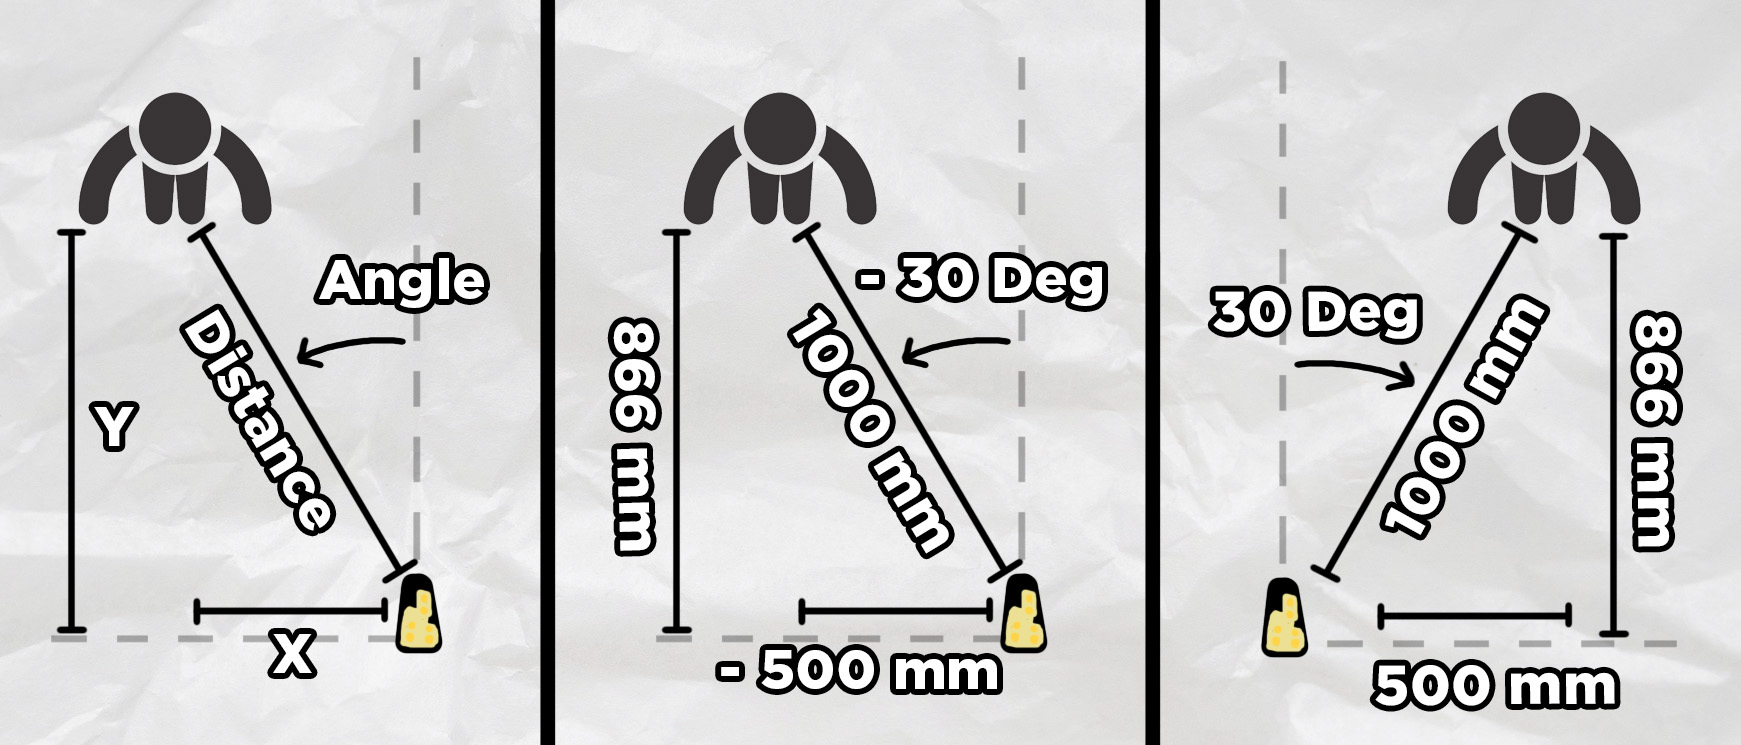
Run that code and you should see all of this data being printed out in the shell. Distance, angle and speed are all pretty straightforward, but the x and y can be a bit tricky. The X-axis is a measurement of how far a person is away from the centre line of the radar, and the Y-axis is a measurement of how far a person is from the parallel of the radar. The image below shows both of these. Also note that both the X-axis measurement and angle have positive and negative values which are also shown in the image below. The maximum angles of this sensor range from -60 degrees to +60 degrees.
Some quick tips on using this in your project:
- This is only set up to detect one person. If you have multiple people in front of the sensor, it will track the person with the strongest return - this is usually the person who is the closest to it.
- If you are going to mount this somewhere to detect people, place it between chest and head height for the best results.
- Radio waves will bounce off surfaces. When testing it, sometimes I was directly behind a sensor yet it was picking up phantom targets several meters away. This was the radar waves bouncing off the wall and seeing me in the reflection like a mirror. If there are random readings it is not a ghost, it is likely picking up a reflection of a person.
- If you are using multiple of these sensors they will interfere. Ensure they are far enough apart from each other so that they don't pick up each other's signals.
Radar Visualisation and Virtual Air-Hockey
With this, you now have everything you need to go out and start applying this sensor in your own projects. However, before we finish let's check out some of the cool things we can do with it. Having a radar sensor that tracks the position of humans is screaming out to have that data visualised in a radar image, like what you think of in a submarine.
Go ahead and open the script called radar_visualisation.py and run it. This script uses Pygame (a really handy inbuilt tool to create visuals and interactive games) to take the information coming from the sensor and library and plot it visually. This is quite a fun thing to play around with, but it's also a handy tool as it helps troubleshoot any issues you are having with the sensor as we humans are better at analysing data in a visual form like this.

With a visualisation of a person being tracked on a 2D plane like above, it is not hard to turn that into some really cool things. For example, if you open up radar_airhockey.py, you will find a script that maps the position of a person being tracked into a game of virtual air hockey. Just a head up, it is a little jank and the AI opponent alternates between being laughably dumb and cheating beyond the laws of physics - it definitely has room for improvement.
The game should work out of the box, but there are a whole heap of settings at the top you may want to tweak, which will change how the game functions. The most important are the lines:
        self.min_play_distance = 1000
        self.max_play_distance = 2500
These set the play zone of your radar by bounding the closest and furthest parts of it.
We aren't going to cover how these 600 lines of code work as this is not a guide on how to use Pygame, but if you do want a breakdown, or you want help in writing your own, large language models like ChatGPT, Claude and Gemini are all able to do so. Much of this code was written with the assistance of models like these.

With that, you are now equipped with everything you need to go out and start applying this in your projects. If you made anything cool with this and you want to share it, or you just need a hand with anything we covered in this guide, feel free to post it on our community forums!
Until next time though, happy making!

