Flawless high-quality audio output on a Raspberry Pi Single Board Computer! All is achieved by the IQaudio DAC+ HAT. This dedicated DAC lets you enjoy high-quality, distortion-free, artifact-free, low noise, and high-bitrate audio playback from your Raspberry Pi single-board computer. A DAC (Digital to Analog Converter) is a device that takes digital audio (like an MP3 or WAV files) and converts it into an analog audio signal that can be readily understood by headphones or external speakers. A HAT is an anagram for Hardware Attached on Top, it refers to boards that easily plug directly on top of and improve the capabilities of the target board.
A Stock Raspberry Pi Single Board Computer has Audio Output that comes out through the Headphone Auxiliary Port or through any of the HDMI Ports (which are visual and audio interfaces). This is perfectly fine for everyday use. However, if you are building a slim device that can deliver immersive media to high-quality speakers or headphones then these two default audio outputs are not up to scratch. That is where the IQaudio DAC+ HAT swoops in for the rescue.
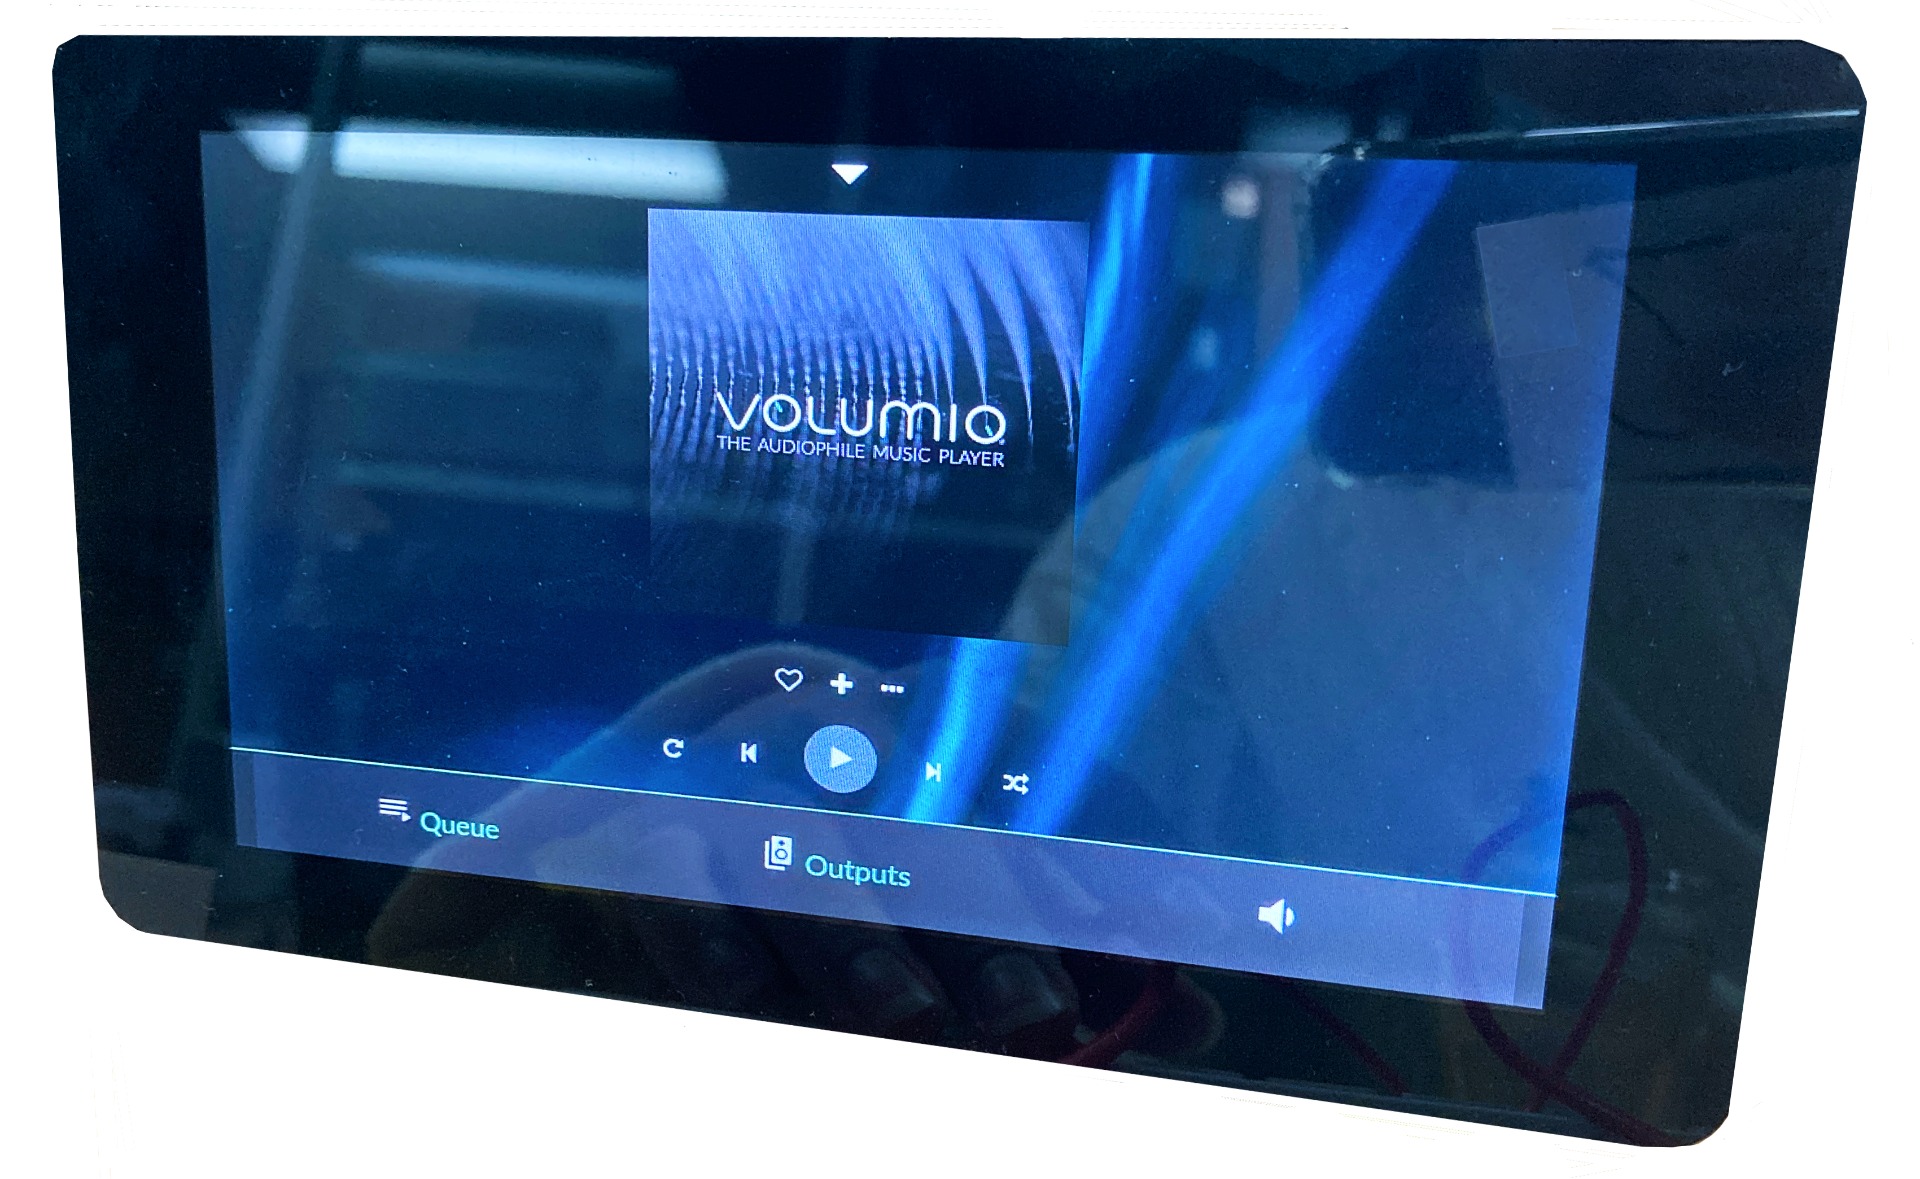
The IQaudio DAC boards (there's more than one type!) are the simplest and Raspberry Pi Foundation Officially Supported way to add crispy, refined, honey-dripped audio to any Pi project. In combination with Volumio, an open-source Audiophile Media Player OS, you can be up and running with a high-quality music playback system really quickly. Volumio officially supports the Official 7 Inch Raspberry Pi Screen, providing a great UI. It also provides remote control through the WIFI and Volumio Phone Application. If you just want to use Raspberry Pi OS with your IQaudio DAC HAT the configuration will be explored here too.
By the end of this guide, you will have all the knowledge to create a near fully open-source IoT Audio Crusher which can take your playlist, scrap all the missing album covers, and fling your favourite beats to your hardest-hitting speakers. Controlled all through your phone or the mounted UI. See below for the contents of this guide.
- What You Need
- Hardware Set-Up
- Raspberry Pi OS Set-Up Process
- Audio Comparison
- Volumio (The Audiophile Music Player for Raspberry Pi) Set-Up Process
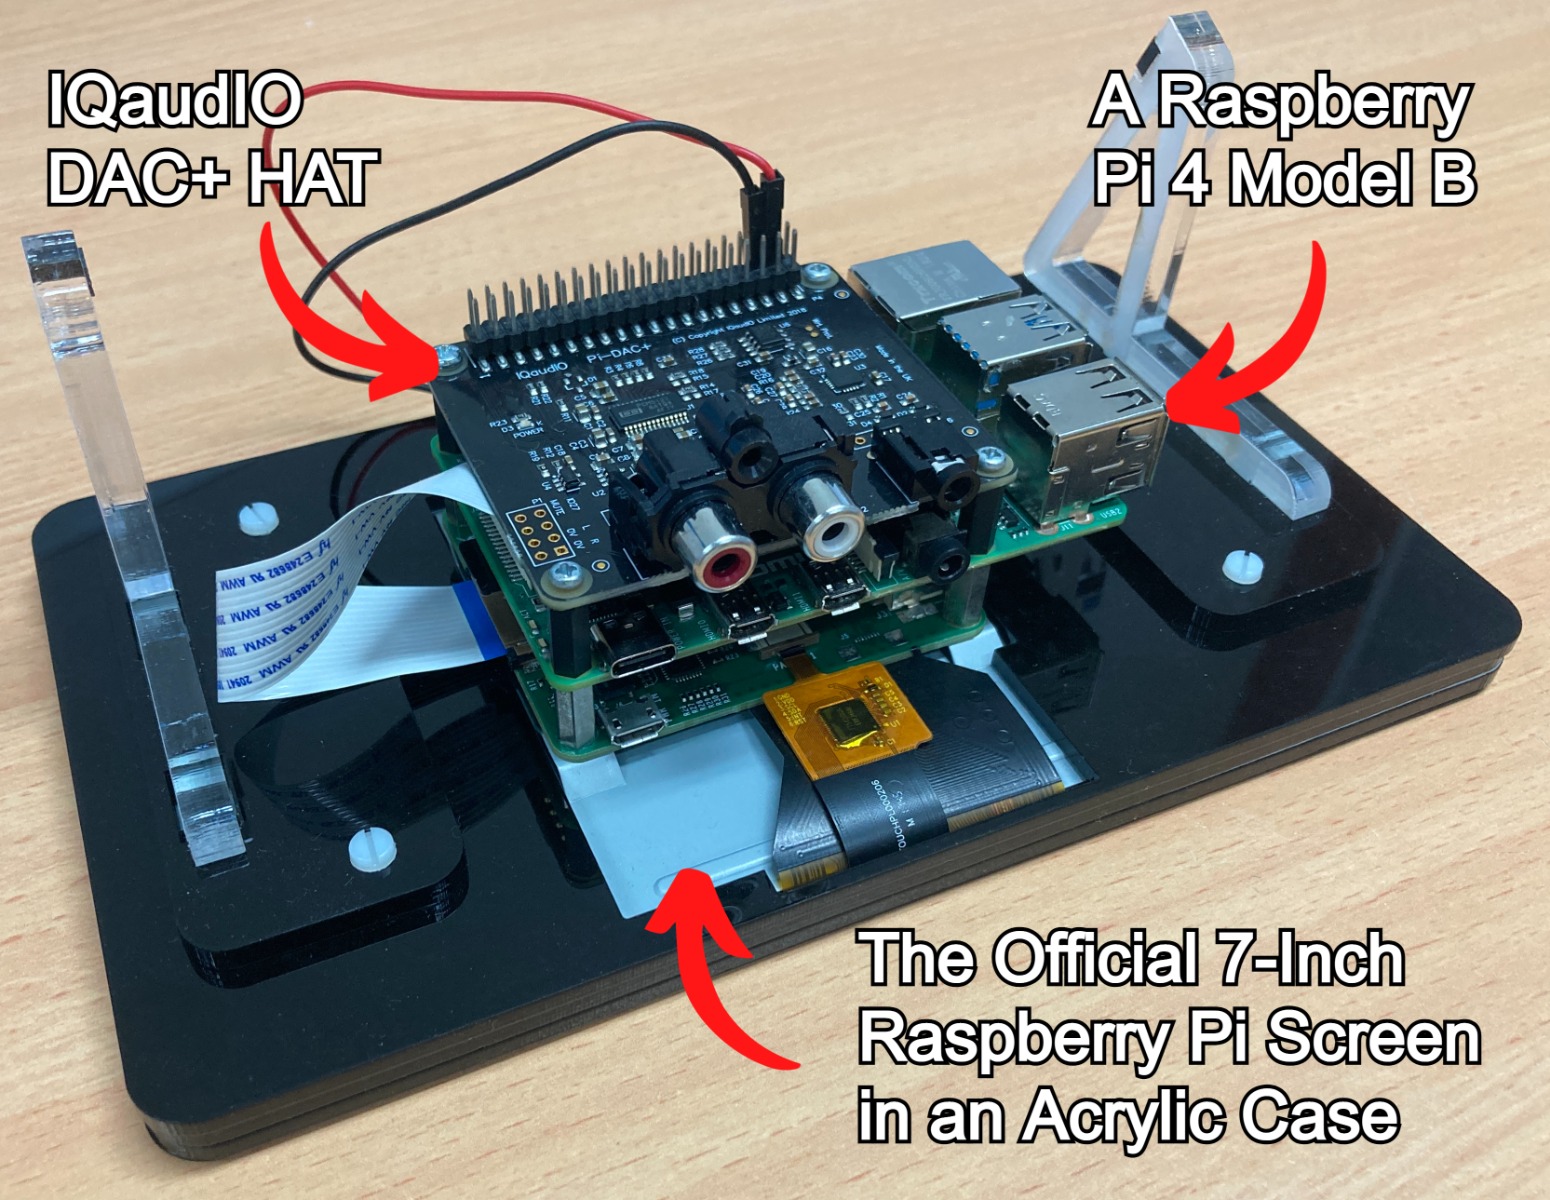
Now not new news to audiophiles, but news to me was that the Raspberry Pi Single Board Computer is referred to as a noisy board. This means unless an external DAC or Amplifier is used the musics you pump through the default audio outputs will have unwanted noise and harmonic distortion responses which can result in audible fuzzy/weird background noises. What it really comes down to is a Raspberry Pi is a digital device, built to send and receive streams of 1s and 0s with voltages that are either all the way on or all the way off. However, headphones and speakers desire a pure analog signal. This is a voltage that is constantly varying in the same shape as the sound waves that the headphones/speaker produce. This analog voltage is best created via an external DAC. See Volumio running on my Phone via the App and direct Volumio UI on a 7-inch screen below left, see the IQaudio DAC+ HAT mounted on a Raspberry Pi 4 Model B below right ready to go (this is hardware is mounted on the back of the 7-inch screen).

IQaudio DAC+ HAT is what I’ll be diving into here but worth noting there are other levels of IQaudIO DAC equipment that will suit whatever Raspberry Pi Board or audio set up that you want precise and clean audio sent to. As always if you have any questions, queries, or things to add please let us know your thoughts!
What You Need
Below is everything you need to set up your Raspberry Pi 4 Model B with the IQaudIO DAC+ HAT.
- A Raspberry Pi Palm-Sized Computer (in my case I have used a Raspberry Pi 4 Model B 2GB but this DAC and Volumio is perfect to be used on earlier Pi's like the Raspberry Pi 3)
- Raspberry Pi IQaudio DAC
- Micro SD Card flashed with Raspberry Pi OS
- Power Supply
- Mouse and Keyboard
Hardware Set-Up
The first natural step is to get all the hardware connected up correctly. The below image has all the hardware that we will assemble to get this system up and running. All the standoffs and screws come with the IQaudio DAC+ HAT. Once we have this all put together we will connect the Raspberry Pi as a desktop computer.

Thus to install this HAT we will follow through with the below image. Blue arrows represent lightly pushing components into each other. Red Arrows indicated fasteners and standoffs to put together. Install the standoffs and push the Micro-SD card which has been flashed with the most recent Raspberry Pi OS into the micro-SD card slot on the Raspberry Pi. Then line up the IQaudio DAC+ HAT with the GPIO pins of the Raspberry Pi Single-Board Computer. Push the two boards gently together until the standoffs take the weight. Then screw in the four screws into the standoffs. This completes the assembly.

From here connect up an HDMI connector to a monitor, a USB mouse, a USB keyboard, and headphones that connect to the Top Audio IQaudio DAC+ HAT Auxilliary Output. Just like a desktop computer. Then plug in the USB-C Charger to the USB-C port of the Raspberry Pi. This will boot the Raspberry Pi.
Configuring Config.txt File When Using Raspberry Pi OS
We are going to fix this by adjusting two settings. No external Terminal Packages are needed!
The goal here is to prevent the two normal audio outputs (the Raspberry Pi Headphone Aux and the HDMI audio) from being active by the Raspberry Pi. For those who aren't in the know, HDMI cords are not just for video interfacing but also for audio. You may note that on the back of a lot of modern monitors a headphone aux input. That HDMI cord is thus transporting both video and audio data.
Now with Raspberry Pi OS, the Raspberry Pi will always want to connect/preference these two options before choosing the IQaudio DAC. Thus the simplest way to get sound out is to completely disable the normal audio outputs. Now to do this we will add some changes to the | Config.txt | file. This will go through the process assuming you have powered up the Raspberry Pi so that the setup is ready to use (with all the connections needed for it to run as a Desktop computer connected).
To make your IQaudio sound card the primary audio device in Raspberry Pi OS, start by opening up a new terminal window using the big black button on the top left of the screen. With that open, your screen will look like the below-left image. Type and enter the following two lines which will then look like the below right image as soon as you press enter. Once you see that blue text it means you have accessed the | Config.txt | file.
cd /boot
sudo nano config.txt

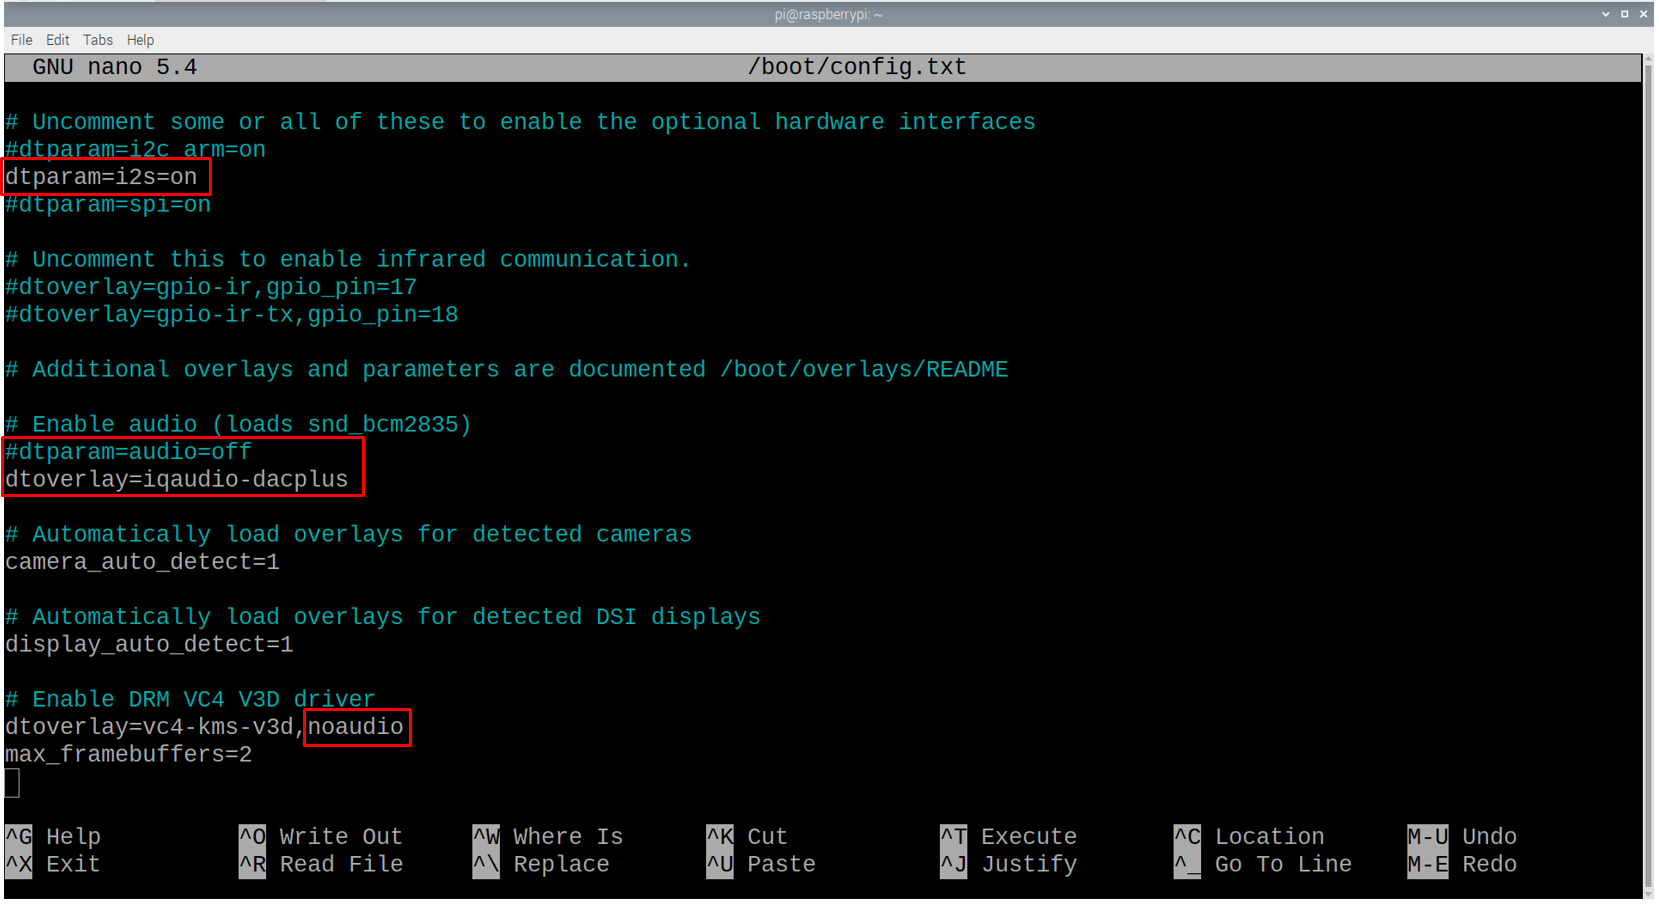
Navigate using the arrow keys on your keyboard and scroll lower until you have the line | # Uncomment some or all of these to enable the optional hardware interfaces | is at the top of your screen. At this point using the image below as a guide for what you want the settings to look like, with the red boxes representing the changes that need to be made.
- First, uncomment (by removing the # symbol) in front of the |dtparam=i2s=on |. Integrated Inter-IC Sound Bus (I2S) is the method of communication (serial bus interface) between the Raspberry Pi and the IQaudIO DAC+ HAT.
- Secondly, comment or remove the line | dtparam=audio=off |. Then underneath type | dtoverlay=iqaudio-dacplus |. This has disabled the normal auxiliary cord and added the specific driver for the IQaudIO DAC+ HAT. As it is officially supported we don't need to download any packages, they come installed to Raspberry Pi OS by default. Also if a slightly different IQaudIO DAC is used make sure to type the correct driver (refer to the chart at the bottom of this section)
- Thirdly, adjust the line | dtoverlay = vc4-kms-v3d | to | dtoverlay = vc4-kms-v3d,noaudio |. Doing this will completely prevent any HDMI connection from transmitting sound output.
Having made those changes press Ctrl-X, Y, and then Enter Key to save these changes. Then reboot your system.
If you are not using the IQaudIO DAC+ HAT but instead using a slightly different variant below is a table showing what you would type in instead of |dtoverlay=iqaudio-dacplus| to activate the correct driver for your system.

Quick Troubleshooting section: If after the reboot your system isn't playing sound out of any of the connectors of the IQaudIO DAC + HAT type each of the below lines in a new terminal window to triple-check that all the drivers are there and that you have the most up to date version of Raspberry Pi OS. Having typed these in reboot your Raspberry Pi system.
sudo rpi-update
sudo apt-get update
sudo apt-get dist-upgrade
Audio Comparison
This DAC really works. Let me show you and unpack the data that proves exactly this. First, allow me to provide some context. We will use a windows software called Audacity. This is a free and open-source digital audio editor and recording application software. In this software, we created a 10-second Waveform Audio File (WAV or .wav file) which will be referred to here as the Fundamental Frequency. This file format was used (instead of a format like MP3) as WAV it is a compressionless file format. Now, this 10-second file has two 5 second segments. The first segment is a 1kHZ Sine Wave, or pure tone. The second segment is a 10Hz to 20kHz Frequency Sweep (logarithmic) or Chirp Signal - one which slowly increases in pitch. The range values are chosen as it covers the entire perceptible audio frequency, it has a logarithmic time scale which results in each octave taking the same amount of time, otherwise, earlier octaves (. As this 10 second sound file was created in Audacity this is an IDEAL waveform. We can confirm this using the Audacity software by switching to Spectrogram Viewing Mode and looking at the spectrum. A spectrogram is a visual way of representing the signal strength, or overall loudness, of a signal over time at various frequencies present in a particular waveform.
This 10 Second waveform was then taken via USB and put onto two separate Raspberry Pi 4 Model B single-board computers. One board was stock and the other had the IQaudio DAC+ installed and operational. The audio data was taken from the Auxillary connection from the default set-up Pi Auxillary Port and from the Pi with the DAC HAT Auxillary Port and fed directly into the Direct Line in of my Windows Computer. The 10 Second waveform was then played and the output was recorded in Audacity on the Windows computer. This then provides information on exactly how the default Raspberry Pi 4 Model B Audio Output compared to the DAC+ output represents the desired IDEAL waveform. It is true that there will be some noise introduced by the Windows computer's Sound Card but the results stand on their two feet regardless. See below for the two Raspberry Pi's set-up about to run the experiment.

After this, the following results were gained and displayed below in the image with the Spectrogram being the main focus. From this, you can visually at a glance see a large improvement in accurate sound reproduction when utilising the IQaudio DAC+ HAT instead of not using it. The Overall Darker hues of the Default Raspberry Pi Audio Output from the Auxilary Port Spectrogram means more noise is being transmitted. Also, the Dark Lines (distortion products) that mimick the fundamental frequency are the result of harmonic distortion. This results in extra noises that will be reproduced by your Audio Output device (speaker or headphones) in a frequency that is a positive integer multiple of the fundamental frequency. The IQaudio DAC+ HAT produced less harmonic distortion products and a lower noise level which is visually identifiable from the results of this test. Thus better and more accurate sound representation is achieved through the IQaudio DAC+ HAT (as it should be).

This is not the only information that we can glean from this experiment. We can dive deeper into the harmonics by focusing on just the first 5 Seconds of the Audio Track and then produce a Frequency Analysis Graph of both Raspberry Pi Systems. This can be seen in the image below, I will provide the actual Audacity files of the captured and created data at the bottom of this article. From that, you can obtain real quantitative data but for the purposes here the visual difference observable between the two Raspberry Pi systems (in combination with Audio Samples that can be heard in the video) are enough.

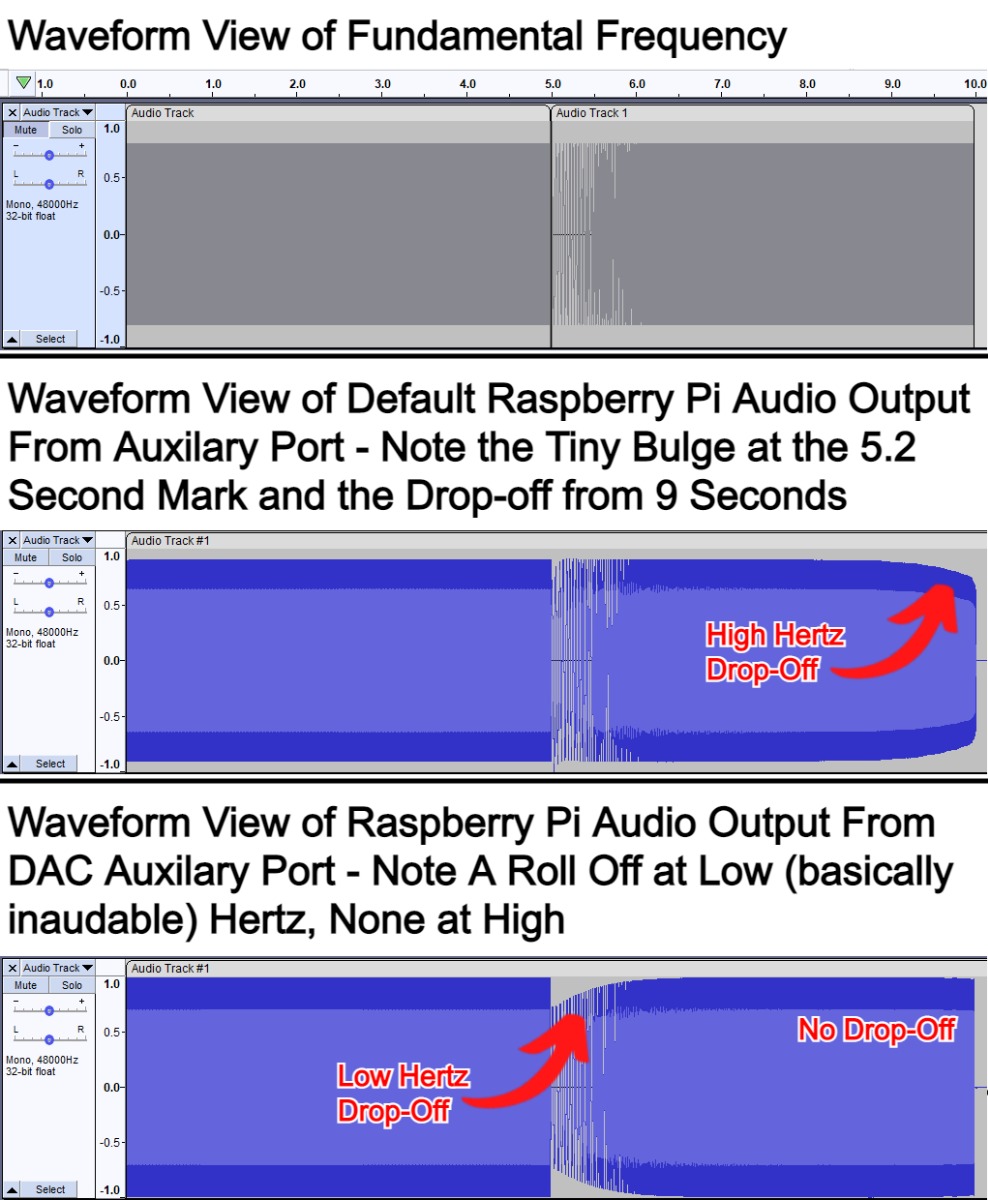
Frequency Response can also be determined from our collected data by aiming our attention at the Second (Logarithmic ) Section of the Fundamental Frequency and looking at the Waveform view of the Data. Below is an image showing exactly that for the Fundamental Frequency and the two output sources. You can also see a tiny over buldge at the very low frequency (around 5.2 Second Mark) and a drop off at the high frequency (from around 9 Second Mark) in the default Raspberry Pi. Keep in mind that this error is very small in audio terms. The other factor to note is that the DAC+ Output has a roll-off at low frequencies. These differences are not enough to be audible. Honestly, both waveforms are very flat, the real difference comes from the noise and distortion seen in previous images. It is possible by zooming in close to where the frequency is changing from one to another. Doing so it can be seen that the Output from the IQaudIO DAC+ HAT has a better (Quicker) Transient Response.
It is also worth noting we are not looking at a ‘Loaded up System’. If it has another Audio Output inserted simultaneously this would dramatically change the system response. We can go deeper into comparing the two sources (and if you want to the data can be downloaded from below) however for this article this comparison is sufficient to demonstrate visually the improvements gained when using the IQaudIO DAC+ HAT with your Raspberry Pi 4 Model B (particularly in regards to minimising noise and distortion).
Download the data by using this link!
Volumio (The Audiophile Music Player for Raspberry Pi) Set-Up Process
Volumio is much like KODI- Can scrap information and do everything that you'd want. There is a paid version (with extra features) but everything shown here will be in the Free, Italian-made, open-source version.
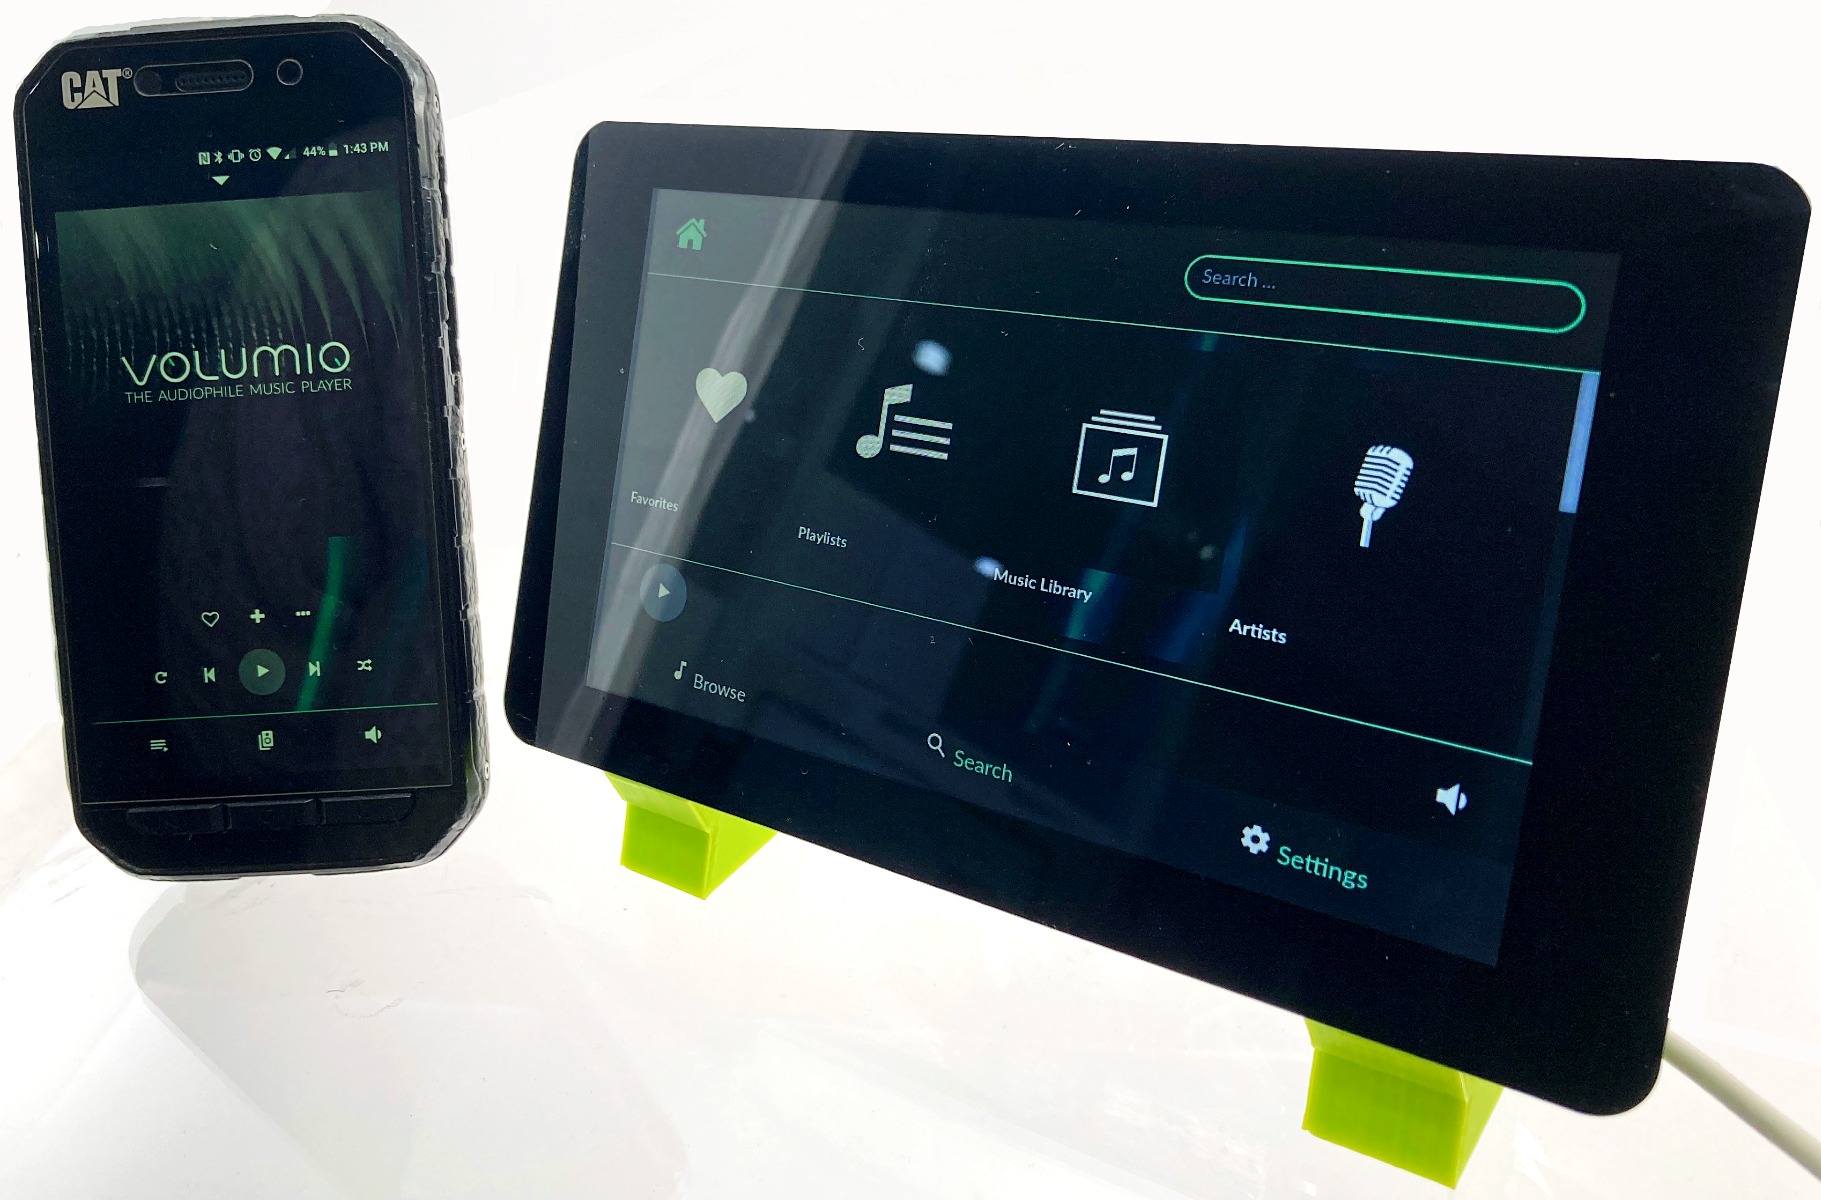
The goal here is to have a system that can be controlled fully through WIFI through a phone app or any computer attached to the network. This as well as being able to control the media playing Raspberry Pi directly using the Raspberry Pi Official 7 Inch display for some elegant UI. The entire setup will look like the image below.
I have collaborated a number of links together to make the whole installation process faster. The important links to keep track of are as follows:
- Volumio Home Page
- Volumio on Google App Store (for Andriod Phones)
- Volumio on Apple App Store (for Apple Phone)
- Volumio Github (Check out all that Open-Source Code)
- Volumio Plugins GitHub (Showing the potential added functionality and Touch Display UI Plugin)
- Volumio Account Sign Up Page (Needed for Plugins)
- Volumio Quick Start Guide (Broad Overview - in case I miss something here)
Now to start go through the process of flashing a Micro-SD with the Volumio OS using the Official Raspberry Pi Imager. Stick your Micro-SD into a computer and download the Raspberry Pi Imager software if you need. Check the image below for a step-by-step of using this imager to flash Volumio to a Micro-SD.

Having done that insert your newly flashed Micro-SD into a Raspberry Pi with the IQaudIO DAC+ HAT installed and turn on the power. The Raspberry Pi 4 Model B I have here I have also installed to the Official 7-inch Screen. This screen will become our direct UI control. Use this guide here to get up to speed on how to assemble the 7-Inch Screen Hardware. You can see this triple stack in the image below.
Having done the screen will boot up to the terminal and request a user name and password. The username is | volumio | and the Password is | volumio |. You won't be able to see the letters getting typed into the screen as it will be invisible. After you have typed one press enter on your keyboard to lock it in. Look at the image below to see this happening in the image below (you will also notice some excellent ASCII art, you know you're dealing with pros when you see that).

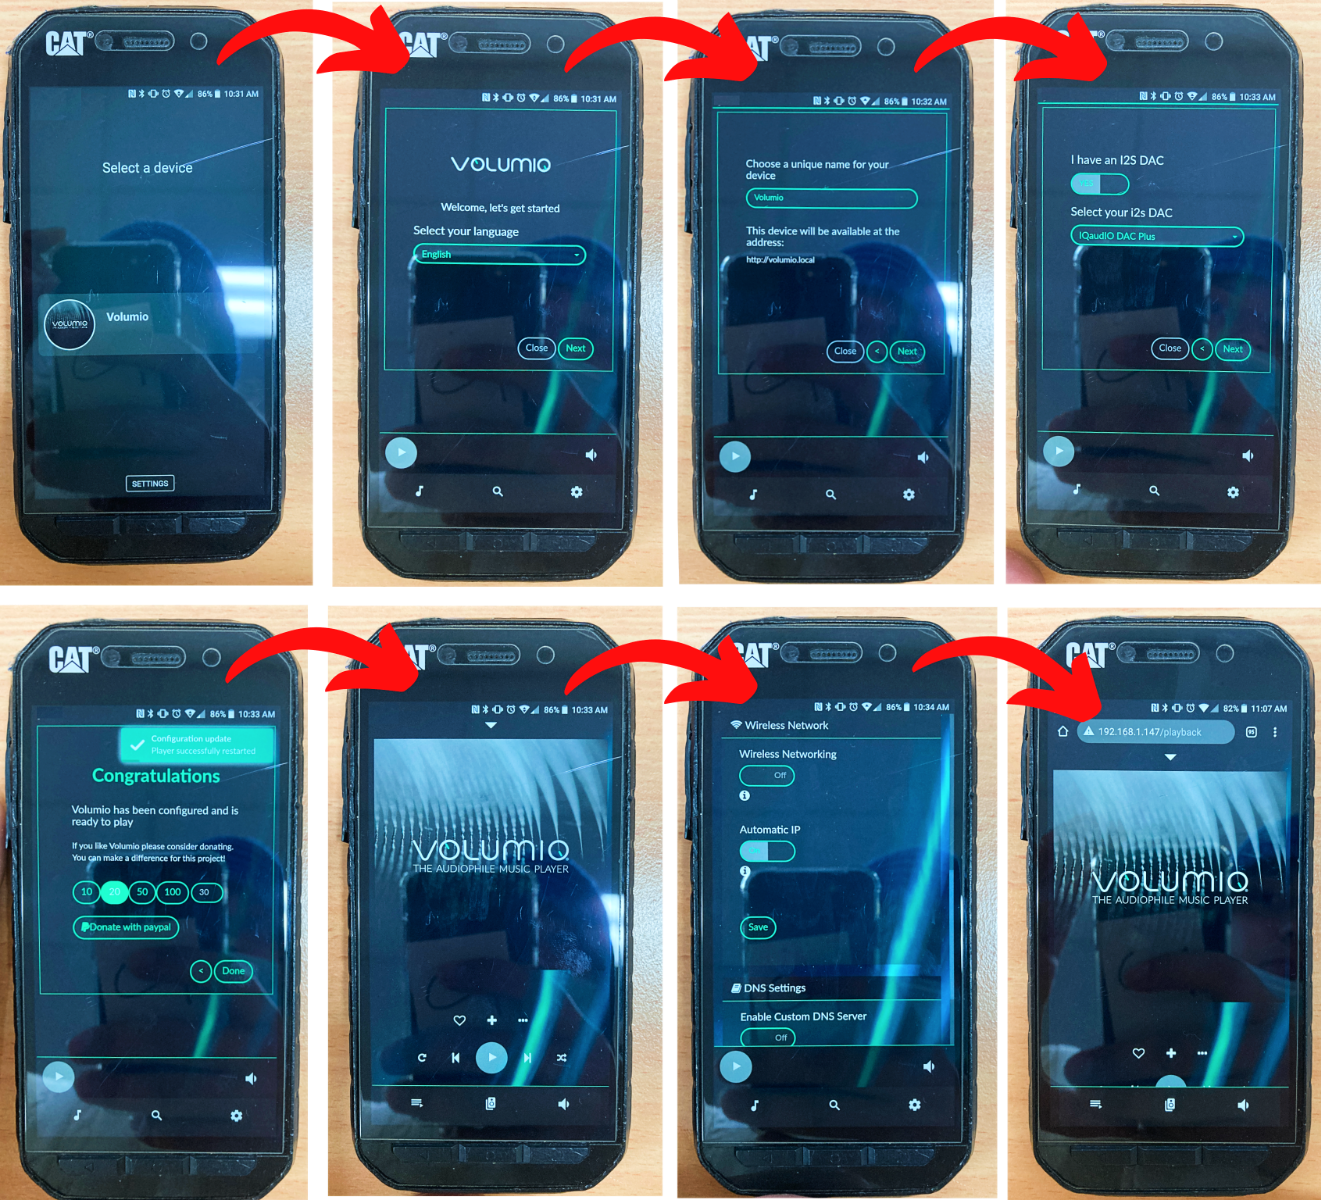
The goal here is to provide initial set up details and the WIFI internet details to the system. I found providing WIFI details the easiest to do by directly connecting an Ethernet Cord to the system and putting in the settings via the Internet Browser on a locally connected Device (Computer or Phone). First let's pull out our Phone (which has the Volumio App and is connected to the same internet connection as the Raspberry Pi). As soon as you open this APP it will search and identify devices on your local network that have Volumio running currently. Then it is a simple matter of telling it what language you prefer, creating a suitable name for your system and telling it what DAC you are using (IQaudIO DAC+ naturally). Setting up the DAC this way is much easier than using Raspberry Pi OS. You will also be able to provide WIFI details in the Wireless Network Setting Menu. Also be aware you can also use a browser (like Chrome or Firefox) to do this, just use your Raspberry Pi's IP Address as the URL. As you can see from the above image my devices IP address was 127.0.0.1. See all this occurring in the image below.
Now with that complete you can use your same network connected Phone or Computer to play music just like that! But the Official 7-Inch Screen will still be in terminal mode. To make the 7-Inch Screen be a beautiful User Interface, that we can directly control our music media, we will need to install a Plugin. To install Plugins to our Volumio set-up we will need to create a (free) account with Volumio. Do this at this location (everything we want to do here can be done with the Free Version) and having done so you will have a screen that looks a lot like the below image.

Then we can bounce back to the App on our Phone or any Computer Desktop Browser (so long as it is connected to the local network) and sign in to the App with our created account. This then activates MyVolumio on the Raspberry Pi Device. Thus we can now download Plugins. Click on the Plugin section and find Touch Display. Choose Install which will start the installation straight away. You can also install any of the other plugins that you desire (like Radio, Bandcamp, Youtube Cast Reciever, or Soundcloud). Then Click on plugins management and turn the Touch Display switch to On. You can see this all happening in the image below.

Having done so keep your eyes peeled on that Official 7-Inch Screen. It should now restart itself and then welcome you with a full operation UI system to control your Volumio running Raspberry Pi Directly. See this in the image below. Now there is a huge amount you can do from here. Scrapping Album covers and information is very possible using Volumio. So is connecting it to an apex audiophile system (or just some cozy headphones) and having a vastly connected way to play your favorite audio media, all open-source. I do hope you go off, have some dance parties, and have some great fun with it.