SSDs on the Raspberry Pi are not new. For many years now people have been enjoying NVME speeds on Raspberry Pis through the use of NVMe-to-USB adapters. But long gone are the days of annoying adapters flopping around and occupying a precious USB port with the release of the Raspberry Pi 5. The Pi 5 brought a long-awaited PCIE slot, opening up the possibilities of connecting M.2 devices directly to the board through the use of the official Raspberry Pi 5 M.2 HAT (Hardware Attached on Top).
This M.2 PCIE HAT can be used for many things (even connecting a GPU to it), but the most common application will be booting the Pi 5 off an NVME SSD. As we will see in this guide, booting the Pi 5 with an NVME HAT provides us with an astounding boost in read and write speeds, as well as providing a nice and compact form factor for it all.
In this guide, we will be covering:
What You Will Need
- Raspberry Pi 5 - Any sized GB model will work.
- Raspberry Pi 5 M.2 HAT+ - We are using the Official Raspberry Pi HAT, but other NVME HATs should follow a similar process.
- NVME SSD - For the M-key HAT, it will either need to be a 2230 or 2242-sized NVME. We have seen some compatibility issues with certain SSDs having issues ranging from flat-out not working to inconsistent read and write speeds. Here is an SSD that we know works, and if you want to try another one, head on over to the "Choosing an SSD" tab where we have some more resources.
- Micro SD Card - If you have a USB to NVME adapter, this is not needed. If you don't have an adapter, you will need to temporarily use a micro SD card to install the OS onto the NVME. This card doesn't have to be fast, it just has to be 16 GB or larger and is not needed after installing the OS onto the NVME. We will also need a way to plug the micro SD card into your computer.
And we will also need peripherals to use the Pi itself:
- A USB Mouse and Keyboard.
- A Micro-HDMI to HDMI Cable to connect it to a monitor.
- And an adequate power supply.

First and foremost, ensure you are using an M.2 NVME SSD, NOT AN M.2 SATA SSD, they are different drives. Also, ensure that it is a 2230 or 2242-sized SSD.
We have tested the Corsair MP600 MICRO with great success if you are looking for an SSD known to work.
From our community, we have seen reports of the following SSDs being successfully booted from:
- Sabrent SB-2130-256
We have also seen a variety of reports of these SSDs working on other branded M.2 HATs that take 2230 and 2242-sized NVMEs. While they aren't 100% guaranteed to work on the official M.2 HAT, they should be a safe bet. We sourced these from tests submitted to PiBenchmarks.
- Western Digital SN740
- Samsung PM991 M.2 NVMe
- Micron 2400 Series
- Micron 2450 Series
- Toshiba BG4 M.2 Series
- SKHynix BC711 M.2 NVMe
- SSSTC CL4
Connecting the HAT and SSD
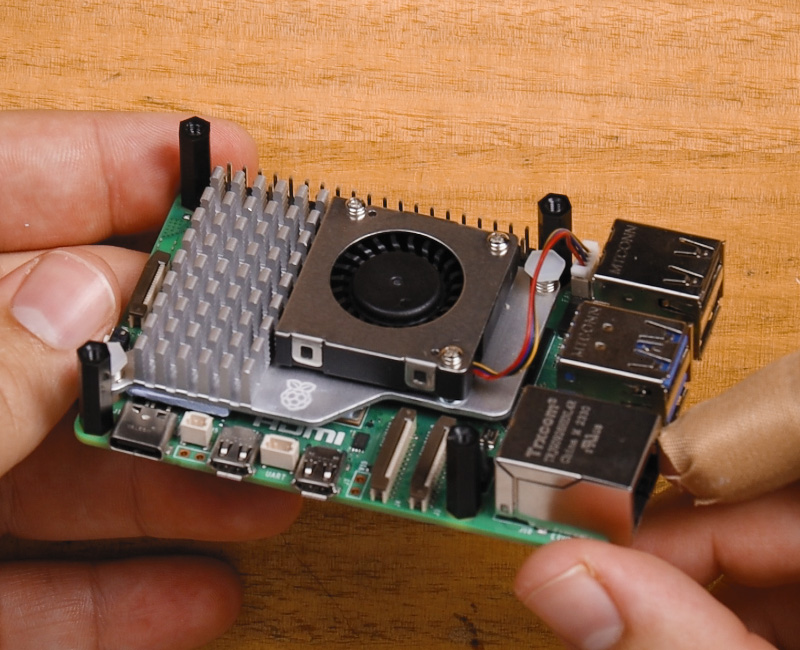
The M.2 HAT is incredibly easy to install, but can be a little finnicky. We found the easiest method was to first install the standoffs onto the Pi 5.
Then connect the ribbon cable by first lifting the Pi 5's connector head.
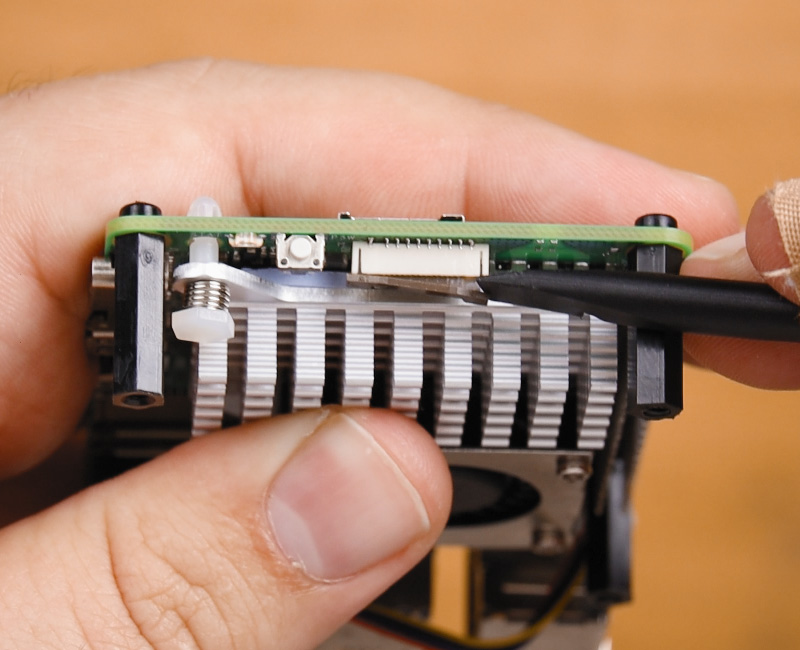
Then inserting the ribbon cabble and pushing the head back down to lock it in place.

Ribbon cables like these can be fragile, so avoid tearing it and bending it too much.

Then screw the HAT to the standoffs.

Insert the NVME into the top of the HAT, ensuring that you come in at about a 30 degree angle like in the picture.

And finally fastening the NVME down with the small silver hold screw.
All finished!

Installing Pi OS From Scratch
If you happen to have an NVME to USB adapter lying around, this step is incredibly easy. You can just plug your SSD into your computer and install it with the Pi OS Imager like you would a micro SD card.
For those of us who don't have one, we will have to follow another process, it's not difficult, it just has more steps. We will need to install Pi OS onto a micro SD card. Then we will boot into Pi OS on the Pi 5 (on the micro SD), and then use the Pi OS imager (on the Pi 5) to install the OS onto the NVME drive.
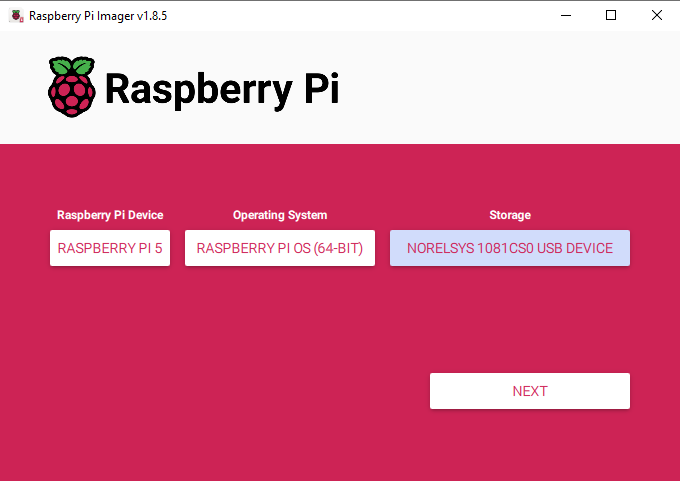
To start, ensure that you have the Raspberry Pi Imager installed, and the micro SD card plugged into your computer. Then in the imager, we will select the Pi 5 as the device, Raspberry Pi OS (64-bit) as our operating system, and the plugged-in micro SD card as our storage device.
NOTE: INSTALLING PI OS ONTO THE MICROSD CARD WILL WIPE ALL DATA ON IT.
Once the installation is finished, insert the SD card into your Pi 5, and power on your Pi 5 with a keyboard, mouse and monitor. You will be greeted by a first-time setup and you can breeze through this as we will not be using this installation of Pi OS on the SD card. Just ensure that the Pi is connected to the internet.
Once you are in a desktop environment head on over to the Raspberry Pi Imager, it comes pre-installed with Pi OS. You can check if your NVME drive is correctly installed as you should be able to should see it listed under storage devices.
If your device is not being correctly recognised, double-check the ribbon cable connection (replug it in), and check that your system is up to date. This can be done in the terminal with:
sudo apt-get update
sudo apt-get upgrade

Now we just repeat the same process to install the Pi OS onto the NVME drive. Select Pi 5 as the Device, Raspberry Pi OS (64-bit) as the operating system and the SSD as the storage.
After it has finished installing, our NVME is now ready to go. But we have one more helpful step left and that is changing the boot order.

Alternative: Cloning an Existing OS
If you have an existing image of Pi OS that you want to keep using (it must be Bookworm or newer), we also have the option to clone an existing installation over to the NVME instead of performing a clean install.
The process is also incredibly easy and can be done through the SD Card Copier that comes pre-installed with Pi OS. Just ensure you select to copy from your existing installation to the NVME SSD.

Selecting Boot Order
The NVME is now able to be booted from, but it isn't first in the boot order. The Pi will try to boot from the Micro SD card first, then the NVME drive. If you don't have a bootable micro SD card plugged in then this won't be an issue, but it is simple to change this boot order setting.
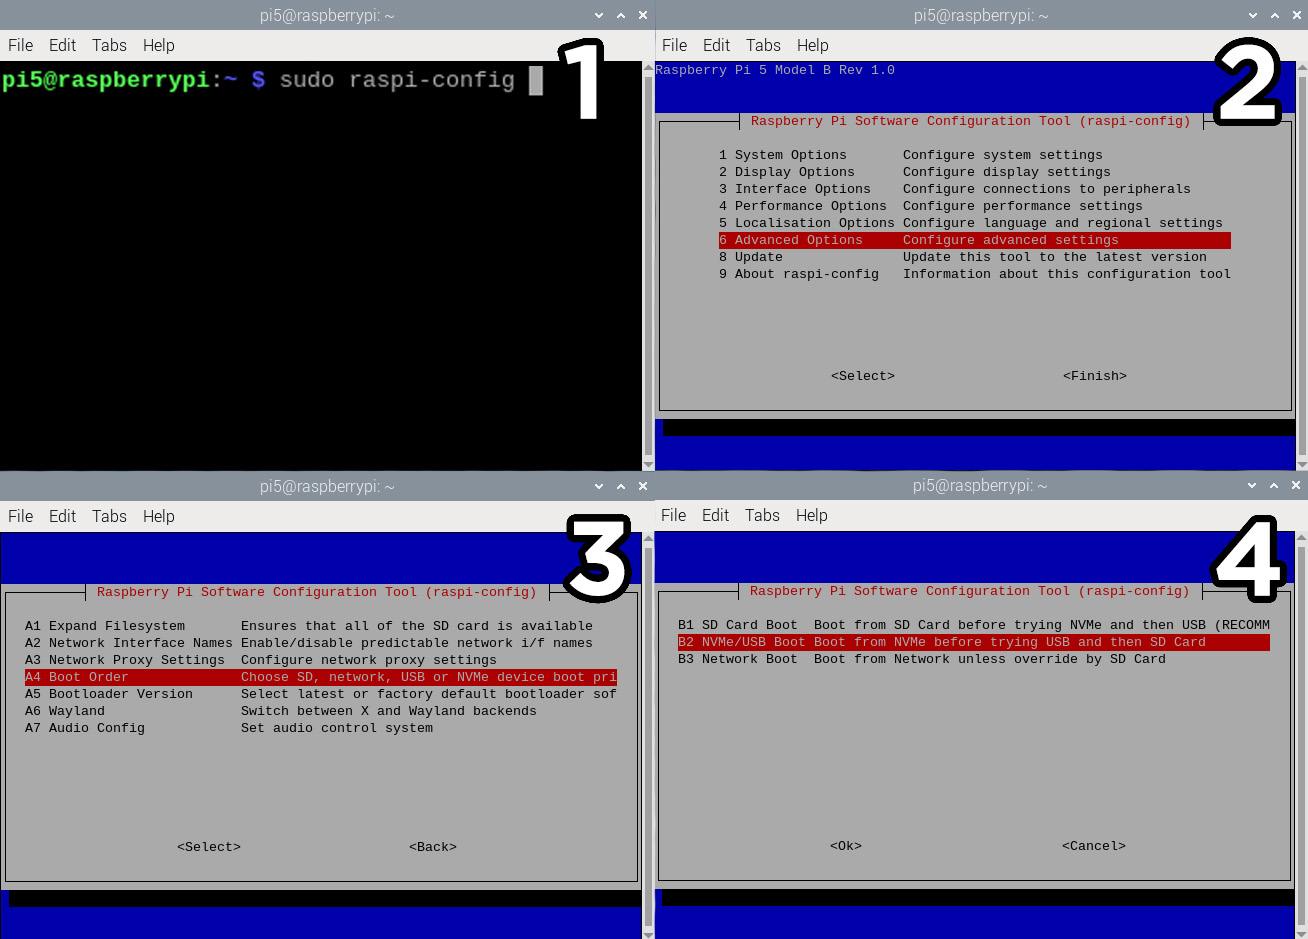
To change the boot order open the raspi-config tool, this can be done in a terminal window by punching in:
sudo raspi-config
Then use the arrow keys to navigate to Advanced Options > Boot Order and then select NVME/USB Boot. The terminal will throw a few lines of code as it makes this change to the Pi's firmware.
You may run into this EEPROM error while trying to set the boot order. This can be fixed in the same menu by navigating to Advanced Options > Bootloader Version and selecting "E1 Latest". This will update the Pi 5's bootloader to the newest version and after restarting, you should now be able to set the boot order.

After rebooting, you should be now in Pi OS on the NVME, and if you have just freshly installed it you will be greeted with the first-time setup.
If you are ever unsure which drive you are booted off, you can always check by opening the terminal and typing in:
df /boot -h
If it starts with "mmcblk", you are booting off an SD card, and an NVME will start with "nvme".
Congratulations, you have now fully set up your NVME SSD with the Pi HAT!

Optional: Enabling Gen 3 PCIE
By default, the Pi 5 has its PCIE set to Gen 2 speeds, but it is possible to set it to Gen 3 speeds, theoretically doubling the maximum read and write speeds of our NVME.
There is a word of warning here. Although it is possible to enable Gen 3 speeds, it is not officially supported as the Pi 5's PCIE is only certified to Gen 2 speeds. Higher frequencies used when Gen 3 speeds are enabled can lead to stability issues. On top of that, the speeds capable through Gen 2 are usually fast enough and the Pi 5 will often be the bottleneck for applications, not the read and write speeds of the drive.
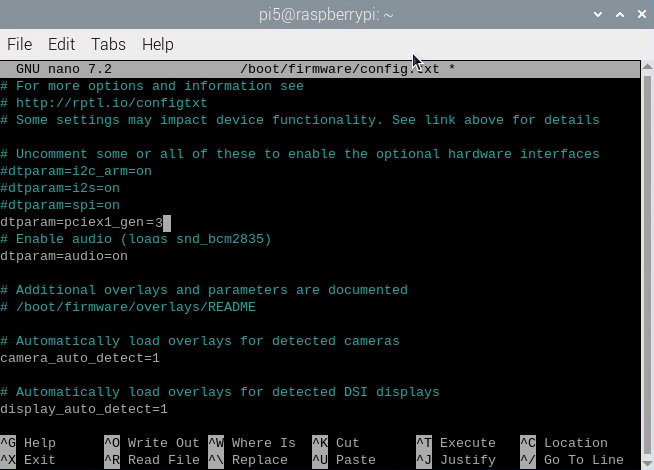
But for those of you wanting to try it, it is easy to enable in the config file. To do so, open a terminal window and punch in:
sudo nano /boot/firmware/config.txt
Then insert in the config file:
dtparam=pciex1_gen=3
Reboot the Pi 5, and you should now be seeing the increased speeds.
Benchmarks
To see the gains in using the M.2 HAT, we put the micro SD card and NVME SSD (in Gen 3 and Gen 2 speeds) head to head in some benchmarks. Feel free to benchmark along with your NVME to see how it compares!
Starting with sequential read speeds which we started by installing hdparm with:
sudo apt update
sudo apt install hdparm
And then running the benchmark with:
sudo hdparm -t /dev/nvme0n1

To perform our sequential write tests, we simply ran dd by first navigating to a directory:
cd /tmp
And then running the write tests with:
dd if=/dev/zero of=testfile bs=8k count=50k conv=fdatasync
From our sequential read/write speeds we can see about a 5x increase in storage speeds with the NVME at Gen 2. This is a very welcomed boost in speed as even with the Pi 5's increase in micro SD speeds, its slow read and write speeds are often a limiting factor.
Although we do see nearly a doubling in speed by running the NVME in Gen 3 mode, pure sequential speeds like these are uncommonly used in day-to-day tasks.

To benchmark our 4K random read and write speeds we installed iozone with:
sudo apt update
sudo apt install -y iozone3
And we ran the test with:
iozone -e -I -a -s 100M -r 4k -i 0 -i 1 -i 2 -f /tmp/iozone_testfile
In these tests, we can see an even greater boost in speed over the SD card, with our Gen 2 speeds being roughly 15 times quicker. Gen 3 speeds are also a little bit quicker, but much less of an increase than sequential speeds. These 4k random tests are more indicative of storage performance seen in general day-to-day tasks.


