This guide will help you get started with a PiicoDev® Magnetometer - get it working as a compass, and read the magnetic field strength of a nearby magnet.
This guide is for the current revision of the PiicoDev Magnetometer, featuring the MMC5603. All of the video content is still relevant for both revisions.
For more information on the differences, select the "Check Revision" tab
To get started - select your dev. board below.
We have tried our hardest to make it a drop-in replacement, the measurement directions and code should work in place of the previous Magnetometer featuring the QMC6310,
The biggest change is to the main IC being used, the previous revision features the QMC6310, while the current revision features the MMC5603.

Hardware and Connections
To follow along, it's best to have:
- A Raspberry Pi Pico with pins soldered (pointing down)
- A PiicoDev Magnetometer MMC5603
- A PiicoDev Expansion Board for Raspberry Pi Pico
- A PiicoDev Cable - longer cables are useful to keep your Magnetometer away from magnetic interference.
- (Optional) A magnetic compass - to compare measured headings.
- (Optional) A PiicoDev platform helps secure everything together.
- (Optional) A magnet
- (Optional) A PiicoDev OLED Module and additional cable for the final project.
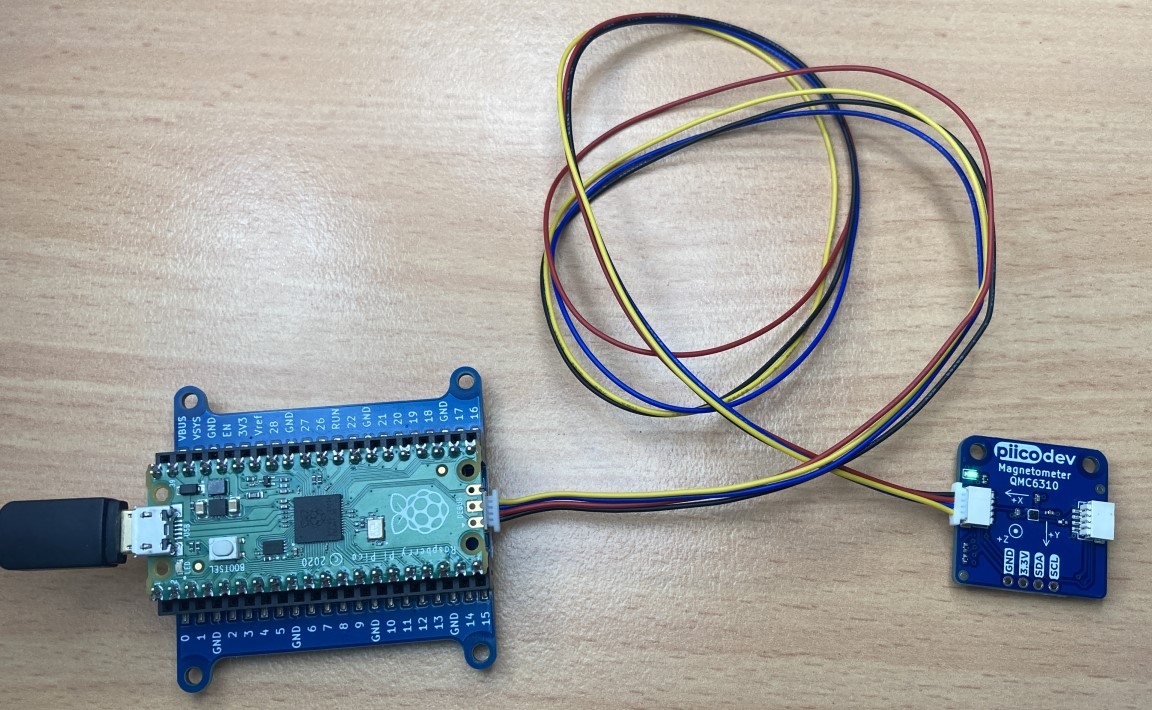
Plug your Pico into the expansion board. Make sure it is plugged in the correct orientation - Pin 0 on the expansion board should be to the left of the Pico's USB connector.
If you're unfamiliar with connecting PiicoDev modules, read the PiicoDev Connection Guide before proceeding.
To follow along, it's best to have:
- A Raspberry Pi (model 3, 4, Zero W) This tutorial will use a Raspberry Pi 4, Model B
- A PiicoDev Adapter for Raspberry Pi
- A PiicoDev Magnetometer QMC6310
- A PiicoDev Cable - longer cables are useful to keep your Magnetometer away from magnetic interference.
- (Optional) A magnetic compass - to compare measured headings.
- (Optional) A PiicoDev platform helps secure everything together.
- (Optional) A magnet
- (Optional) A PiicoDev OLED Module and additional cable for the final project.
Mount the PiicoDev® Adapter on your Raspberry Pi and plug connect your Magnetometer to the Adapter via the PiicoDev cable.
The adapter connects to the 40-pin GPIO header on the Raspberry Pi - ensure the header is mounted correctly, with the "Ethernet" label on the same side as the Pi's ethernet adapter (for a Pi 4. On a Pi 3 this will be the USB connector).

Pictured above: A Raspberry Pi 4 Model B with USB Power and HDMI (two white leads). The PiicoDev Adapter is placed on the 40-pin header, and connects to the weather sensor with a PiicoDev Cable.
To follow along, it's best to have:
- A MicroBit V2
- A PiicoDev Magnetometer QMC6310
- A PiicoDev Adapter for MicroBit
- A PiicoDev Cable - longer cables are useful to keep your Magnetometer away from magnetic interference.
- (Optional) A magnetic compass - to compare measured headings.
- (Optional) A PiicoDev platform helps secure everything together.
- (Optional) A magnet
- (Optional) A PiicoDev OLED Module and additional cable for the final project.
Plug your micro:bit into the Adapter - make sure the buttons are facing up, as shown in the picture below. Connect your magnetometer to the Adapter via the PiicoDev cable, and finally connect your micro:bit to your computer with a USB lead.
If you're unfamiliar with connecting PiicoDev modules, read the PiicoDev Connection Guide before proceeding.

Setup Thonny
Select your dev board from the tabs above to get ready for programming with Thonny for the first time.
If you have already programmed with PiicoDev modules before, there's probably no need to follow these steps again.
Let's get set up with scripting in Thonny for the Raspberry Pi Pico.
We'll install Thonny, configure for Pico and write our first script. To follow along you'll need:
Install Thonny
If you're working on a Raspberry Pi 4, you're in luck - Thonny comes pre-installed. For those on another operating system, download Thonny here and run the installer.
Once the installer finishes, run Thonny.
Set up Thonny
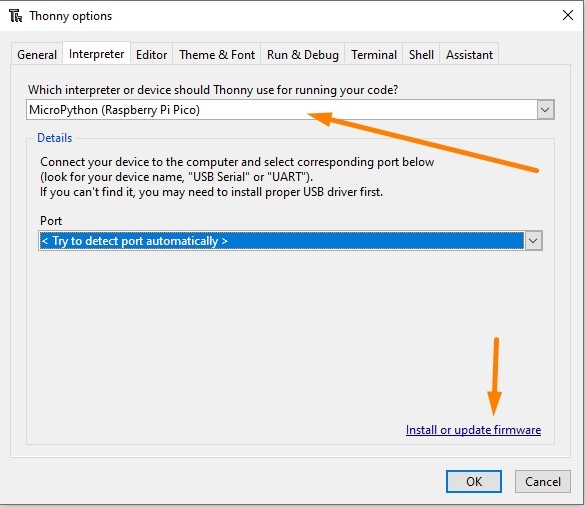
Hold the BOOTSEL button on your Pico, and connect your Pico to your computer via USB.
Go to Run > Select interpreter and choose MicroPython (Raspberry Pi Pico).
It's also a good idea to install or update firmware. This will update your Pico with the latest version of MicroPython, or install MicroPython if it wasn't already.
REPL interface (Shell)
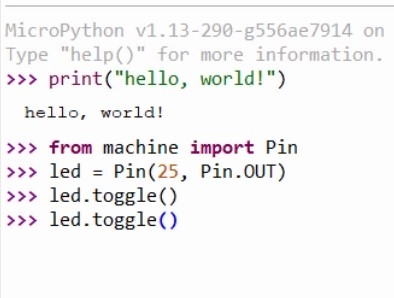
We can immediately start executing code in the REPL - Enter this code in the shell tab: print("Hello, World!")
The command will be sent to your Pico, which will execute the command and display back the message.
We can also take control of the on-board LED by executing the following code:
from machine import Pin
led = Pin(25, Pin.OUT)
led.toggle()
This code will toggle the LED. If you keep executing led.toggle() the LED will keep changing state.

Writing a Script
Create a new script with File > New and paste in the following code:
from machine import Pin
from time import sleep
led = Pin(25, Pin.OUT)
n = 0;
while True:
    led.toggle()
    print("13 x {} = {}".format(n, 13*n)) # print the thirteen-times table
    n = n + 1
    sleep(0.5)
Save the script - you will be prompted to save to your computer OR the pico. Select save to Pico and name the file main.py
Return to the REPL and press Ctrl+D (or use the Stop/Restart button) to restart your Pico. The LED should flash at a steady rate and the shell should begin printing multiples of thirteen.

Installing a Package
Packages are reusable pieces of code that another programmer has written for a common task, such as interfacing with a specific piece of hardware. Thonny has support for installing micropython packages from the Python Package Index - aka 'PyPI' directly onto the Raspberry Pi Pico.
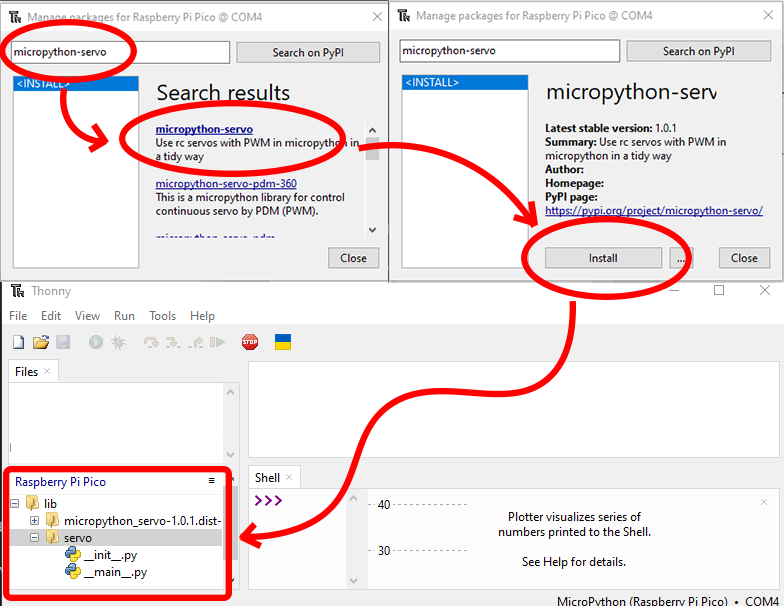
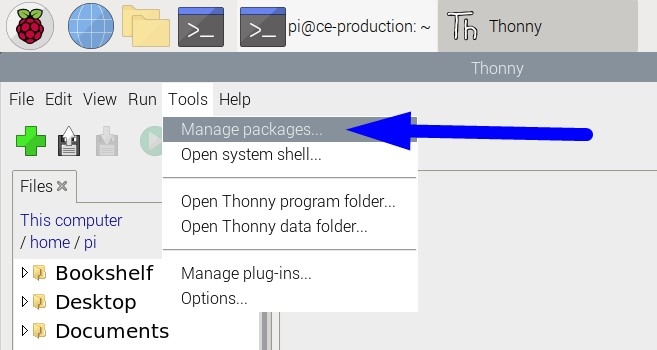
To install a package, ensure the Pico is plugged in and go to Tools > Manage Packages, which will show the Manage Packages dialog.
Enter the name of the package you would like to install into the search bar and click 'Search on PyPI'.
In the search results list, click the title of the package you would like to install. A title that's in bold simply indicates a direct search match on the text you entered in the search bar.
The Manage Packages dialog will show an overview of the package you have clicked. Click Install to install the package on your Pico.
You can confirm the package has been installed by checking the 'Raspberry Pi Pico' section of the File View in Thonny. The view should show a new folder named 'lib', and inside this folder will be one or more folders containing the metadata and source code of the library you just installed.
Conclusion
We've installed Thonny and uploaded scripts to our Raspberry Pi Pico - if you have any questions feel free to start the conversation below, or open a topic in our forums - we're full time makers and happy to help!
Good news! Thonny comes pre-installed with Raspberry Pi OS. However, to work with PiicoDev we need to enable I2C communications as follows:
- Power on your Raspberry Pi.
- Open the Preferences > Raspberry Pi Configuration, select the Interfaces tab
- Ensure I2C is Enabled
You only need to do this step for your first PiicoDev project - from here on you probably won't have to repeat this step when using PiicoDev hardware.

Let's get set up with scripting in Thonny for the Micro:bit. We'll install Thonny, configure for Micro:bit, and write our first script.
All you'll need to follow along is a Micro:bit v2 GO kit
Contents
- Install Thonny
- Set up Thonny
- REPL interface
- Writing a Script
- Useful Tips
- Uploading and Downloading Files
Install Thonny
Download Thonny here and run the installer.
Once the installer finishes, run Thonny.
Set up Thonny
Connect your Micro:bit V2 to your computer with the USB cable.

Open Thonny, and in the menu bar find Run > Select interpreter and choose MicroPython (BBC micro:bit)
It's also a good idea to install or update firmware. This will update your micro:bit with the latest version of MicroPython, or install MicroPython if it wasn't already.

Make sure the Files pane and Plotter are visible by selecting them in View > Files, and View > Plotter.
REPL interface (Shell)
Click the red STOP button to restart the MicroPython on your micro:bit if necessary. The Shell tab should display a block of text that indicates MicroPython is running:

We can immediately start executing code in the REPL - Enter this code in the shell tab: print("Hello, World!")
The command will be sent to your micro:bit, which will execute the command and display back the message - nice!
Next, we can also take control of the on-board speaker by executing the following code:
from microbit import *
import audio
audio.play(Sound.HAPPY)
This code will play a happy tone from the micro:bit's speaker! If you the LED. If you keep executing audio.play(Sound.HAPPY), the tone will repeat.

Writing a Script
The REPL is great for test-driving some new commands and performing short experiments - the real power is in scripting though.
Create a new script with File > New and paste in the following code:
from microbit import *
import audio

print("Hello!")

multiple = 1 # initialise the counter

while True:
    if button_a.was_pressed(): # get the next multiple of the thirteen
        result = multiple * 13 # Calculate the result
        print("13 times " + str(multiple) + " is " + str(result)) # print the multiplication
        multiple = multiple + 1 # increment the multiple

    if button_b.was_pressed(): # Say Hello
        display.show(Image.HAPPY)
        audio.play(Sound.HAPPY)
        display.clear()

    sleep(10) # a 10 millisecond delay
Save the script - you will be prompted to save to your computer OR the micro:bit. Select save to micro:bit and name the file main.py
Return to the REPL and press Ctrl+D to restart your micro:bit. If something went wrong, use the Stop/Restart button, then Ctrl+D.
Now, when we press the A button, the Shell will print the next multiple of 13, or if we press the B-button, our micro:bit gives us a smile and a hello sound.

Notice the plot is also showing some lines, and they're colour-coded to numbers in the print statement! In my case:
- The Blue line is the constant 13,
- The Orange Line is the multiple variable that increases slowly, and
- The Red line is the result variable, which increases really quickly.
Useful Tips
- You can stop a running script by selecting the Shell window and pressing Ctrl+C. This is useful if we want to make changes to the file(s) stored on the micro:bit.
- Reboot your micro:bit (or other MicroPython device) by selecting the Shell window and pressing Ctrl+D
- If something goes wrong, you can always click the red STOP button in the menu bar
Uploading and Downloading Files
We've been working with a file stored directly on the micro:bit - if you'd like to keep a copy on your computer, right-click the main.py file and select the 'download' option. Similarly, you can always upload code to your micro:bit by right-clicking files on your computer and selecting the upload button.

Conclusion
We've installed Thonny and uploaded our first script to our micro:bit. The script includes branches depending on which button is pressed and can generate audio tones and perform basic arithmetic. Now we can write scripts, move them between micro:bit and computer, or test code interactively using the REPL.
If you have any questions feel free to start the conversation below or open a topic in our forums - we're full-time makers and happy to help!
Download / Install PiicoDev Modules
To work with PiicoDev hardware, we need to download some drivers. The drivers provide all the functions to easily connect and communicate with PiicoDev hardware. Select your dev board from the options above.
We will need these files to easily drive the PiicoDev Magnetometer:
- Save the following files to your preferred coding directory - In this tutorial, we save to My Documents > PiicoDev.
- Download the PiicoDev Unified Library: PiicoDev_Unified.py (right-click, "save link as").
- Download the device module: PiicoDev_MMC5603.py (right-click, "save link as")
- Upload the files to your Pico. This process was covered in the Setup Thonny section.
The PiicoDev Unified Library is responsible for communicating with PiicoDev hardware, and the device module contains functions for driving specific PiicoDev devices.
We will now install/upgrade the PiicoDev python module for Thonny. This module contains all the drivers to work with all current PiicoDev hardware. Even if you have already installed the PiicoDev modules before, it's still worth upgrading to the latest version if one is available.
First, run Thonny by clicking the:
- Pi Start Menu
- Programming
- Thonny IDE

We need to set up a virtual environment to install the PiicoDev module into. This only needs to be done once as Thonny will remember an environment you have already made. If you are unsure if you have already set one up, you can always create a new one by following these steps.
To set up a virtual environment, click on run > configure interpreter, to open up the interpreter tab.

In this window, we can create a new virtual environment in the bottom right. A notification window will first pop up, just click OK.

In this window, we are going to create a new empty folder in our Home Directory which will be the location of our virtual environment. To do so follow these steps:
- Select the Home tab on the left-hand side of the window.
- Click the Create Folder button in the top right.
- Enter the name of the new folder. You can call it what you want, but we will call ours "myenv". Once you have written the name, click Create next to it.
- Click OK in the bottom left.

Thonny will then set up your virtual environment and when it has finished, it will return to the Interpreter tab. Click OK, and you will have successfully set up the environment.
Note: the Python Executable path now points to the environment we just created.
Remember, you only need to do this once as the next time you open Thonny it will use this environment.

Next, open the package manager. From within Thonny click Tools > Manage Packages
Enter "piicodev" and click "Search on PyPI"

Finally, Install PiicoDev. If you already have PiicoDev installed, there may be an Upgrade button instead, to upgrade to a newer version.
With the PiicoDev module installed we are now ready to begin programming with PiicoDev hardware.

We will need these files to easily drive the PiicoDev Magnetometer:
- Save the following files to your preferred coding directory - In this tutorial, we save to My Documents > PiicoDev.
- Download the PiicoDev Unified Library: PiicoDev_Unified.py (right-click, "save link as").
- Download the device module: PiicoDev_MMC5603.py (right-click, "save link as")
- Upload the files to your Pico. This process was covered in the Setup Thonny section.
The PiicoDev Unified Library is responsible for communicating with PiicoDev hardware, and the device module contains functions for driving specific PiicoDev devices.
Example 1 - Compass and Calibration
We're ready to go with our first example on the Magnetometer! The following example compass.py, first requests to calibrate the magnetometer:
# Calibrate the sensor by turning it in a circle
# Display the heading with compensation for magnetic declination

from PiicoDev_MMC5603 import PiicoDev_MMC5603
from PiicoDev_Unified import sleep_ms          # Cross-platform compatible sleep function

compass = PiicoDev_MMC5603() # Initialise the sensor

# Calibration recommended for best results.
compass.calibrate() # only need to calibrate once

# Optional: Declination is the difference between magnetic-north and true-north ("heading") and depends on location
# compass.setDeclination(12.3) # Found with: https://www.magnetic-declination.com/Australia/Newcastle/122944.html

while True:
    heading = compass.readHeading()   # get the heading from the sensor
    if compass.dataValid():           # Rejects invalid data
        heading = round(heading)      # round to the nearest degree
        print( str(heading) + "°")    # print the data with a degree symbol
    sleep_ms(100)
Slowly rotate the sensor on a flat surface until calibration is complete. You can see the calibration progress shown by a progress bar in the shell.

Follow along with the video for this part - getting a high-quality calibration is important for reading an accurate heading.
Once calibration is complete, your console will begin printing the measured heading into the shell. This is the same heading that you would read off a magnetic compass. The heading is the direction the top edge (with the PiicoDev label) of the module is pointing when placed on a level surface like a table.

If you have a magnetic compass you can compare headings. In the video I scribe a line pointing north - as read from my magnetic compass. I then compare the data gathered by the magnetometer and the results are really close!

You may notice a new file named calibration.cal has appeared on your micro:bit - this is the calibration data. This calibration data will be automatically loaded every time the script runs, so you can comment-out compass.calibrate() if you don't want to calibrate on every power-up. It's still a good idea to calibrate periodically, or if you notice your heading has drifted.
Remix - True North
So far we have been working with Magnetic North - this is the direction a magnetic compass will point. To find a true heading, we need to input some more information. Magnetic Declination is the difference between Magnetic North and True North (or "Geographic North"). The value for declination changes depending on location. In Newcastle, Australia, the declination is about 12° (as of 2022). There are lots of online tools that will help you find the declination in your area (here's one example). Once you know the declination in your area, you can input that angle into the setDeclination() function. Re-run your script and you should notice the heading data has been offset slightly. Your magnetometer is now indicating its measurement for True North.
Example 2 - Detect a Magnet
In this example, we'll measure magnetic-field-strength. This is useful to detect the presence of a nearby magnet. Replace the code in main.py with the following code.
# Read the magnetic field strength and determine if a magnet is nearby

from PiicoDev_MMC5603 import PiicoDev_MMC5603
from PiicoDev_Unified import sleep_ms

magSensor = PiicoDev_MMC5603() # initialise the magnetometer
# magSensor.calibrate()

threshold = 120 # microTesla or 'uT'.

while True:

    strength = magSensor.readMagnitude()       # Reads the magnetic-field strength in microTesla (uT)
    if magSensor.dataValid():                  # Rejects invalid data
        myString = str(strength) + ' uT'       # create a string with the field-strength and the unit
        print(myString)                        # Print the field strength

        if strength > threshold:               # Check if the magnetic field is strong
            print('Strong Magnet!')

    sleep_ms(1000)
When we run the script, we see the measured field strength being printed to the shell. If the measured strength goes above a set threshold, the program prints a message to the shell. This time around, the magnetometer is initialised with the maximum range (3000 uT), since there could be a strong magnet nearby. When we exceed the range of the magnetometer, the measurement becomes invalid and so the measurement data is returned as a special "Not a Number" type.
A note about calibration: In Example 1 we performed a 2-axis calibration (rotating the magnetometer on a flat surface. For best results in this example a 3-axis calibration is necessary. To calibrate 3-axes, call the calibrate() function, and rotate the device slowly in all axes.

Above: Bring a magnet nearby the Magnetometer and observe how small movements can be easily observed by the magnetic field strength. The above figure is using modified code that removes other print() statements. Refer to tutorial video to reproduce this example.
Example 3 - Raw Data
The read() method allows you to extract the 3-axis magnetometer data (in uT, or just the raw register data) - for when you wish to process the data with your own algorithm.
# Prints the raw axis readings in micro-Tesla (or unscaled raw data)

from PiicoDev_MMC5603 import PiicoDev_MMC5603
from PiicoDev_Unified import sleep_ms

magSensor = PiicoDev_MMC5603() # Initialise the sensor

while True:
    raw_data = magSensor.read()         # Read the field strength on each axis in uT
#    raw_data = magSensor.read(raw=True)  # Read the raw, unscaled data on each axis
    if magSensor.dataValid():             # Rejects invalid data
    print(raw_data)                     # Print the data
    sleep_ms(200)
Project - Graphical Compass
So far we've been using the shell to visualise information collected from the magnetometer. Now for a fun mini-project. We can use a PiicoDev OLED Module to display a digital compass-needle that always points north. The following code is really similar to Example 1, except there's extra code to drive the display, and handle drawing an indicator on the display.
To follow along with this project, you'll need to save PiicoDev_SSD1306.py onto your Pico.
# Similar to the compass example, this demo uses a PiicoDev OLED module to show a compass graphic

from PiicoDev_MMC5603 import PiicoDev_MMC5603
from PiicoDev_SSD1306 import create_PiicoDev_SSD1306, WIDTH, HEIGHT
from PiicoDev_Unified import sleep_ms
from math import sin, cos, radians # for calculating the compass-needle co-ordinates

compass = PiicoDev_MMC5603(range=1200) # Initialise the sensor
oled = create_PiicoDev_SSD1306()
# compass.calibrate() # only need to calibrate once

# Declination is the difference between magnetic-north and true-north ("heading") and depends on location
compass.setDeclination(12.5) # Found with: https://www.magnetic-declination.com/Australia/Newcastle/122944.html

centreX = int(WIDTH/2)
centreY = int(HEIGHT/2)

# This function draws the artwork onto the OLED display. It takes a heading and draws a line at that angle from the centre of the display - along with some other nice stuff.
def drawCompass(heading):
    rads = radians(heading + 180) # convert heading to radians and offset by 180 degrees (to account for y increasing down the display)
    length = 25 # compass needle length (in pixels) from centre

    # Convert polar coordinates (length, angle) to cartesian coordinates (x,y) for plotting on display. Offset the coordinates by half the screen width/height to draw from the centre - rather than the top-left of the display.
    x = int( length * sin(rads) + WIDTH/2 )
    y = int( length * cos(rads) + HEIGHT/2 )

    # Plot the compass on the display
    oled.fill(0)
    oled.line(centreX, centreY, x, y, 1) # draw the compass needle
    oled.circ(x,y,4)                     # put a north-indicator on the end
    oled.text(str(heading),100,57)       # show the heading in the bottom-right corner
    oled.show()

while True:
    heading = compass.readHeading()
    if compass.dataValid(): # only draw for valid data - prevents errors
        heading = round(heading)
        drawCompass(heading)
    print(heading)

    sleep_ms(100)
The drawCompass() method converts the heading into x,y coordinates that draw a line to the centre of the display. A circle is drawn on the end of the line and the heading in degrees is shown in the bottom corner of the display.
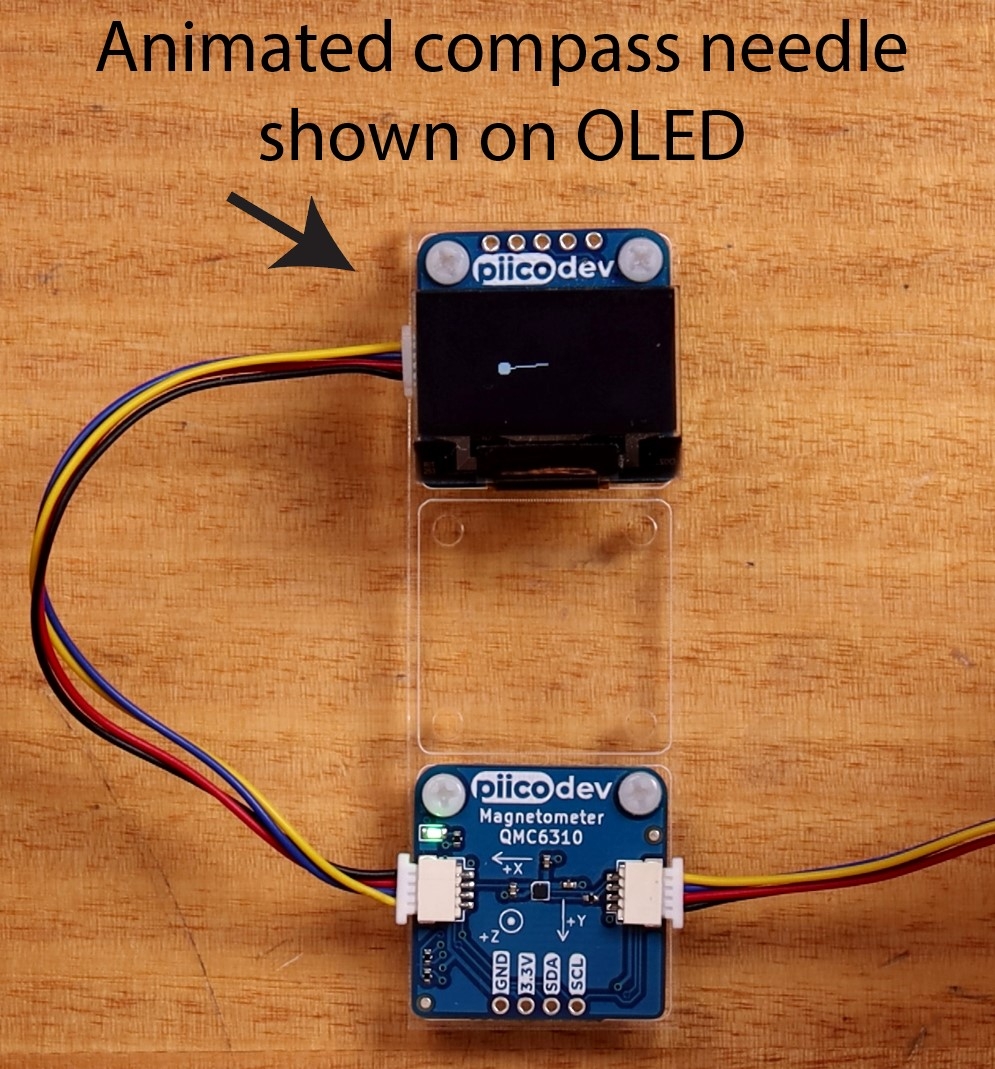
Above: a compass needle is animated on the OLED to point North, even if the whole assembly is rotated.
Conclusion
We can measure the properties of magnetic fields using a 3-axis magnetometer. Build-in functions allow us to easily measure the sensor's heading in a magnetic field, and we've even built a cool graphical compass project using an extra display module.
If you make something cool with this starter project we'd love for you to share it on our forums! And if you'd like some help with this guide, start the conversation below - We're full-time makers and here to help!
Resources
- Magnetometer library: PiicoDev® Magnetometer QMC6310 MicroPython Module
- Hardware Repository for the PiicoDev Magnetometer
- OLED Library: PiicoDev Unified MicroPython module for SSD1306
