Layer Exposure Time is the crucial parameter that when dialed in will change average 3D resin printed components into awesome, crispy, final results that capture every single detail of the CAD model. As a general rule for Normal Layer Exposure Time use 0.5-5 seconds for Monochrome Screen Printers and 2-20 seconds for RGB Screen Printers. But that is quite the range, so this guide will teach you how to find exactly the right time to utilise.
But first, what exactly is exposure time? Layer Exposure Time determines the light exposure duration for a single layer of an object that you are trying to print. Unlike filament printing (where it can feel like there is an almost endless amount of settings that you must know about for perfect 3D prints) resin 3D printing has much simpler dials to adjust up and down. And the most crucial dial is Layer Exposure Time and its wrong adjustment is one of the major reasons why resin 3D prints fail. It is all about finding that sweet spot.
Under-exposing or over-exposing can really cause havoc with the resin printing experience. Too long exposure will result in light bleeding and scattering deep through the resin material resulting in a loss of intricate details and dimensional inaccuracy. Too short an exposure will create an under-cure result. Under-curing can be identified by several factors such as layer delaminations in the middle of the part, serious loss or miniaturisation of intricate details, general poor model adhesion to the build plate, or the worst, the entire model falling off the build platform. This part would then get repeatedly squished into the bottom of the resin tank. This is a big problem as it can cause damage to the resin 3D printer, particularly in regards to the FEP sheet and LCD screen.
So this tutorial all we are interested in is finding the correct Exposure Time to produce perfect resin prints. I will show you exactly how to do it fast and without using much resin so you can get right back to 3D printing. See below for the contents of this guide.
- Decoding the Best Layer Exposure Test Print
- Bottom Layer Vs Normal Layers Exposure Settings
- Other Great Exposure Test Prints Worth Using
- When to Run an Exposure Test Print
- Download All Exposure Test Print Files
If you want just get right in, not worry about all this and just print something right away How To Complete Your First Resin 3D Print is the guide for you. Also if you are just starting your journey with resin 3D printers a great place to get an overview of this technology and the process to calibrate print platforms can be found here. If you want to create sliced files of your custom model check out this guide Preparing a Computer Model for Resin 3D printing - Lychee Slicer. See in the video thumbnail and at the bottom of the page the detail you will be able to obtain by following this guide. For reference, the model is only 6 cm tall!
If you want a guide on how to Replace your FEP Film, Print with Multiple Colours on a Single Resin Print, or Colourise 3D Printer Resin using Alcohol Inks and Pearl Ex Powder we have the tutorials for you. As always if you have any questions, queries, or things to add please let us know your thoughts!
Decoding the Best Layer Exposure Test Print
The best way to test for and find the correct Layer Exposure Time for your set-up is to print a couple of exposure test models with your Resin 3D printer at different exposure amounts. You can adjust the exposure settings directly through your 3D resin printer user interface (UI) or in your slicing software. See below the UI on the Creality LD-002H 3D printer, this page you can access once you have started a 3D print by clicking the Cog button seen in the bottom right of the touch screen. This Cog button I have put a red box around for clarity. Then by clicking each number you can change or alter the exposure time and bottom layers.

One of the best exposure test prints is the Validation Matrix devised by Anycubic, seen below. This small model takes less than 15 minutes to 3D print and, by visual inspection, it will tell you exactly whether you are over or underexposing your layers. Link at the bottom of the article for the STL of this model. Start by using the default settings that come with your machine and then slowly refine this value over a number of 3D prints. For the Creality LD-002H UV 3D Printer the default Layer Exposure Time was set at 3.5 seconds. Experimentation below will demonstrate that this is definitely over-curing each layer but manufacturers will do this on purpose so that your initial 3D prints with these machines are basically guaranteed to stick to the build plate.
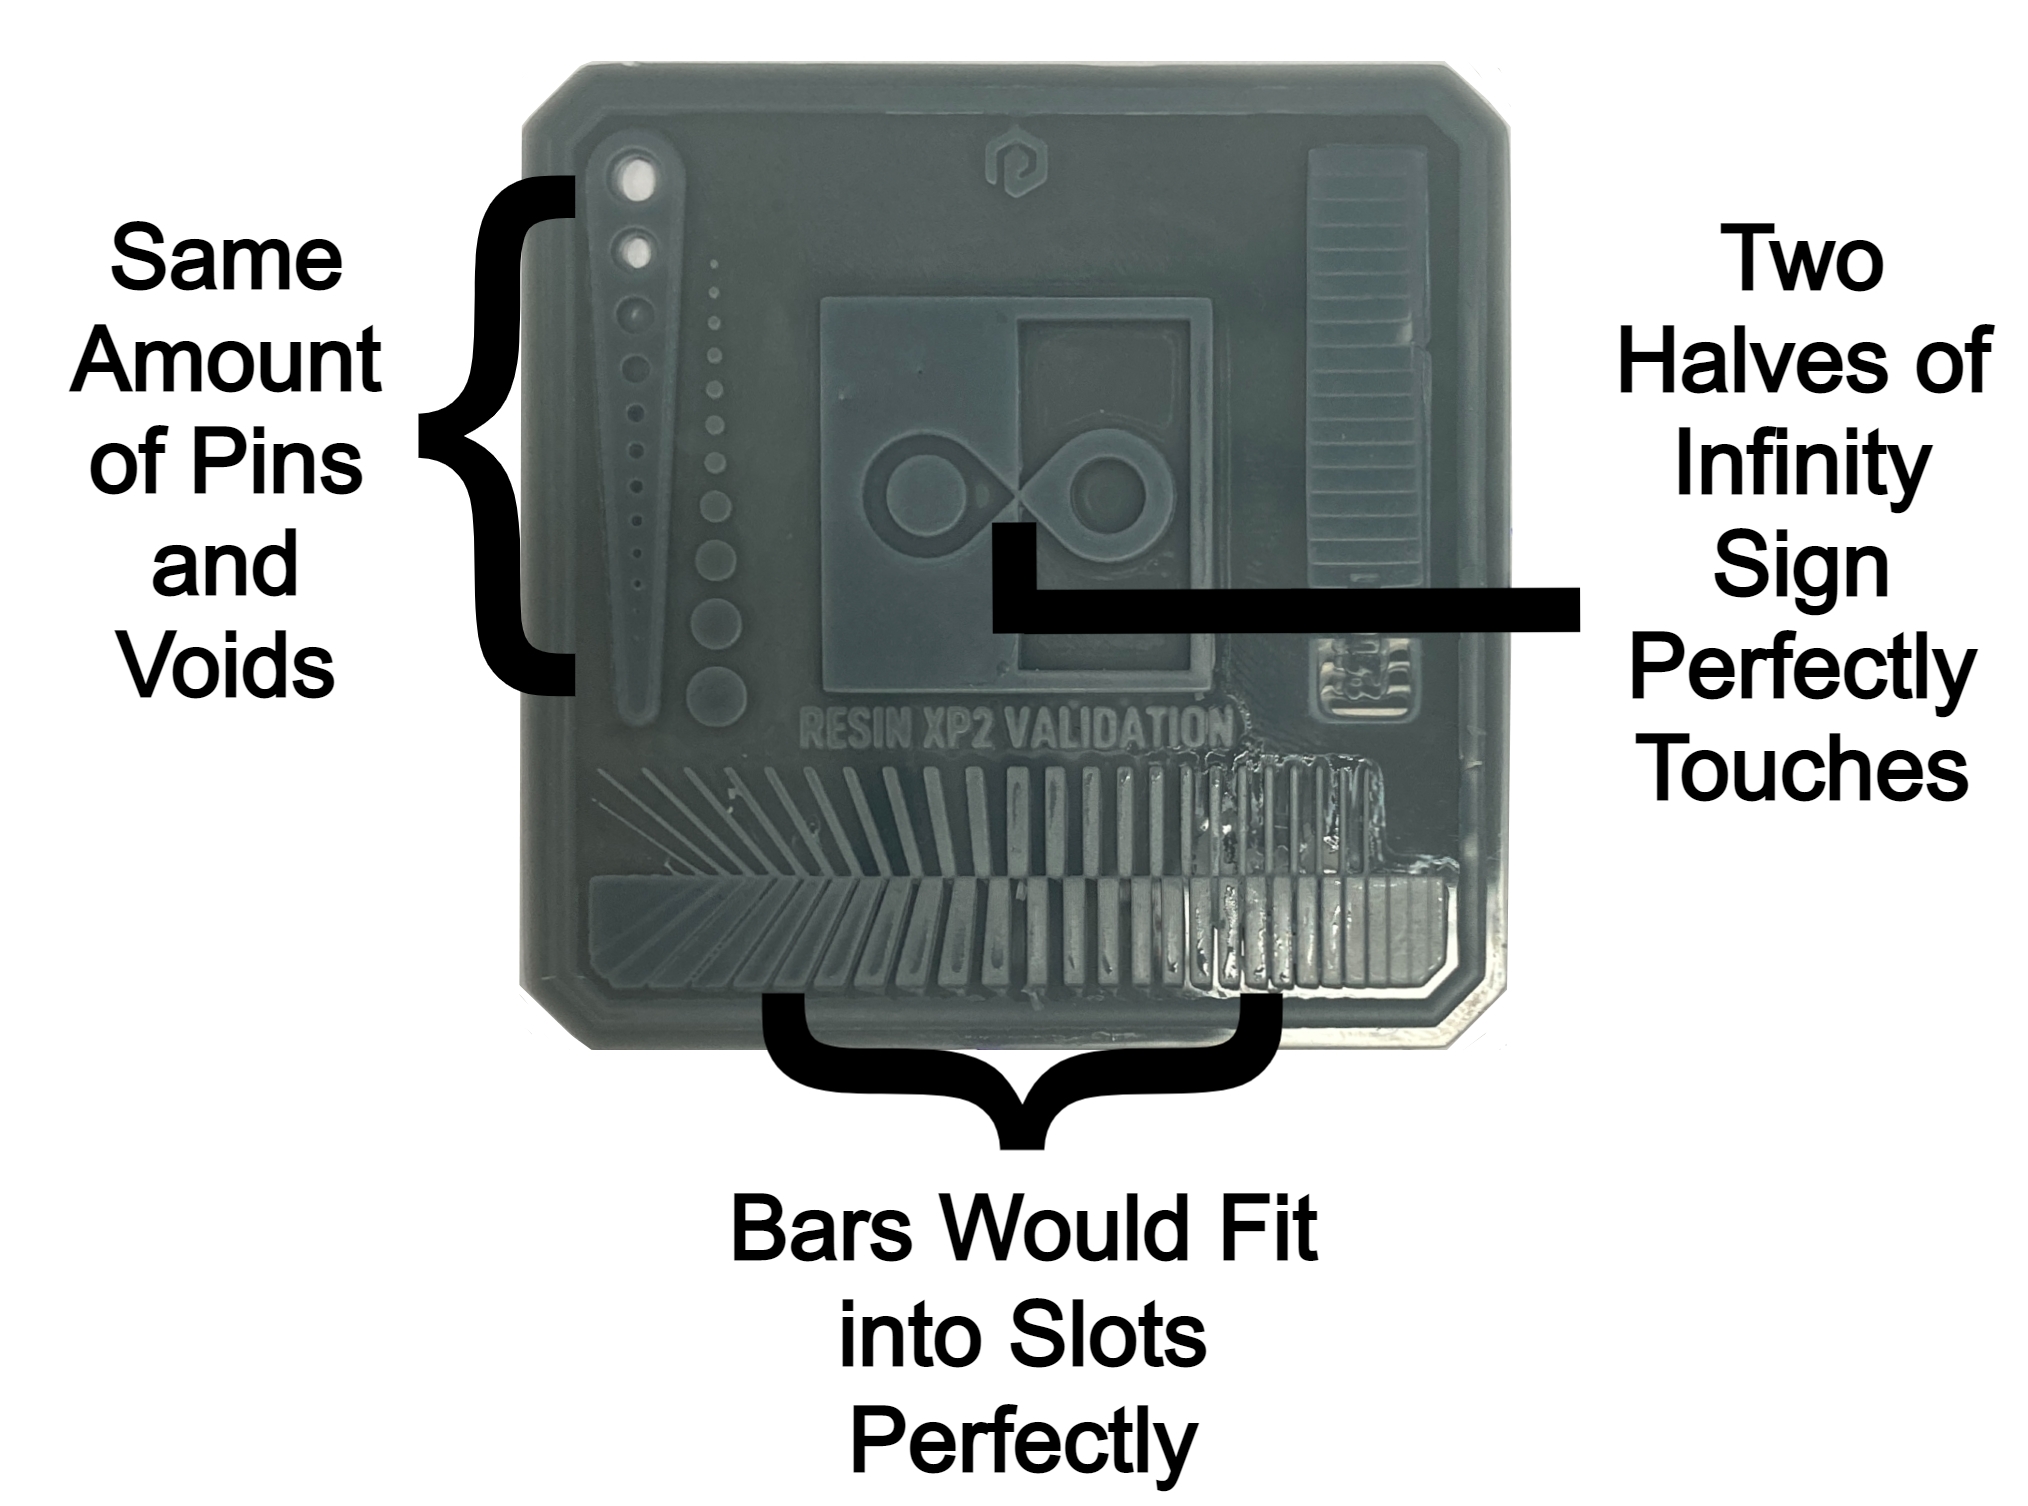
Now seen below is an image of a Validation Matrix printed with an almost perfect Layer Exposure Time. This image has also been annotated so that you can know exactly what you are looking for. Worth noting a really good 3D print and settings won't capture all the details, some bars and pins are missing. This test is designed to push your 3D printer to the limit. A 1.5-second Normal Layer Exposure Time was used to create this model with 4 Bottoms Layers which each had a 15-second Bottom Layer Exposure Time. This is almost the perfect exposure time for this Grey Creality Resin when used by the Creality LD-002H UV 3D Printer.
To further this point using the same set up only altering the Normal Layer Exposure Time I printed a number of test prints that you can see in the image below (right-click and open the image with a new tab to zoom deep into the photo). Each test piece was printed with 4 Bottom Layers at 15 seconds. 4 Bottom layers are recommended by Anycubic for this Validation Matrix test part. Each piece after printed was then washed in a Creality Wash and Cure Station for 5 minutes at slow wash speed. Then, after drying off overnight with the important side facing up, each piece was cured for 2 minutes on both sides twice (for a total of 8 minutes altogether). The Layer Exposure Time is labeled underneath them. Right-click and open the images to see them closer up in full size. When you get up close you can really see the following in the below image:
- When the model is over-exposed the following features will be present. More Pins than Voids. Overlapping Touching of the Infinity in the Centre. Bars that will not fit in the Bottom Gap Section.
- When the model is under-exposed the following features will be present. Fewer Pins than Voids. An Empty Gap between the Infinity in the Centre. Bars that will easily fit with space into the bottom Gap Section.

To gain the best quality models it is valuable to get a high enough sample rate. Above would be a suitable test spectrum for an RGB screen printer but to really dial in and find the perfect exposure settings with a Monochrome printer it is totally worth it to run tests with 0.1-second increments. Below shows prints between 1.9-second to 1.5-second Normal Exposure Time. Looking at this very closely 1.7-second Normal Layer Exposure looks almost perfect, fitting all the requirements very well.

In the quest for completionism, a 0.1-second increment was done from 1.5-second to 1.1-second for Normal Layer Exposure. Every other setting and post-processing was done exactly the same as above. You will notice that features like the bars and pins start to disappear as its gets closer to 1 second. Also, the pieces have blemishes where they look shinier in sections. This is where the UV light from the printer was not strong enough in the time provided to do the initial cure crisply. This results in sticky and tacky resin that sticks to the surface of the part. Resin like this is too hard to remove from an IPA wash but not strong enough to create features or a good surface. This tacky resin then gets cured fully after post-processing so it ends up as a permanent shiny blemish on models.
Bottom Layer Vs Normal Layer Exposure Settings
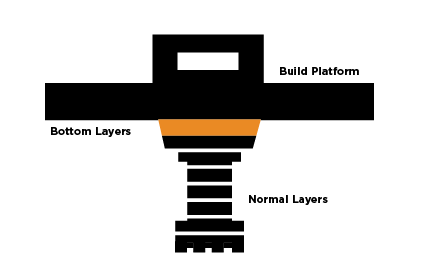
Bottom layers are the first few layers that are exposed to UV light in your model and bottom layer exposure times are always longer than normal layers exposure times. They are exposed longer so that the model can adhere more securely to the build platform. As I always use a raft when 3D printing with resin models so these bottom layers never negatively affect the end finish of the model (as by the time it stops printing bottom layers it has normally only gotten through printing the raft itself). See image below for a diagram of bottom layers vs normal layers keeping in mind that the only difference between the two is how long they are exposed to UV light for.
So you have figured out the best Layer Exposure Settings for normal layers what about the Bottom Layers Exposure Settings? And how many layers should I use?
A good rule of thumb to follow is to set the Bottom Layer Exposure Time to be 8-12 times longer than the Normal Layer Exposure Time. This is a good general rule but make sure to keep the bottom exposure time lower than ~30 seconds. Any higher and the printer will get too hot. For the LD-002H UV 3D Printer, which has a Monochrome LCD, I have been using 10 times the value of normal layer exposure with 10 bottom layers. This has allowed great results with a whole range of resins. So considering I got the best results utilising 1.7-second Normal Layer Exposure Time with the Creality Grey Resin I would then set a 17-seconds Bottom Layer Exposure Time and have 10 bottom layers.
Worth noting - there can be situations where the last bottom exposed layer fails to adhere to the first normally exposed layer and this issue will reveal itself as delamination. In this rare case, you can fix it in two ways. You can simply increase the Normal Layer Exposure as this will fix most of the issue. If however, you do not want to alter the Normal Layer Exposure (because you have identified it as the best exposure time) you can use Transition Layers. Adding this will slowly reduce the Bottom Exposure Time over a number of layers until you get to the optimal Normal Layer Exposure. Depending on your slicer, the transition layer option may or may not be readily available. If not available you may have to adjust a few settings manually, either on the Resin printer as it is running or in the G-Code. This guide will help you manually edit g-code with Repetier-Host.
Other Great Exposure Test Models
The Anycubic Validation Matrix is a great test to create a brilliant exposure platform to springboard and produce damn near perfect models from. Once you have a fantastic result with this test you can basically go from there pretty confident in your future prints. However, it is worth it to consider printing other test pieces too. Validation Matrices are great for checking two-dimensional accuracy but won't supply you with knowledge of a couple of details. To dial-in overhanging features and overall model stiction to the build platform, your best procedure is to print a more three-dimensional test object.
The best model to do this is the Make:Rook Calibration Chess Piece. This test part has heaps of overhangs, from the DNA double-helix in the centre to the outside walls and internal staircase structure. If you can print the Make:Rook model, have the text found along the base and top be legible whilst having great results with the overhanging structure, all while using the same settings for the Validation Matrix, then you are good to go to print your dreams. Your setup is going to be fully dialed in. You can download this model in the downloads section.
Now at this point, everything becomes a compromise between overhang reproduction, horizontal slice accuracy, really tiny feature reproduction, and having prints that stick to the build platform. Another test I have found to explore this is the Ameralabs Town Calibration Part. It also has the added benefit of looking quite nice. If you are printing this part, the Make:Rook, and the Validation Matrix beautifully then you are in the gold. You can download this model in the downloads section. See below for an image of the top text from the Make:Rook Chess piece (very difficult to print legibly) as well as some early testing done with the Ameralabs Town parts.

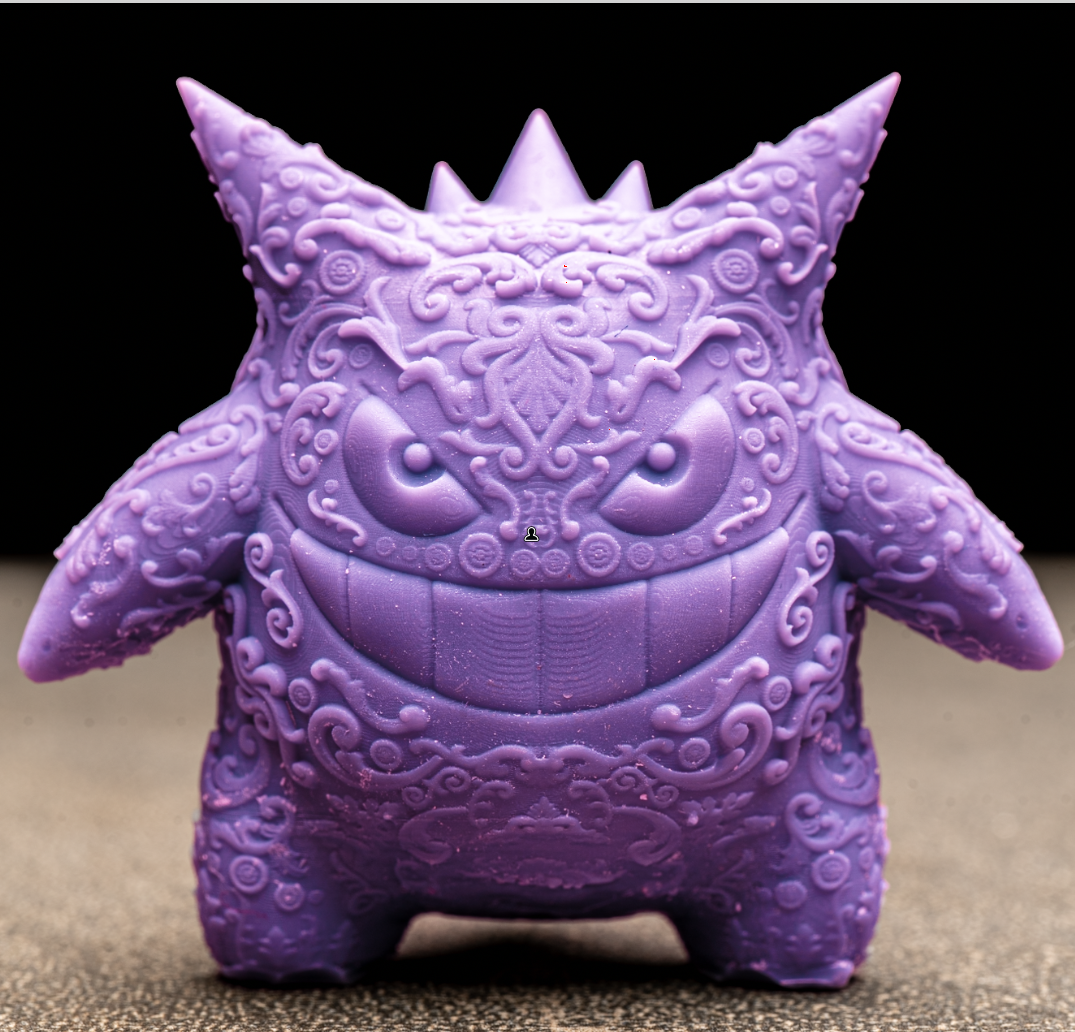
Now it is worth noting all of these tests have been done for a single location in the center of the build platform. Depending on the quality of your 3D printer the power of your UV light hitting the resin can be weaker the further you go away from the center of the build platform. Thus it is worthwhile to run a number of test prints along the extremities of your build platform to see if there is any degradation of quality. You can manually set up test prints all across your print bed or you can use this very nifty piece of software, UV Tools, that will do it for you. With all these tools and knowledge in your tool kit you can now go on and print really crispy models, just like the Ornamental Gengar printed using the optimal exposure settings, see below. This model stands no more than 6 cm tall, right-click and open the image in a new window to see it in full size.
When to Test for Best Layer Exposure
It is always the best idea to test Normal Layer Exposure for your own printer/resin combo. Taking the results from someone else can lead to trouble. You could be in a different climate, or your printer could have some quirks, or the resin batches might be slightly different. Other people's settings are a great starting point, but fine-tuning with test prints is how you really get your settings down.
Below are scenarios in which it would be good to run a Layer Exposure Test Print.
- When you first get a 3D printer. The exposure setting on all resin 3D printing machines are set by default to get a successful print result, making sure the models will work no matter what (so that your print won't fall off the print bed) but to get the best results you want the perfect exposure time. So even if your new printer is working really well run a quick test to double-check you're not missing out on awesome details.
- Every time you use a different resin with the 3D printer. (There is even variation between resin batches so an argument can be made to re-do an exposure test every time you crack open a new bottle of 3D resin)
- Every time you place a contaminant to colourise the resin.
- Every time you change your Layer Height. Most Resin 3D printers can print from the range of 10-50 microns in the Z-Axis. The Creality LD-002H 3D Printer by default prints at 20-microns. If you want exceptional quality for miniatures a 10-micron height will work very well (and will take twice the amount of time).
- Once every 6 Months. Over time, UV projectors slowly lose their strength so it is worth it to test every 6 months particularly if printing vigorously and eagerly, even if you are using the exact same resin.
Download The Exposure Tests
The Ameralabs Town Calibration Test Print and the Photonsters Validation Model can both be downloaded using the link below. These are my two go-to test prints to get the best exposure settings for my resin 3D prints. Also in the Zip is the Make:Rook test model which is another great 3D exposure testing model. And if anything, always remember to markdown your settings onto each test model!


