In this tutorial, we'll get some WS2812B LEDs (also known as GlowBits and NeoPixels) working with a Raspberry Pi Pico. If you haven't already set up Thonny for programming your Pico, follow our guide on that first.
To follow along you'll need:
- A Raspberry Pi Pico
- WS2812B LEDs (we recommend GlowBit rainbow because the version 5 LEDs work reliably with the Pico's 3.3V logic level).
- A way to connect your Pico to your LEDs. I'm using some test clips
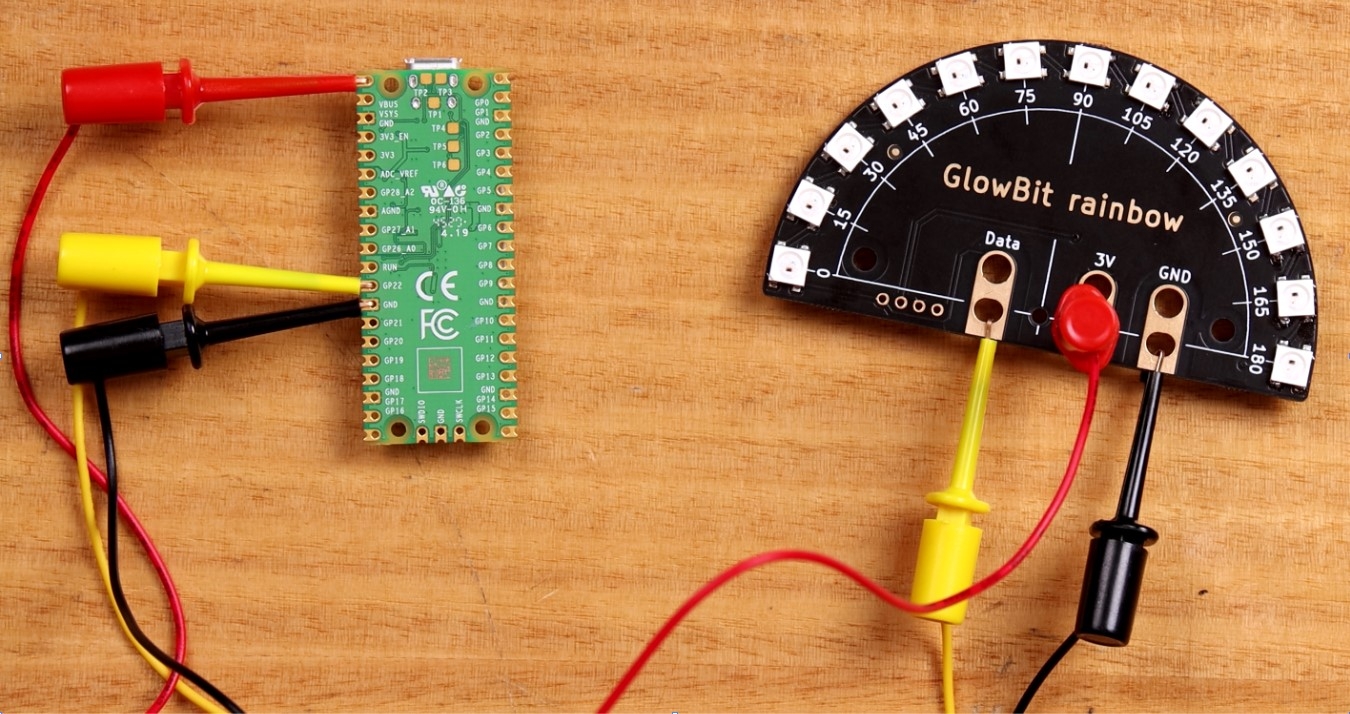
Connect the Pico to the LEDs
Make sure your Pico is unpowered for this bit. If you make a mistake with wiring while the Pico is powered you could damage or destroy your Pico.
RED Connect Pico: VBUS to the LED positive terminal. (Labelled 3V on the rainbow, they're happy with anything between 3-5V)
BLACK Connect Pico: GND to the LED negative terminal (GND)
YELLOW Connect Pico: GP22 to the LEDs Data-Input.
Upload Code
Create a new script in Thonny and paste in the following code.
# Example using PIO to drive a set of WS2812 LEDs.

import array, time
from machine import Pin
import rp2

# Configure the number of WS2812 LEDs.
NUM_LEDS = 16
PIN_NUM = 22
brightness = 0.2

@rp2.asm_pio(sideset_init=rp2.PIO.OUT_LOW, out_shiftdir=rp2.PIO.SHIFT_LEFT, autopull=True, pull_thresh=24)
def ws2812():
    T1 = 2
    T2 = 5
    T3 = 3
    wrap_target()
    label("bitloop")
    out(x, 1)               .side(0)    [T3 - 1]
    jmp(not_x, "do_zero")   .side(1)    [T1 - 1]
    jmp("bitloop")          .side(1)    [T2 - 1]
    label("do_zero")
    nop()                   .side(0)    [T2 - 1]
    wrap()


# Create the StateMachine with the ws2812 program, outputting on pin
sm = rp2.StateMachine(0, ws2812, freq=8_000_000, sideset_base=Pin(PIN_NUM))

# Start the StateMachine, it will wait for data on its FIFO.
sm.active(1)

# Display a pattern on the LEDs via an array of LED RGB values.
ar = array.array("I", [0 for _ in range(NUM_LEDS)])

##########################################################################
def pixels_show():
    dimmer_ar = array.array("I", [0 for _ in range(NUM_LEDS)])
    for i,c in enumerate(ar):
        r = int(((c >> 8) & 0xFF) * brightness)
        g = int(((c >> 16) & 0xFF) * brightness)
        b = int((c & 0xFF) * brightness)
        dimmer_ar[i] = (g<<16) + (r<<8) + b
    sm.put(dimmer_ar, 8)
    time.sleep_ms(10)

def pixels_set(i, color):
    ar[i] = (color[1]<<16) + (color[0]<<8) + color[2]

def pixels_fill(color):
    for i in range(len(ar)):
        pixels_set(i, color)

def color_chase(color, wait):
    for i in range(NUM_LEDS):
        pixels_set(i, color)
        time.sleep(wait)
        pixels_show()
    time.sleep(0.2)

def wheel(pos):
    # Input a value 0 to 255 to get a color value.
    # The colours are a transition r - g - b - back to r.
    if pos < 0 or pos > 255:
        return (0, 0, 0)
    if pos < 85:
        return (255 - pos * 3, pos * 3, 0)
    if pos < 170:
        pos -= 85
        return (0, 255 - pos * 3, pos * 3)
    pos -= 170
    return (pos * 3, 0, 255 - pos * 3)


def rainbow_cycle(wait):
    for j in range(255):
        for i in range(NUM_LEDS):
            rc_index = (i * 256 // NUM_LEDS) + j
            pixels_set(i, wheel(rc_index & 255))
        pixels_show()
        time.sleep(wait)

BLACK = (0, 0, 0)
RED = (255, 0, 0)
YELLOW = (255, 150, 0)
GREEN = (0, 255, 0)
CYAN = (0, 255, 255)
BLUE = (0, 0, 255)
PURPLE = (180, 0, 255)
WHITE = (255, 255, 255)
COLORS = (BLACK, RED, YELLOW, GREEN, CYAN, BLUE, PURPLE, WHITE)

print("fills")
for color in COLORS:
    pixels_fill(color)
    pixels_show()
    time.sleep(0.2)

print("chases")
for color in COLORS:
    color_chase(color, 0.01)

print("rainbow")
rainbow_cycle(0)
There are a few important parameters to be aware of:
NUM_LEDs is the number of LEDs in your strip/module. Since I'm working with the rainbow, I'll use 13.
PIN_NUM is the data connection to the LEDs.
brightness is a value between 0 and 1. Higher values will make the LEDs brighter and consume more power.
Make any changes you find necessary and run the script. Your LEDs should now cycle through a few colourful patterns.
Make sure you watch the video for this article for some inspiration on how you might modify this example code to change its functionality.
As always, if you have any questions then start the conversation below or open a thread in our forum. We're full-time makers and happy to help!


