Have you ever wanted to dive into computer vision? How about on a low-power and portable piece of hardware like a Raspberry Pi?
Well, in this guide we will be setting up some with OpenCV and the YOLO pose estimation model family on the Raspberry Pi 5. We will be taking a look at a few of the different YOLO models available, as well as how to optimise them to get smoother FPS', and also how to use the keypoint data generated by the model so you can implement pose estimation into your next project. This has been one of the most fun guides we have made in a while so let's get into it!
For our external audience looking for it, here is our project code zip folder, which contains all the needed scripts to run our pose estimation.
Space Invaders Demo
To follow along with this guide you will need a:
- Raspberry Pi 5 - Either a 4GB or 8GB model will work here. Although this could technically be done on a Pi 4, it is far slower than the Pi 5 and would not be a nice experience, and for those reasons, we haven't tested on a Pi 4
- Pi Camera - We are using the Camera Module V3
- Adapter Cable - The Pi 5 comes with a different-sized CSI camera cable and your camera may come with the older thicker one so it's worth double-checking. The Camera Module V3 WILL need one
- Cooling Solution - We are using the active cooler (computer vision will really push your Pi to its limits)
- Power Supply
- Micro SD Card - At least 16GB in size
- Monitor and Micro-HDMI to HDMI Cable
- Mouse and Keyboard
Hardware Assembly
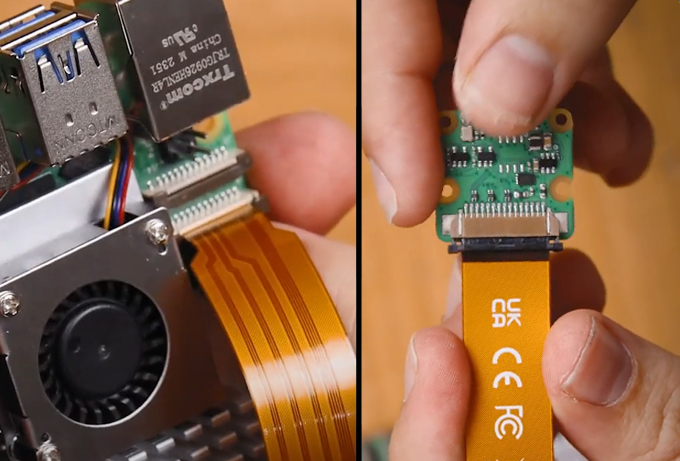
In terms of hardware assembly, it's pretty light here. Connect the thicker side of the cable to the camera, and the thinner side to the Pi 5. These connectors have a tab on them - lift them up, then insert the cable into the slot. Once it is sitting in there nice and square, push the tab back down to clamp the cable into place.
Just keep an eye out as these connectors only work in one orientation, and they can be fragile so avoid bending them tightly (a little bit is okay).
Installing Pi OS
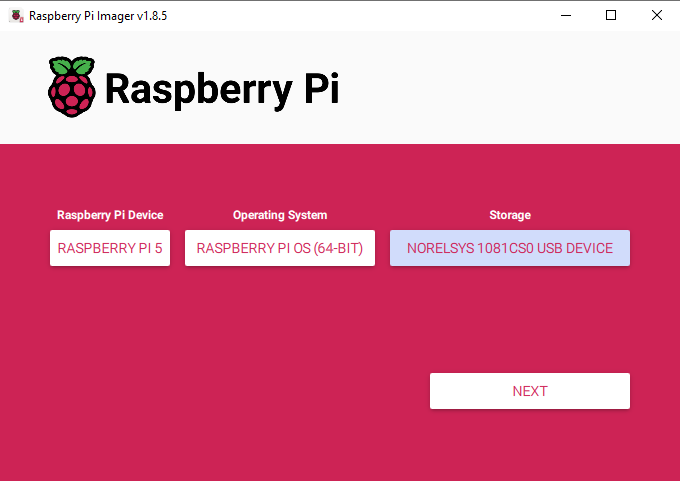
First things first, we need to install Pi OS onto the micro SD card. Using the Raspberry Pi Imager, select Raspberry PI 5 as the Device, Raspberry Pi OS (64-bit) as the Operating system, and your microSD card as the storage device.
NOTE: INSTALLING PI OS ONTO THE MICROSD CARD WILL WIPE ALL DATA ON IT.
This process may take a few minutes to download the OS and install it. Once the process has finished, insert it into the Pi and boot it up. Your Pi will run through a first-time installation and just ensure that you connect it to the internet.
Setting up a Virtual Environment and Installing Libraries
With the introduction of Bookworm OS in 2023, we are now required to use Virtual Environments (or venv), as they are an isolated space on the Pi where we can experiment without the risk of harming the rest of our Pi OS or projects. We have all the needed commands and instructions in this guide, but if you need a hand, virtual environments have their own guide.
To create a virtual environment, open a new terminal window and type in:
python3 -m venv --system-site-packages yolo_pose
After creating the venv, we can enter into it by typing in:
source yolo_pose/bin/activate
After doing so you will see the name on the virtual environment to the left of the green text - this means we are correctly working within it. If you ever need to re-enter this environment (for example if you close the terminal window you will exit the environment), just type in the source command above again.

Now that we are working in a virtual environment, we can start installing the required packages. First, ensure that PIP (the Python package manager) is up to date by entering the three following lines:
sudo apt update
sudo apt install python3-pip -y
pip install -U pip
Then install the Ultralytics Package with:
pip install ultralytics[export]
The lovely folks at Ultralytics have been one of the key developers and maintainers of the newest YOLO models. This package of theirs is going to do much of the heavy lifting and will install OpenCV as well as all the required infrastructure for us to run YOLO.
This process will also install quite a large amount of other packages, and as a result, is prone to failing. If your installation fails (it will display a whole wall of red text), just type in the Ultralytics install line again and it should resume. In rare cases, the install line may need to be repeated a few times.
Once that has finished installing, reboot the Raspberry Pi. If you want to be a power user, you can do so by typing into the shell:
reboot
We have one more thing to do, and that is to set up Thonny to use the virtual environment we just created. Thonny is the program we will be running all of our code out of and we need to get it to work out of the same venv so that it has access to the libraries we installed.
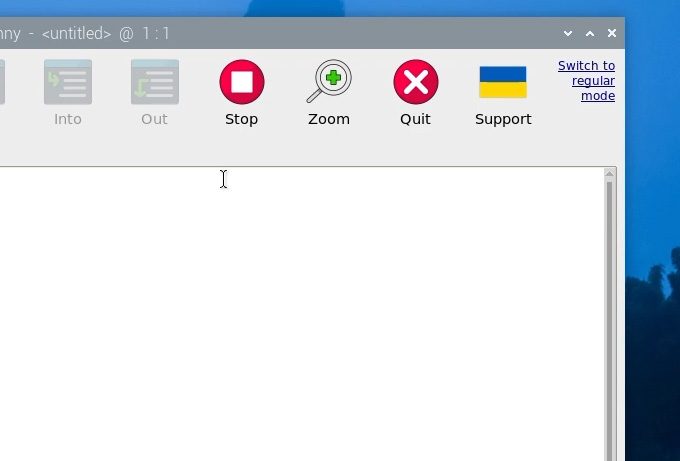
The first time you open Thonny it may be in the simplified mode, and you will see a "switch to regular mode" in the top right. If this is present click it and restart Thonny by closing it.
Now enter the interpreter options menu by selecting Run > Configure Interpreter. Under the Python executable option, there is a button with 3 dots. Select it and navigate to the Python executable in the virtual environment we just created.

This will be located under home/pi/yolo_pose/bin and in this file, you will need to select the file called "python3". Hit okay and you will now be working in this venv.
Whenever you open Thonny, it will now automatically work out of this environment. You can change the environment you are working out of by selecting it from the drop-down menu under the Python executable in the same interpreter options menu. If you wish to exit the virtual environment, select the option bin/python3.

Running Pose Estimation
Now that we have our libraries installed and Thonny is working out of the virtual environment, we can run our pose estimation script. Go ahead and extract the project zip folder to a convenient place like the desktop. In there, you will find the first script we will use "pose demo.py". Open it Thonny and hit the big green run button. The first time you run this it may install a few extra needed things (all automatically), and after a few seconds you should see a preview window appear with your pose estimation running.
A few things should be happening here. First YOLO will be trying to detect humans, and if it recognises one it will draw a box around it with the confidence rating at the top. The important thing is that it will be placing points at where it thinks some essential places of your body are (these are called keypoints), and it will be drawing lines between these points to estimate the pose and orientation of the person. In the top right will also be the FPS this is running at (which we will improve in a bit).
And that's it! With these few steps, we already have our Pi running pose estimation!

Changing YOLO Models
So far we have been running YOLO11, and one of the beauties of this Ultralytics package is that we can simply swap out a single line in the code to completely change the model. We can use this to run a more advanced YOLO11 model, or even an older model. All you need to change is this line here in the setup:
# Load our YOLO11 model
model = YOLO("yolo11n-pose.pt")
This line is currently using the nano model which is the smallest, least powerful, but fastest model of YOLO11, and we can change this line to run one of the different sizes that this model comes in by changing the single letter after "11" as shown on the right. If you change this line to another model size and run it, the script will automatically download the new model (which can be in the 100s of Mb for the larger models).

The difference between these models is a trade-off between pose-estimation performance and FPS. The larger the model, the better it is at estimating the parts of your body that might not be seen by the camera, as well as more complex angles, and frames with more people in it, however, you can expect to only get 1 frame processed every 10 seconds! We will increase this in the next step.
The nano model on the other hand runs the fastest, getting about 1.5 FPS without optimisation, but it doesn't have the processing power of the larger models. For pose estimation, you can get away with the nano model most of the time as it is usually good enough for your needs, but if you need something a bit more powerful, keep increasing the model size to fit your needs.
In this line, we can also change the version of YOLO running. You can revert to an older model if you want, or you can utilise a newer model. This guide will eventually be outdated and if Ultralytics releases YOLO13, you should simply be able to change the line to the following to start using the newer YOLO version:
# Load our YOLO11 model
model = YOLO("yolo13n-pose.pt")
Also just be aware that some of the older YOLO models have a "v" in their names. E.G. YOLO8 is called:
# Load our YOLO11 model
model = YOLO("yolov8n-pose.pt")

Increasing Processing Speed
There are 2 things we can do to increase FPS on the Pi and the most effective way is to convert the model to a format called NCNN. This is a model format more optimised to run on ARM-based processors like the Raspberry Pi's. Open up the script called "ncnn conversion.py" and you will find the following:
from ultralytics import YOLO

# Load a YOLO11n PyTorch model
model = YOLO("yolo11n-pose.pt")

# Export the model to NCNN format
model.export(format="ncnn", imgsz=640)  # creates 'yolov11n-pose_ncnn_model'
To use this script, first specify the model you wish to convert. This uses the same naming conventions we talked about in the last section. Then the model format "ncnn" is specified as the output format, as well as the resolution. For now keep this at the default of 640. The first time you run this script it will download some more additional things it needs, but it should only take a few seconds to run the actual conversion.
Once that has finished, in the folder the scripts live in your will find a new folder called something along the lines of "yolo11n-pose_ncnn_model". Copy the name of this file and return to our demo script from earlier.
You now need to tell the script to use this model that we created by changing the model line to the name of that folder it just created. It should look something like this:
# Load our YOLO11 model
model = YOLO("yolo11n-pose_ncnn_model")
And if you run the script, it should work exactly as before but with a 4x increase in FPS thanks to that NCNN conversion.
The other thing we can do to increase FPS is to drop the processing resolution. This is the resolution that we will run the YOLO model at and less pixels means less time spent processing each frame.
While converting to NCNN was a free FPS boost, lowering the resolution does come at the cost of capability. A lower resolution will slightly decrease the accuracy of your pose estimation (not very much though), and the biggest effect it will have is that it decreases the distance it can estimate pose at. With the default resolution of 640, the range is quite far, so we can afford to drop it down a bit.
To do so, open up the NCNN conversion script we just used and specify the resolution to what you want in the line:
# Export the model to NCNN format
model.export(format="ncnn", imgsz=320)  # creates 'yolov11n-pose_ncnn_model'
NOTE: This will need to be a multiple of 32. So you cannot set it to 300, but you can set it to 320.
We find that resolutions in the 160 to 320 range give a good balance of performance and speed.
Run the conversion code and it will export the model with the desired resolution. Doing so will also overwrite any previously exported models of the same name.
In the demo script ensure that you specify the NCNN model like we did before. There is one more important thing we must do and that is to tell the script what resolution to feed the model. In the while true loop, you will find the following line. Ensure that it matches the resolution of the model, for this example we exported at 320:
    # Run YOLO model on the captured frame and store the results
    results = model.predict(frame, imgsz = 320)
If all goes well, you should see another significant increase in FPS. Play around with this resolution to fit your needs but remember:
- It must be a multiple of 32
- You must change the name in the main script to use the exported model
- You must set the resolution in the main script to match the model

Space Invaders Demo and Where to From Here
We now have our pose estimation running and at a suitable FPS, so lets look at how we can do something with those keypoints. All the data coming out of the model is stored in the "results" variable. Go ahead and open up the script called "keypoint acquisition.py". This script is nearly the same as the previous demo script with the addition of this function at the top:
def get_keypoint_position(keypoint_num, axis='x'):
    """
    Keypoint reference:
        0: nose          5: left_shoulder  10: right_wrist    15: left_ankle
        1: left_eye      6: right_shoulder 11: left_hip       16: right_ankle
        2: right_eye     7: left_elbow     12: right_hip
        3: left_ear		 8: right_elbow    13: left_knee
        4: right_ear	 9: left_wrist     14: right_knee
    """
    if not 0 <= keypoint_num <= 16:
        raise ValueError("Keypoint number must be between 0 and 16")
    if axis.lower() not in ['x', 'y']:
        raise ValueError("Axis must be 'x' or 'y'")

    # Get the keypoint data
    keypoint = results[0].keypoints.xyn[0][keypoint_num]

    # Return x or y coordinate based on axis parameter
    return keypoint[0].item() if axis.lower() == 'x' else keypoint[1].item()
This function takes in 2 inputs, the keypoint you want to use, and whether you want the x or y coordinate of it across the screen. It will then take this request and pull that data from the function to spit it out. It also has a reference for the mapping of what keypoint number belongs to what point of the body inside of it. If we wanted to call the function to find out the position of the nose (keypoint 0), and where it is on the x-axis, we would use the following line:
nose_x = get_keypoint_position(0, 'x')
This will return the relative position of the nose along the x-axis, so it will be a number between 0 and 1. 0 will be on the far left of the screen, and 1 will be on the far right. If we instead got the y-axis, it would also return a number with 0 being the top of the screen and 1 being the bottom of the screen. Running the script is the best way to get an intuition of this.
This is the bridge between YOLO running pose estimation and applying it in our projects as we now have a Python script that can track the position of a specific part of the body and return its location in the camera. As an example of what's possible, we (sort of) created the script called "space invaders.py". This is a modified version of the keypoint acquisition script that uses the position of the nose along the x-axis to control a simple game of space invaders. Run this script and have a play around with it!
This was made using a cool library called Pygame, and unfortunately, this isn't a tutorial on using Pygame. We also didn't write this code by hand and consulted with an expert in Pygame that you can access as well. Large language models like ChatGPT and Claude are experienced in writing this code and we simply copied and pasted in the keypoint acquisition code along with some text asking it to make a game of space invaders with it, and it spat out this code for us. You can do the same thing but for other simple games like Breakout and Snake!
Chances are it won't be perfect on the first go, you may get an error, or it may be too slow, or the colours might not be right. But you can simply ask it to fix this and it will have a good crack at it. It can also break down and teach you how the code works, just ask it like you would a person.
You can also do more than just control a video game, you could use the points to control hardware like servos, motors and solenoids. Or you could get creative and track the position of your shoulders and build a pull-up or push-up counter.
What ever your project is, you now have a Raspberry Pi that can analyse a video feed, look for humans, and feed out the position of points on that persons body. And the fact that we can run all of that on our humble little Pi is truely an incredibly feat.
If you make anything cool with this, or you need a hand with anything, feel free to drop a post below on our forum post specifically for this guide.

Acknowledgements
We would like to first of all thank the many contributors, developers and maintainers of the OpenCV and the COCO library. Much of the modern computer vision world has been built upon their efforts.
We would also like to thank Joseph Redmon and Ultralytics for developing and maintaining many of the YOLO models used here. They are fantastically powerful models that have been made able to run on low-power hardware like the Raspberry Pi and that is no small feat!
Project Zip File Download
This is just here to make it easier to find our code:

