
In this guide, we are going to be setting up Ollama alongside Open WebUI right on your NVIDIA DGX Spark to give you a completely local, browser-based LLM experience that feels just like using the flagship cloud tools, but now with the bonus of the data never leaving your machine! We will be leveraging NVIDIA's handy playbooks to pull a ready-to-go Docker container, mapping it directly into NVIDIA Sync as a custom application, and breaking down how to pull, test, and responsibly select the absolute best open-source models for your workflow.
In our last DGX Spark guide, we went ahead and set up NIM (NVIDIA's inference engine). It helps if you have watched that; however, it is not mandatory. As long as you already have NVIDIA Sync running and you’ve added Docker to your user group, you should be able to follow along with these steps.
Let’s get into it!
Setting it up as a Custom Nvidia Sync Application
To get this stack running, we are going to leverage some fantastic resources found inside NVIDIA’s playbooks. Specifically, we are going to pull a pre-built Docker container that bundles both Ollama (our backend inference engine) and Open WebUI (our frontend browser interface) into a single package. Rather than jumping into the terminal every single time you want to fire this up, we are going to tie the entire deployment process to a custom script right inside NVIDIA Sync. This gives us a convenient, one-click launcher available straight from the desktop. You likely won't be using this method in a professional deployment, but it really helps in the development process.
Setting this up is incredibly straightforward:
- Open up NVIDIA Sync from your system tray.
- Open the Settings menu and navigate over to the Custom tab.
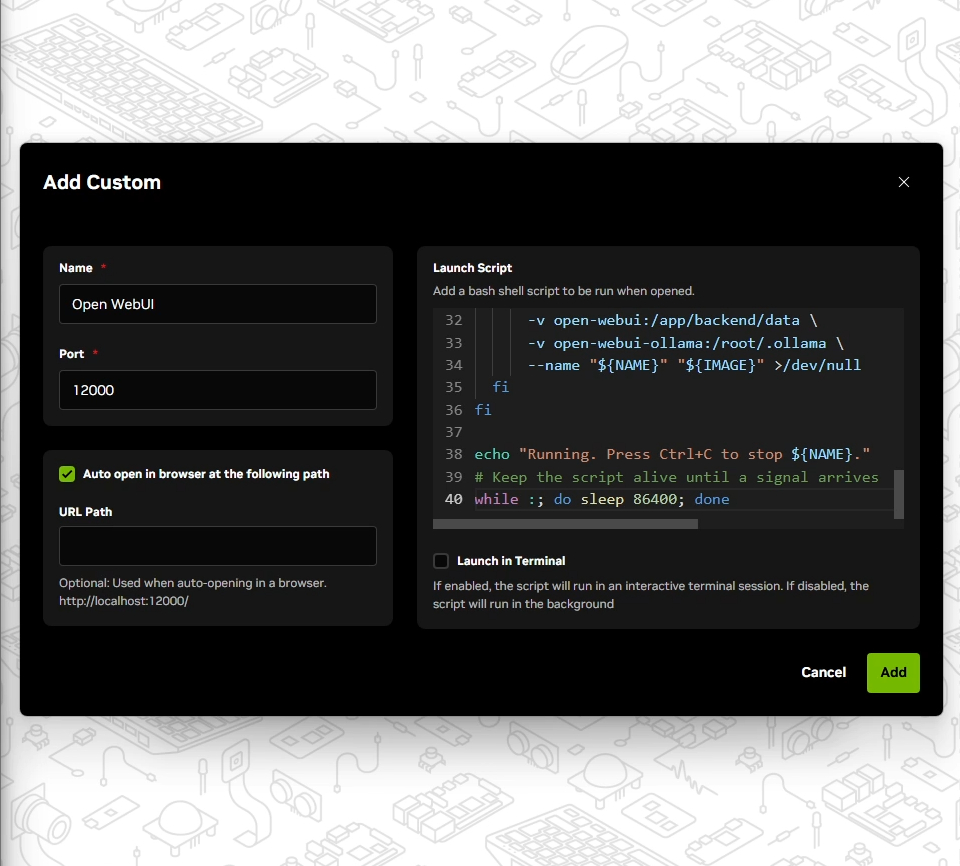
- Click on Add New App and fill out the configuration fields:
- Name: Give it a clear name like Ollama WebUI.
- Port: Set this specifically to 12000.
- Auto Open in Browser: Check this box so the interface pops up automatically once the service is ready.
- Paste the launch script below into the execution block, and hit Add to save your new application:
#!/usr/bin/env bash
set -euo pipefail

NAME="open-webui"
IMAGE="ghcr.io/open-webui/open-webui:ollama"

cleanup() {
  echo "Signal received; stopping ${NAME}..."
  docker stop "${NAME}" >/dev/null 2>&1 || true
  exit 0
}
trap cleanup INT TERM HUP QUIT EXIT

# Ensure Docker CLI and daemon are available
if ! docker info >/dev/null 2>&1; then
  echo "Error: Docker daemon not reachable." >&2
  exit 1
fi

# Already running?
if [ -n "$(docker ps -q --filter "name=^${NAME}$" --filter "status=running")" ]; then
  echo "Container ${NAME} is already running."
else
  # Exists but stopped? Start it.
  if [ -n "$(docker ps -aq --filter "name=^${NAME}$")" ]; then
    echo "Starting existing container ${NAME}..."
    docker start "${NAME}" >/dev/null
  else
    # Not present: create and start it.
    echo "Creating and starting ${NAME}..."
    docker run -d \
      -p 12000:8080 \
      -p 11434:11434 \
      -e OLLAMA_HOST=0.0.0.0 \
      -e OLLAMA_KEEP_ALIVE="-1" \
      --gpus=all \
      -v open-webui:/app/backend/data \
      -v open-webui-ollama:/root/.ollama \
      --name "${NAME}" "${IMAGE}" >/dev/null
  fi
fi

echo "Running. Press Ctrl+C to stop ${NAME}."
# Keep the script alive until a signal arrives
while :; do sleep 86400; done
This is a fantastically helpful script, as it will check if the container is installed (and install it if so), check if the container is installed but not running (start it if so), and check if it is running (where it will just open a WebUI terminal). If you want a full breakdown of it, we will do it in the appendix of this guide.
How to Install Models in Ollama
Now that we have configured our custom application within NVIDIA Sync, it is time to turn the key and fire everything up.
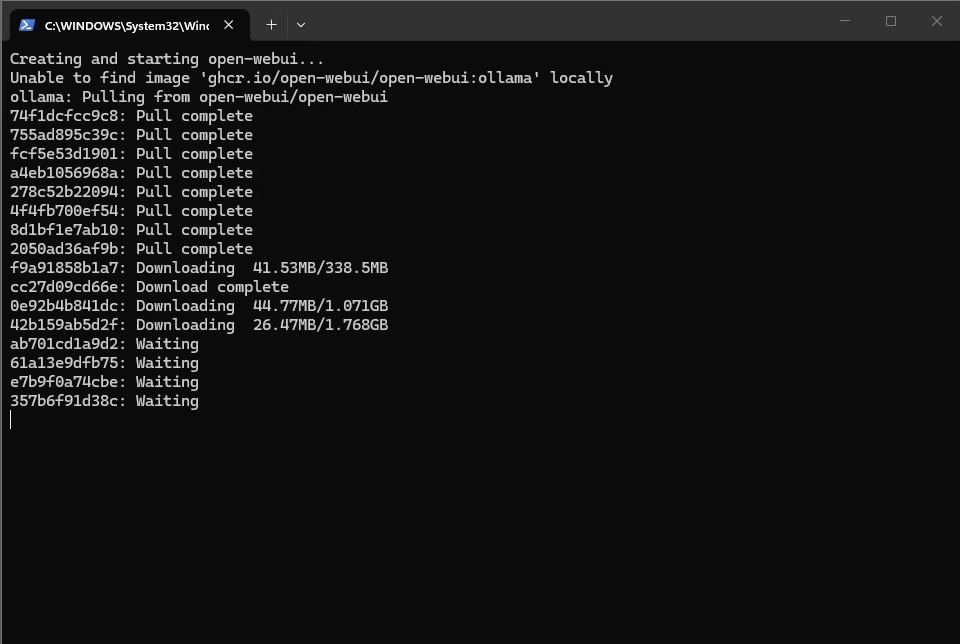
When you look at your NVIDIA Sync dashboard, you should see a brand-new, prominent Open WebUI button sitting ready. Go ahead and click it. The moment you do, the system will execute our launch script and begin pulling the bundled Docker container from the GitHub Container Registry.
Because this container houses the entire foundation for both Ollama and Open WebUI, it is a substantial file. The initial pull will take a few minutes depending on your internet connection. Once the container is safely downloaded and deployed on your machine, booting it up in the future will happen almost instantaneously with that same button click.
As the script completes its run, it will automatically launch a fresh window in your default web browser pointing straight to your local instance. The very first time this page loads, the backend will spend a minute or two performing its first-time setup. Don't panic if you see a get a 404'd page; just give it some time to set up, and refresh the page.
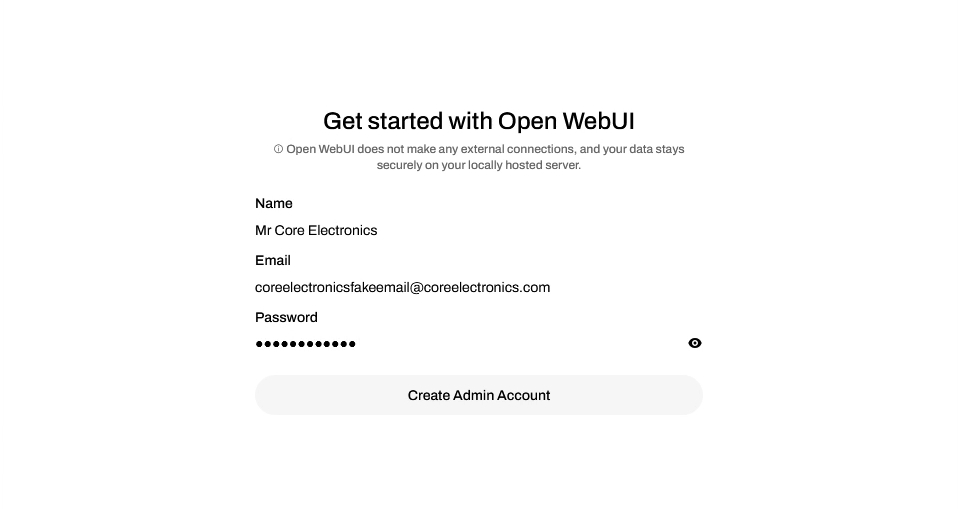
Once the initialisation sequence finishes, you will be greeted by a clean, modern account setup page asking you to input some credentials. These account details are stored 100% locally on your machine. Because we are running an entirely self-hosted stack, Open WebUI is not reaching out to any external database, cloud service, or third-party validation server. You could quite literally type in completely fictional credentials, and the system wouldn't care less.
However, you absolutely must remember the username and password you create here. The very first account registered on a fresh deployment is automatically designated as the Administrator of this instance. This admin profile gives you the exclusive power to manage global system preferences, adjust user access rules, and control how models are handled in Open WebUI.
With your admin profile configured, you will drop right into the main dashboard interface. It should feel immediately familiar if you have spent any time interacting with mainstream cloud-based LLM applications. We just have one problem: we don’t have a model installed yet!
To find a model, we will head on over to the Ollama model library. The landscape of open-source artificial intelligence moves at absolute breakneck speed. What is sitting at the top of the popularity charts as a gold standard today might be completely superseded in a matter of weeks. For this specific walkthrough, we are going to deploy Gemma 4. However, if you are reading this guide further down the track and a newer iteration like Gemma5 or a completely different architectural frontrunner has taken the crown, feel free to use that instead! The underlying process remains identical.
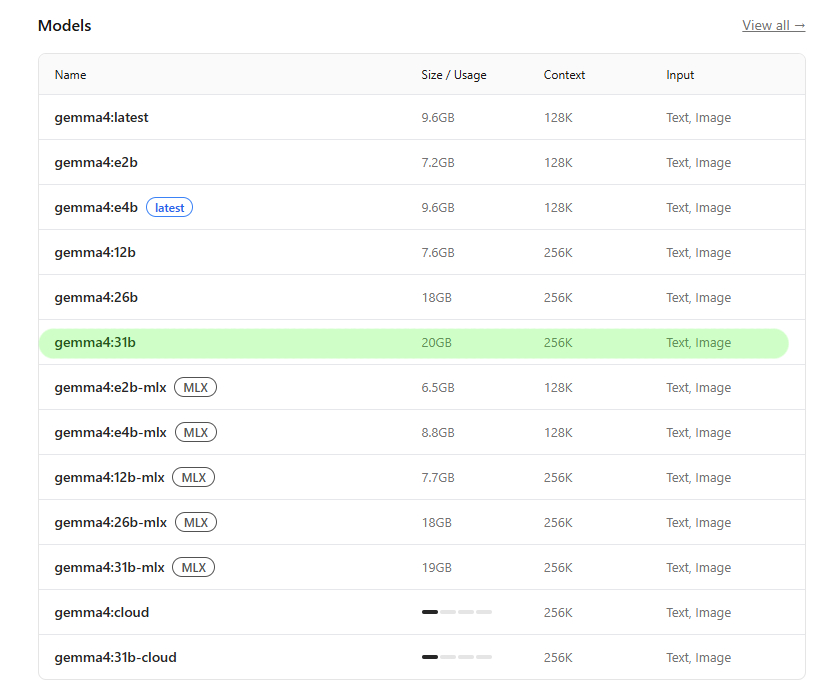
When you click into your model of choice on the Ollama repository, you will notice that it isn't just a single download link. Instead, you will be presented with an extensive list of different model variants and parameter sizes. If you venture into the "View All Models" sub-tab, the sheer volume of choices can look a bit overwhelming.
For our deployment, we are going to select the highly capable gemma4:31b variant. Locate its specific text tag on the site (which will look exactly like gemma4:31b) and copy it.
Head back to your Open WebUI dashboard window. In the top left, you will have a drop-down menu to allow you to search for a model. Paste in the model name, and you should see the option to "Pull from Ollama.com", which will download the model.
Now, depending on the specific version of the interface you are running, you may occasionally experience a minor visual quirk where the built-in UI progress bar doesn't pop up to show the download percentage. If this happens to you, don't worry; the system hasn't crashed. We can use a Docker command to check in on our download progress.
Open up a standard terminal window on your machine and type in:
docker stats
This command opens a live, real-time diagnostic stream showing the resource utilisation of all active Docker containers. Keep a close eye on the network input/output column (NET I/O). You will see the container downloading data. Because our chosen gemma4:31b model weighs in at roughly 20GB in storage size, you can gauge your overall progress by watching that data counter tick upward.
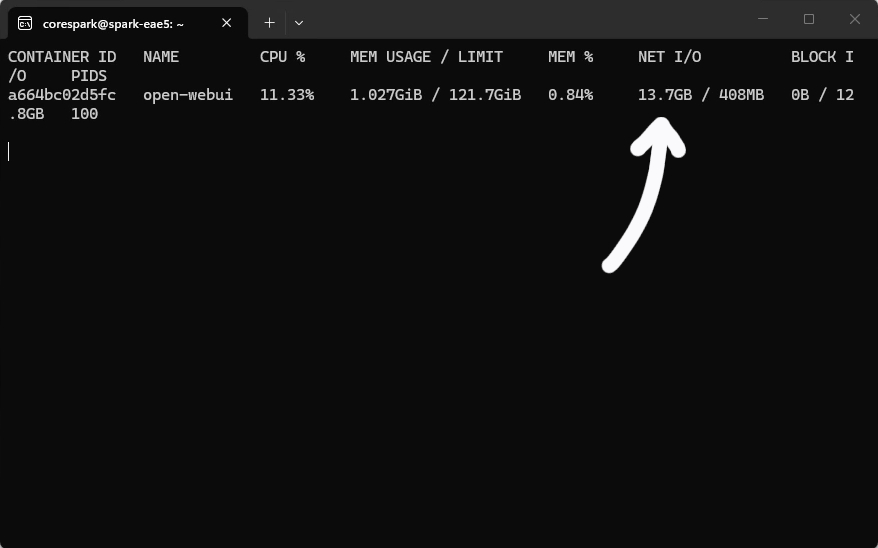
That 20GB size milestone tells us two important things:
- It is the physical space the compressed model files take up on your storage drive.
- It's the size that the base model itself will take up in RAM.
Keep in mind that there is more than 20 GB of RAM needed. It does not account for the RAM required for operational overhead, the contextual window size processing, or the KV cache needs that we looked at in our previous guide.
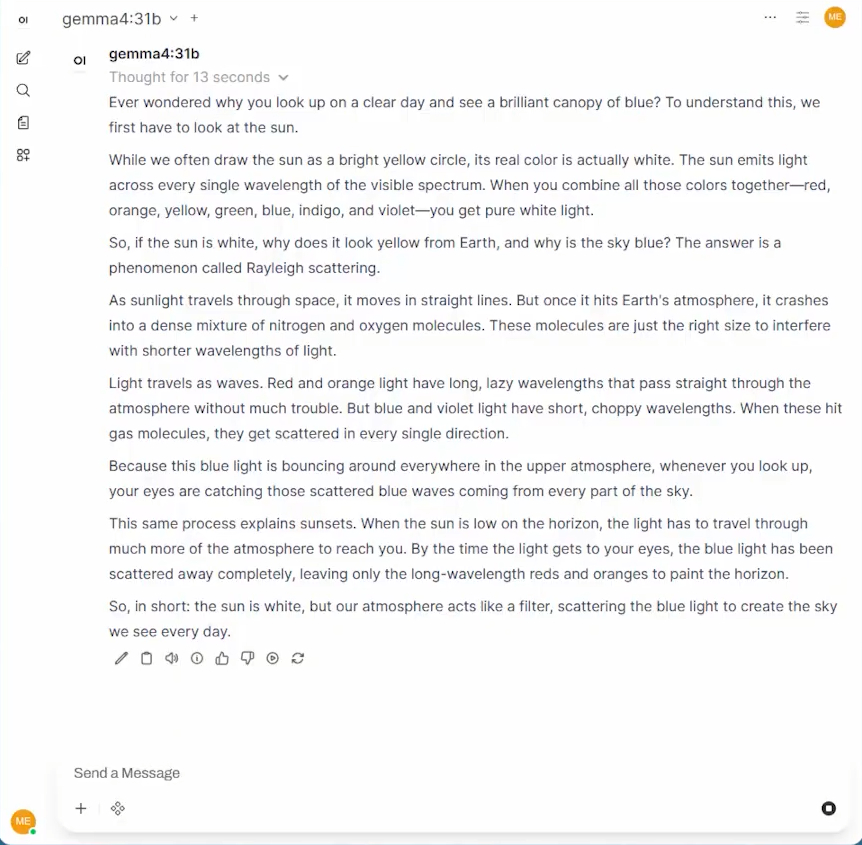
Once the terminal indicators settle down and the download process finishes, head back into your Open WebUI browser tab. Click the model dropdown menu at the top of the chat page, select your freshly pulled model, and drop a test question into the prompt bar. I always like to test models with the prompt shown on the right, as it is in an area of my expertise that I can evaluate it on:
"Write a 2-minute science explainer video as to why the sky is blue, and the real colour of the sun. Do not include visual notes or time stamps."
This task is a bit of a difficult test for LLMs, and Gemma4 did pretty well, except for a bit of confusion in the last paragraph.
And that is the summit of this guide!
Let's take a quick step back and get some perspective of what we have. Gemm4 is a very capable model. While comparing open-weights architecture directly to proprietary commercial models is a bit of an "apples to pears" scenario, the power and "intelligence" of Gemma4 is quite comparable to the flagship cloud models that multi-billion-dollar AI conglomerates could only offer via paid API access at the start of 2025. This guide was written in mid-2026, and the fact that we can run a model only 18 months behind the bleeding edge but offline and locally, without a single byte of data leaving your physical hardware: how incredible!
AND we still have a ridiculous amount of RAM spare! There is plenty of headroom to jump back into the Ollama repository, pull some alternative model families, experiment with different model sizes, and roadtest them! If you wanna get prepped for the next video, go ahead and install gemma4:12b as we will be using it.
Explaining the Ollama Naming Schemes
Let’s now take a step back and have a quick chat about the models themselves. When you start browsing through the Ollama repository or the wider open-source ecosystem, you are going to run headfirst into some truly baffling strings of text. What on earth does it mean when someone says, "Hey, I’m deploying qwen3.5:35b-a3b-q4_K_M"?
It looks like absolute gibberish, and naming conventions in the AI world can definitely feel like a bit of a wild west. However, it actually follows a logical pattern once you know how to slice it up. Let's dissect that specific string piece by piece:
- qwen: This represents the Model Family.
- 3.5: This is the generation or version of the model architecture.
- 35b: This stands for the Total Parameter Size of the model, the size of the brain.
- -a3b: This denotes the Active Parameter Size (3 billion parameters), which tells us this model uses an architecture called a Mixture of Experts (MoE). Instead of firing up all 35b parameters when asked a question, it only fires up the relevant 3b of specialised neurons relevant to the request, which helps speed up token generation.
- q4_K_M: This is a label of the quantisation method and "aggressiveness" applied to the model.
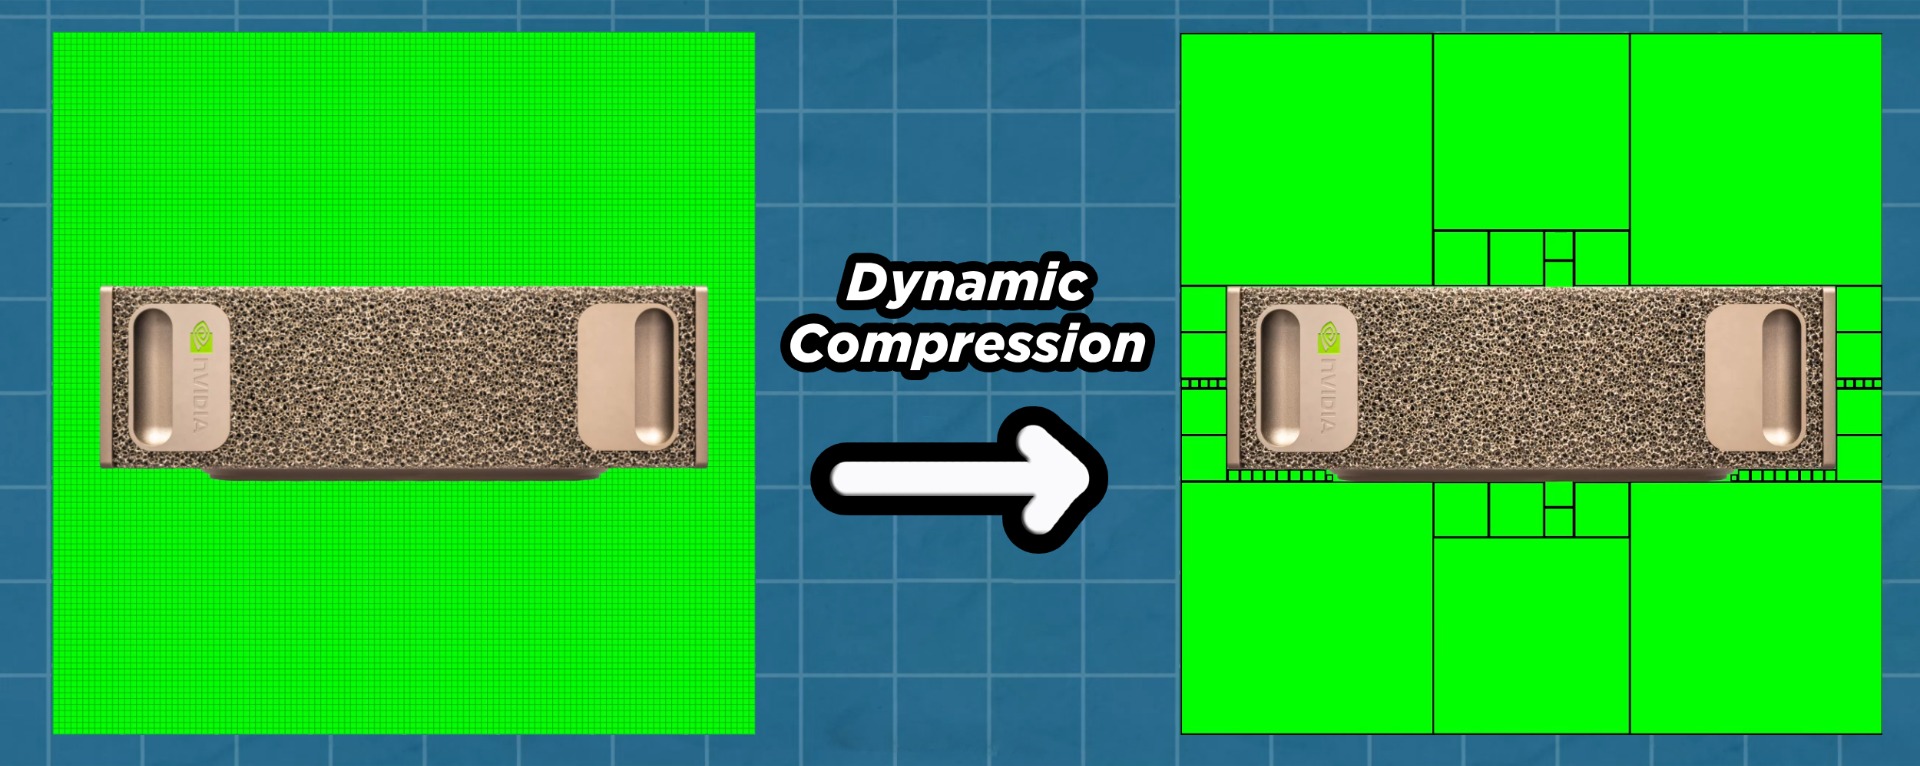
A lot of that is familiar or straightforward except the quantisation labelling, so let's look at it. We looked at quantisation in our last video, and this is the same idea, but it is being done dynamically. The "K" in the middle stands for K-quant, which means that important parts of our model that do the heavy lifting are left alone, while the less important or less used parts of the model are quantised and compressed a lot. By dynamically compressing our model, we get better intelligence for less processing cost.
Imagine an image of an object on a green screen. If we used a high-resolution image, we would have thousands of pixels all being the exact same green colour; what a waste of data! What if instead, we replaced a thousand pixels in the background with a few giant green pixels, but kept the full resolution of the object of interest? Doing so gives us a smaller file size, but the same image, and the same logic is applied to our models.
The "Q" on the front is a measurement of the total compression performed:
- Q8: Very low compression. It retains virtually 100% of the original model's accuracy, and it demands a massive amount of VRAM.
- Q6: A light touch of compression. It shaves off a noticeable amount of RAM usage while keeping the model's baseline intelligence almost entirely intact.
- Q4: The universal sweet spot. The model file size is drastically cut in half (or more), yet its real-world performance and reasoning accuracy remain quite close to the uncompressed original.
- Q3 or Q2: Overly compressed. While they are tiny and will run on practically anything, the extreme compression cuts too deep into the model's logic pathways, making it not very "smart".
While the above are good rules of thumb, remeber this may not hold in the future as very smart people figure out how to do more with less!
Some other common tags to look out for:
- MLX: This is Apple's framework and means the model has been optimised for M-series chips. Not very helpful for us.
- -instruct or -chat: This indicates that the base model has undergone Instruction Fine-Tuning. It has been specifically trained to behave like an interactive conversational assistant, answering prompts, following formatting commands, and holding a dialogue.
- -fp16 or bfp16: This means the model is completely uncompressed and running at full 16-bit precision. It will give you the absolute purest, highest-quality outputs the model architecture is capable of producing, but it will absolutely devour your hardware resources - as we discussed in the last guide. You may also find fp8 and fp4 models as well.
How to Choose a Model to Run Locally?
Which model should you actually choose? This is not an easy question to answer cleanly. If we give you a definitive answer right now, there is a very high probability it will be completely out of date within a month as newer, shinier models are released. However, when you are selecting a model for real-world business applications, there are a few important things to consider.
Give it "time in the sun": If a brand new model is released, maybe give it some time before deploying it. In the open-source community, "time in the sun", with millions of people poking and prodding at a new model, is the way that critical issues, and even security vulnerabilities, are found. This is a thing you should utilise (and contribute to when you can!) before making it a critical piece of infrastructure.
Commercial Licensing: When scrolling through a sea of open-source models, it is really easy to forget to check if a model has commercial licensing. Most of the time they do, but worth a check. Also worth double-checking when using any AI tooling or custom applications!
Tool Calling: In future guides, we will be setting up an LLM with a series of tools to perform automated tasks. These tools rely on interacting with and structuring JSON strings. You may find that some models are able to more reliably adhere to the rules of these systems than others.
Jailbreaking: How easily can the model be prompted by a customer or employee to do things outside of its given task?
Check out Hugging Face: While Ollama's native repository is incredibly convenient, it is not a comprehensive list of every available LLM. You can find and install models directly from Hugging Face, which serves as the ultimate central library for the global AI community. You will find a massive playground of incredibly fresh, experimental, and highly customised models that independent developers have fine-tuned for hyper-specific tasks (like advanced medical analysis, obscure coding languages, or highly niche creative writing styles).
⚠️ Warning: Watch Out for Namespace Attacks. Someone may upload a model with a very similar name, hoping you typo the name of the real one.
The best way to choose a model is to immerse yourself in it through social media and forums. New model releases are often "over-hyped" to some degree, and benchmarks are often carefully curated as a result. LLM and local hosting subreddits, as well as other community-driven online spaces, are a great way to cut through a lot of this noise. Spending just a few minutes a week passively scrolling through those spaces will keep you up to date on which models are performing well in the real world, which ones are overhyped benchmarks, and what is currently considered the gold standard for local deployment.
Where to From Here?
And that brings us to the end of this guide! We now have a pretty solid model running locally, offline, on our own dedicated hardware, backed by a massive playground of weird and wonderful models. And it really is a testament to how fast this entire space is moving: if you travelled back in time 4-5 years from now, your DGX Spark (and the software on it) would be worth billions of dollars, and you would be handing a monopoly over generative AI on a silver platter to whoever owns it. That is pretty breakneck speed for an industry!
We are also just getting started with this system. We can push this architecture even further by leveraging our local models to build out fully automated, localised AI Agents. These agent frameworks add an incredible amount of capability, so check out our guide on how to do that!
You are also primed to start playing around with a lot of models you can find online. While you might not be able to use the more frontier-sized 300b or 700b models, that 128 GB of uRAM will allow you to install some sizeable models. The DGX Spark plays into the strength of trading high-speed memory for more memory, so use it! Why not also try to install a model we looked at in the last NIM video, and compare the performance of Ollama and NIM!
As usual, check out NVIDIA's Playbooks for the DGX Spark as well; they have lots of guides for handy AI applications.
If you’ve built something awesome using this setup, or if you run into any technical hurdles or walls of red text while configuring your DGX Spark, please head straight over to our community forums and start a thread. We are always happy to lend a hand.
Until next time, happy making!
Appendix: Breaking Down the Launch Script
If you want to start writing your own custom application scripts wth NVIDIA Sync, it is well worth taking a peek under the hood to see how this one works, as it is a great example of how to do it right (probably because we took it from NVIDIA's guide and modified it a little). Let's break down exactly what this script is doing.
Starting off, we set up some strict rules for our script and define the variables we will be using:
#!/usr/bin/env bash
set -euo pipefail

NAME="open-webui"
IMAGE="ghcr.io/open-webui/open-webui:ollama"
The set -euo pipefail line is a great safety measure that ensures our script fails gracefully if it encounters an error or an undefined variable. We then define the name of our container and point it to the specific Docker image we want to use—in this case, the awesome Open WebUI with Ollama baked right in.
Then we set up our cleanup phase, which acts as a safety net for when we want to close the program:
cleanup() {
  echo "Signal received; stopping ${NAME}..."
  docker stop "${NAME}" >/dev/null 2>&1 || true
  exit 0
}
trap cleanup INT TERM HUP QUIT EXIT
Instead of just killing the script instantly and leaving our Docker container running in the background, eating up resources, this trap catches exit signals (like when you hit Ctrl+C). When it detects that signal, it runs our cleanup function to gracefully stop the container first.
Next, we run a quick check to make sure our system is actually ready to run the container:
# Ensure Docker CLI and daemon are available
if ! docker info >/dev/null 2>&1; then
  echo "Error: Docker daemon not reachable." >&2
  exit 1
fi
Before we try to do any heavy lifting, we want to ensure the Docker daemon is actually running. If it isn't, this code catches it and throws a helpful error instead of spewing a whole wall of red text at us.
This next bit of code is the main brain of our script. It works through a logical checklist using an if/else block:
# Already running?
if [ -n "$(docker ps -q --filter "name=^${NAME}$" --filter "status=running")" ]; then
  echo "Container ${NAME} is already running."
else
  # Exists but stopped? Start it.
  if [ -n "$(docker ps -aq --filter "name=^${NAME}$")" ]; then
    echo "Starting existing container ${NAME}..."
    docker start "${NAME}" >/dev/null
  else
    # Not present: create and start it.
    echo "Creating and starting ${NAME}..."
    docker run -d \
      -p 12000:8080 \
      -p 11434:11434 \
      -e OLLAMA_HOST=0.0.0.0 \
      -e OLLAMA_KEEP_ALIVE="-1" \
      --gpus=all \
      -v open-webui:/app/backend/data \
      -v open-webui-ollama:/root/.ollama \
      --name "${NAME}" "${IMAGE}" >/dev/null
  fi
fi
First, it asks, "Is the container already running?" If yes, it does nothing. If not, it asks, "Does it exist but is just asleep?" If so, it simply wakes it up with docker start.
If the container doesn't exist at all, we move into our docker run command which builds and starts it from scratch. Notice how we are mapping our network ports, giving it full access to our hardware with --gpus=all (which is crucial for getting those high-speed processing times with AI models!), and setting up persistent volumes (-v) so we don't lose our downloaded models and chat history when the system restarts.
And we end it by putting the script into a holding pattern:
echo "Running. Press Ctrl+C to stop ${NAME}."
# Keep the script alive until a signal arrives
while :; do sleep 86400; done
This infinite loop simply keeps the script alive in your terminal, sleeping for a day at a time. This ensures that the script stays active so that when you do press Ctrl+C, our cleanup function from earlier can trigger and shut everything down smoothly!

