
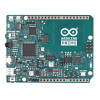
The Arduino Primo is the first board developed in cooperation with Nordic Semiconductor. It brings new benefits for the IoT world all on one platform: advanced 32-bit microcontroller architecture, bluetooth low energy (BLE), Wi-Fi, near-field communications (NFC), and infrared (IR) transmit and receive capability.
There are three onboard microcontrollers:
- nRF52832, the main Arduino microcontroller with integrated BLE and NFC
- STM32f103, a service microcontroller used for advanced debugging and programming of the other microcontrollers
- ESP8266, for Wi-Fi and related internet connectivity functions.
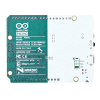
The board has:
- 14 digital input/output pins (of which 12 can be used as PWM outputs)
- 6 analog inputs
- 64 MHz ceramic resonator
- micro-USB connector
- ICSP header
- battery charger
- Infrared receiver and transmitter
- NFC antenna
- BLE interface
- Buzzer
- two service buttons
- LEDs
- reset buttons (to reset the various microcontrollers).
Arduino Primo can be connected to a computer using a micro-USB cable, or it can be powered using a battery, connected via a 2-pin JST-PH connector. Having both Bluetooth and Wi-Fi connectivity on board makes it easy to get started in the IoT world.

Power
The Arduino Primo can be powered three different ways:
- using a micro-USB connector
- connecting a power supply to the Vin pin
- using an external battery connected via the 2-pin JST-PH connector.
The Primo has integrated a charger and power management circuit that allows to run on battery or an external 5V and also to charge a Li-Ion and Li-Pol battery.
When it runs an external 5V(4.75~5.25V ) then it cuts off the battery if the voltage is lower than 3.5V and the switching from a source at the other one is done automatically.
Charger:
The charge current is 340mA as default setting but you can close the solder bridges, in the back of the board, when you need more current .
-MED :810mA
-HIGH: 910mA

The power pins are as follows:
- VIN. The input voltage to the Arduino board can be supplied using an external power source or battery. It must supply between 2.7V and 5.5V.
- 5V. This pin outputs a regulated 5V power supply voltage that is generated from the onboard regulator. Connecting an input power source to the 5V or 3.3V pins bypasses the regulator, and can damage your board. We don't advise it.
- 3V3. This pin outputs a regulated 3.3V power supply voltage that is generated from the onboard regulator. Maximum current draw is 50 mA.
- GND. Ground pins.
- IOREF. This pin on the Arduino board provides the voltage reference at which the microcontroller operates. A properly configured shield can read the voltage on the IOREF pin to select the appropriate power source, or to enable voltage translators on the 5V or 3.3V outputs.
- Memory
The nRF52832 has 512 KB of Flash memory and 64 KB of SRAM. There is no onboard EEPROM memory.
Input and Output
Each of the 14 digital pins on the Primo can be used as an input or output, using pinMode(), digitalWrite(), and digitalRead() functions. They operate at 3.3V. Each pin can provide or receive a maximum current of 14 mA. In addition, some pins have specialized functions:
- Serial: 0 (RX) and 1 (TX): Pins 0 and 1 are used to receive (RX) and transmit (TX) TTL serial data.
- External Interrupts: all pins (digital and analog) can be used as external interrupts except pins 0 and 1. Keep in mind that you can’t use more than eight interrupt pins at the same time. These pins can be configured to trigger an interrupt on a low value, a rising or falling edge, or a change in value. See the attachInterrupt() function for details.
- PWM: pulse width modulation is available on all digital pins except pins 0 and 1. The 12-bit PWM output resolution can be adjusted using the analogWriteResolution() function.
- SPI: A serial peripheral interface (SPI) bus is available using pins 10 (SS), 11 (MOSI), 12 (MISO), and 13 (SCK) as well as using the onboard ICSP header. SPI communication is available using the SPI library.
- LED: There is a built-in LED connected to digital pin 9. When the pin is HIGH value, the LED is on, when the pin is LOW, it's off.
The Primo has 6 analog inputs, labeled A0 through A5, each of which provide up to 14 bits of resolution (i.e., 16384 different values). By default they measure from ground to 3.3 volts, though it is possible to change the upper end of their range using the analogReference() function. A few additional pins are on the headers and those pins have specialized functions:
- TWI: Two-wire interface (TWI) communication is available from the serial data line (SDA) and serial clock line (SCL) pins (located near AREF). TWI communication is supported using the Wire library.
- AREF. Unlike some other Arduino boards, the analog reference (AREF) pin cannot be used to connect an external reference voltage for the analogRead() command. But it can be used to compare analog inputs (see Comparator library).
- RESET. Bringing the reset line LOW will reset the microcontroller. RESET pin will reset only nRF52832 microcontroller. In order to reset all the three microcontrollers on board use reset button instead.

Communication
The Arduino Primo has a number of facilities available for communicating with a computer, tablet, or smartphone; another Arduino; or other microcontrollers and devices.
The easiest method to communicate is to use a USB cable between the micro-USB port on a Primo, and a standard USB port on a PC. This is the same method used to communicate between the classic Arduino UNO and a PC, in order to upload sketches. Also like the UNO, the Primo supports a serial monitor function, which enables checking the communication between the board and a PC, and sending text messages and sensor data to help debug or analyze the operation of a sketch.
A SoftwareSerial library allows for serial communication over any of the digital pins.
The nRF52832 also supports I2C (TWI) and SPI communication. The Arduino software includes a Wire library to simplify use of the I2C bus and the SPI library for the SPI communication.
The board allows wireless communication with other devices via Bluetooth, NFC, WiFi and IR, using specific libraries for each protocol.
The BLE interface allows Primo to communicate with other BLE devices. It can also be used by PCs, tablets, and smartphones. The library used is BLE that allows peripheral and central capabilities.
The NFC peripheral supports type A communication signals at a106 kbps rate. The NFC library is contained in the NRF52 platform for Arduino software (Arduino IDE 1.8.x or later).
The Primo Wi-Fi communication is supported by the ESP8266 module, which includes a self-contained SoC with integrated TCP/IP protocol stack. This module allows connecting the Primo to a Wi-Fi network. The Primo Wi-Fi configuration supports access point (AP) mode, station (STA) mode, and the combination of the two: AP + STA by the WiFi Link library
The CIR library allows the Primo board to interact with a large number of IR sensors. The board has both receiver and transmitter capability, to give full flexibility to your sketches.

Programming
The Arduino Primo can be programmed with the Arduino IDE software, as well as 3rd party software. The Arduino is available from Arduino IDE 1.8.x version, downloading the corresponding platform (Arduino NRF52) from the Board Manager.
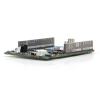
Physical Characteristics
The length and width of the Primo printed circuit board (PCB) is 2.7 x 2.1 inches respectively. It includes a micro-USB connector and a 2-pin adapter for power via a battery or external supply. Four screw holes allow the board to be attached to a surface or case.
Note that like the Arduino Uno and several other boards, the distance between digital pins 7 and 8 is 160 mil (0.16"), not an even multiple of the 100 mil spacing of the other pins.
Now you are ready to begin using your Arduino Primo following the Getting Started guide guide.
Exact shipping can be calculated on the view cart page (no login required).
Products that weigh more than 0.5 KG may cost more than what's shown (for example, test equipment, machines, >500mL liquids, etc).
We deliver Australia-wide with these options (depends on the final destination - you can get a quote on the view cart page):
- $3+ for Stamped Mail (typically 10+ business days, not tracked, only available on selected small items)
- $7+ for Standard Post (typically 6+ business days, tracked)
- $11+ for Express Post (typically 2+ business days, tracked)
- Pickup - Free! Only available to customers who live in the Newcastle region (must order online and only pickup after we email to notify you the order is ready). Orders placed after 2PM may not be ready until the following business day.
Non-metro addresses in WA, NT, SA & TAS can take 2+ days in addition to the above information.
Some batteries (such as LiPo) can't be shipped by Air. During checkout, Express Post and International Methods will not be an option if you have that type of battery in your shopping cart.
International Orders - the following rates are for New Zealand and will vary for other countries:
- $12+ for Pack and Track (3+ days, tracked)
- $16+ for Express International (2-5 days, tracked)
If you order lots of gear, the postage amount will increase based on the weight of your order.
Our physical address (here's a PDF which includes other key business details):
40 Aruma Place
Cardiff
NSW, 2285
Australia
Take a look at our customer service page if you have other questions such as "do we do purchase orders" (yes!) or "are prices GST inclusive" (yes they are!). We're here to help - get in touch with us to talk shop.
Have a product question? We're here to help!
Guides

The Maker Revolution
Projects
")
Raspberry Pi Cyberdeck (SDR Edition)

Pico-Dog Motion Activated Audio Alarm

WaveJumper: Music Sample Slicer on a Breadboard
Educational Workshops

Arduino Workshop for Beginners

Makers love reviews as much as you do, please follow this link to review the products you have purchased.
Product Comments