RetroPie is a fantastic system, and once you map your input device, it will take those mappings and apply them to all of the emulators on RetroPie. If you’re new to RetroPie and want to find out a bit more, take a read of our Gaming Kit for RetroPie tutorial. However, sometimes the mappings don’t always carry across as intended. This can be because of a few different reasons, but usually, it’s because of the fact that some emulators, such as mupen64, use RetroArch mappings instead of the intended ones. For example, you may find that on the new 8Bitdo N64 style controllers, the buttons will be mapped correctly in Emulation Station (the home menu system that loads on startup), however, when you try and play a game with the N64 emulators, the buttons are mapped incorrectly.
Well, today is your lucky day, we’ll be walking through how to remap controller input for individual emulators. This means that all the rest that map exactly as they should won’t be affected, only the emulator that you specify. You can use this method for any emulator, but today we’ll be looking specifically at the mupen64plus (default for all RetroPie versions past 3.3).
Before following this tutorial, we recommend reading the Gaming Kit for RetroPie, Setting Up 8Bitdo Controllers in RetroPie, and Updating 8Bitdo Controller Firmware (coming soon) tutorials.
In our testing, we found that turning the controller on for the first time can be a little tricky. As mentioned in the Setting Up 8Bitdo Controllers in RetroPie tutorial, to turn the controller on, you hold the START button for 3 seconds, however, you'll need to be sure to charge it for about 30mins before using it for the first time.
Pairing and Configuring Controller
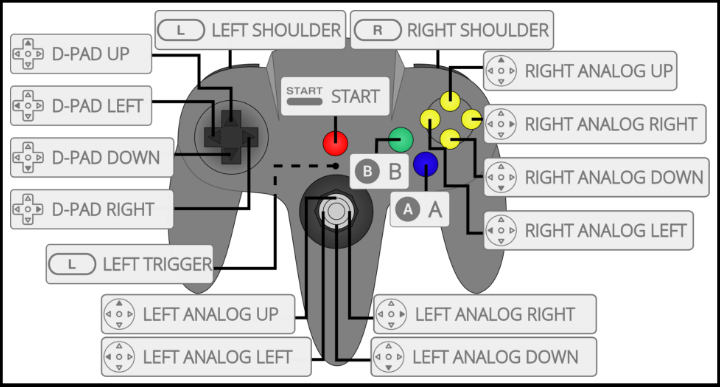
We’ll be using the N64 style 8Bitdo controller as an example for this tutorial, however, it will work with others too. The first thing you’ll need to do is to pair the controller with your system over Bluetooth as detailed in our Setting Up 8Bitdo Bluetooth Controllers in RetroPie tutorial. Once you’ve done that, go ahead and map your input device in Emulation Station as detailed in the mapping section of the Gaming Kit for RetroPie tutorial, however, you’ll notice that each time you map a button, it will tell you the button ID. We’ve detailed the settings for the 8Bitdo N64 controller we tested this on, and they should be the same as yours, however, if any are different, just make a note of your button ID for that control.
N64 Controller Layout for Input Configuration
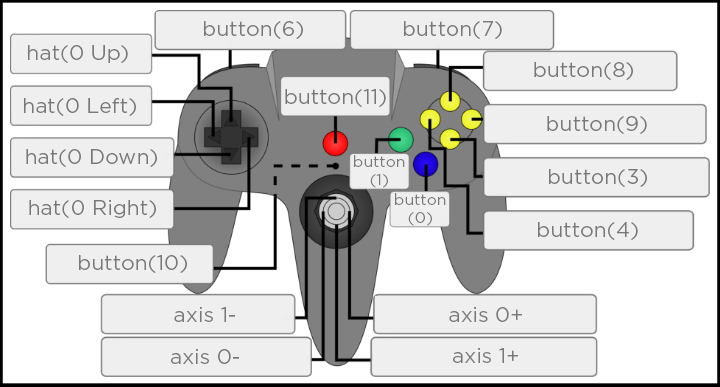
N64 Controller Button IDs
The quickest and easiest way to get the correct N64 RB8 Controller Mapping for RetroPie onto your system requires a few things:
- A working internet connection on your RPi running RetroPie
- A Keyboard connected to your RPi
- An 8BitDo N64 Controller connected via bluetooth to your RPi
If you have those 3 things the good news is, you are about 2 minutes away from playing 007 with your controller. If you want the full, more in-depth explanation of the process we are about to follow, scroll down to "Editing the Config File for your controller" below. If you just want to get up and running, quickly; follow these simple steps.
Step 1: From the EmulationStation homescreen press the F4 button on your keyboard, this will open a terminal window where you can pass commands to your computer
Step 2: In the terminal we are simply going to download our working config file for your controller and place it where your emulator looks for controller information. To do this all you need to do is type in the following command, exactly as it appears below.
wget http://coreelec.io/2e -O /opt/retropie/configs/n64/InputAutoCfg.ini
(That's a capital o in that command by the way)
That's it! You've now got the correct controller mapping for your controller!
Step 3: To get back into the emulation station from the terminal, simply type
emulationstation
and hit enter. You are now free to use your N64 controller as the retro-gaming gods wanted you to!
Editing the Config File for your controller
In order to change the mapping for a particular emulator, we need to set what each button in the emulator corresponds to on the controller. To do this, you’ll need to open up the terminal in RetroPie. This isn’t as scary as it sounds, simply press F4 on your keyboard, and it will open terminal up. The config file for mupen64plus (default on every RetroPie release post 3.3) can be opened by entering the following:
sudo nano /opt/retropie/configs/n64/InputAutoCfg.ini
Here you’ll see a set of button mappings for each input device you have configured. Scroll down until you see the set of mappings with the header:
[8Bitdo N64 Gamepad]
Now here you want to enter the following (make sure that if any of your button IDs were different to ours, that you change them accordingly):
; 8Bitdo N64 GamePad_START
[8Bitdo N64 Gamepad]
plugged = True
plugin = 2
mouse = False
AnalogDeadzone = 4096,4096
AnalogPeak = 32768,32768
DPad R = hat(0 Right)
DPad L = hat(0 Left)
DPad D = hat(0 Down)
DPad U = hat(0 Up)
Start = button(11)
Z Trig = button(10)
B Button = button(1)
A Button = button(0)
C Button R = button(9)
C Button L = button(4)
C Button D = button(3)
C Button U = button(8)
R Trig = button(7)
L Trig = button(6)
Mempak switch =
RumblePak switch =
X Axis = axis(0-,0 )
Y Axis = axis(1-,1 )
; 8Bitdo N64 Gampad_END
Make sure to remove the old mapping for the 8Bitdo N64 Gamepad, then hit ‘Ctrl X’ to save, ‘y’ to confirm, and Enter to save the changes. Well done! That’s all there is to it. Mupen64plus will read this file and create it’ mappings from there and everything should work accordingly.
You can exit out of the terminal by typing:
exit
However, you will need to reboot your Pi so use:
sudo reboot
Now your 8Bitdo N64 controller can be used with the N64 emulator to you heart's content, with all of the mappings exactly as you’d expect. If you ever need to adjust any mapping settings for whatever reason, you can always come back and edit this file. If something goes wrong and you make a mistake, don’t worry, simply remove the controller’s Bluetooth mapping in the Bluetooth menu, follow the tutorial to remap your controller, and start again. Happy gaming!
