Display devices are used to visually display the information we are working with. LCD (Liquid Crystal Display) screens are one of many display devices that makers use. We have libraries to control specific LCD functions which make it ridiculously easy to get up and running with LCDs.
In this tutorial, we will learn the basics of LCD functionality within the Arduino platform, including the wiring and coding necessary to make our data appear where we need it to.
The project
We are going to connect an LCD screen to our Arduino and make it print some stuff to the display, grab whatever you need and get started
- Solderless Breadboard
- Arduino Board
- USB Cable
- Potentiometer (10k ohm)
- LCD Screen (16x2)
- Jumper Cables
What is the LCD and how do you make it work?
A liquid crystal display is essentially a liquid crystal sandwiched between 2 pieces of glass, the liquid crystal reacts depending on current applied. Our LCD is a white on black, 16 by 2 character LCD that we will use to display symbols. Graphical LCDs also exist, but today we are just focusing on the character variety.
Each character is off by default and is a matrix of small dots of liquid crystal. These dots make up the numbers and letters that we display on screens. The actual coding that goes into making these characters appear is quite complicated, luckily for you, the people over at Arduino.cc have made a library of functions for the LCD that we can import into our sketch.
Essentially you will just need to pick a character spot on your screen and tell your Arduino what to write there. We call the place that we are writing characters to ‘the cursor’, similar to the cursor on your PC.
The LCD also has a backlight and contrast control options. The backlight will shine through the pieces of glass the screen is made of to display the characters on the screen. The contrast will control how dark (or light) the characters appear. We will use a variable resistor to control contrast, and we will set the backlight to being on.
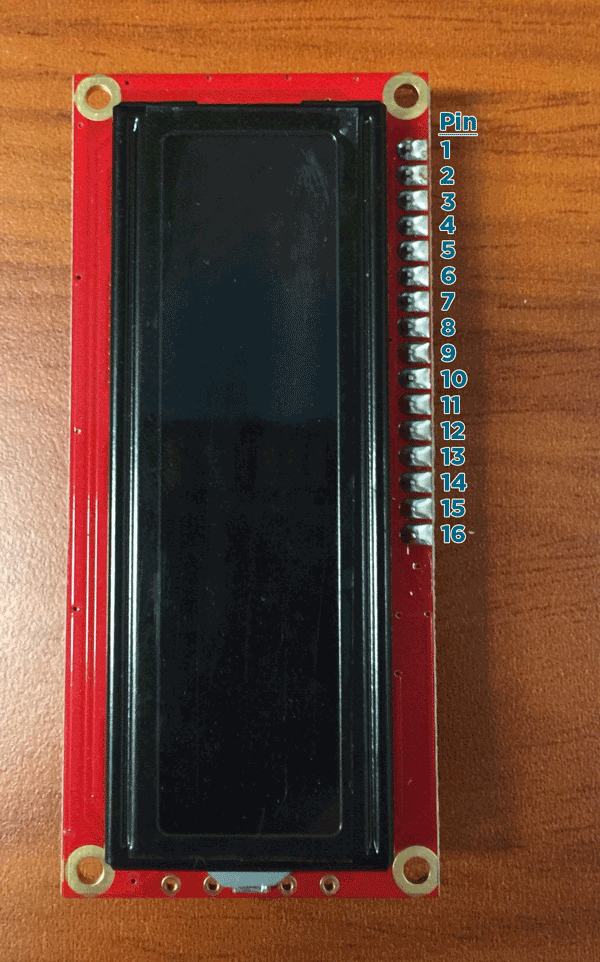
|
Pin |
Function |
Label |
|
1 |
Ground (0v) |
GND |
|
2 |
Supply Voltage (5v) |
Vcc |
|
3 |
Contrast Adjustment |
Vee |
|
4 |
Register Select (0 for Command Register, 1 for Data Register) |
Register Select |
|
5 |
Read/write select (0 for write, 1 for read) |
Read/Write |
|
6 |
Data Enable (When pulse is given, send data) |
Enable |
|
7 |
Data Pin 1 |
DB0 |
|
8 |
Data Pin 2 |
DB1 |
|
9 |
Data Pin 3 |
DB2 |
|
10 |
Data Pin 4 |
DB3 |
|
11 |
Data Pin 5 |
DB4 |
|
12 |
Data Pin 6 |
DB5 |
|
13 |
Data Pin 7 |
DB6 |
|
14 |
Data Pin 8 |
DB7 |
|
15 |
Backlight Supply Voltage |
LED |
|
16 |
Backlight Ground |
LED- |
The Setup
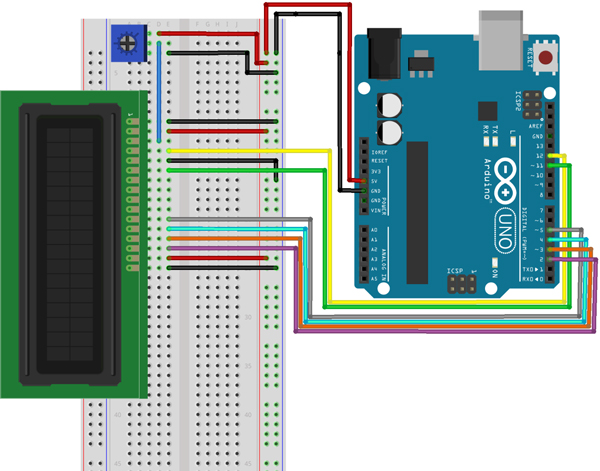
- Insert your LCD screen into your breadboard vertically such that each pin has its own separate line on the board.
- Insert your potentiometer in the same way.
- Connect 5v and GND from Arduino to the / - rails on your breadboard. This will ground your Backlight and LCD.
- Connect Pins 1 and 16 from the LCD screen to the negative power rail. This will power your Backlight and LCD.
- Connect Pins 2 and 15 from the LCD to the positive power rail. This will power your Backlight and LCD.
- Connect Pin 3 to the center pin of your potentiometer, this will control the contrast.
- Connect the top and bottom pins on your potentiometer to GND and 5v rails. As you twist this potentiometer you will control contrast.
- Connect Pin 4 of the LCD to pin 12 on your Arduino. This will be the register select pin we output to from the Arduino later.
- Connect Pin 5 of the LCD to ground.
- Connect Pin 6 of the LCD to pin 10 on your Arduino. This is the data enable pin that we will use later.
- We will be using data pins 4,5,6,7 for our LCD screen. This represents 4 bits of data, known as a nibble. The LCD screen has the capability for 8-bit parallel communication but 4 bit will be adequate for our project.
- Connect those pins to 4 pins on your Arduino, we use 5,4,3,2 respectively.
- Connect your Arduino to the PC and move on!
You are going to be displaying the words HELLO WORLD on your LCD screen.
I find it helpful to plan for the different states our circuit will take. For this circuit, we will have the circuit switched on and displaying HELLO WORLD from the top left across the screen horizontally.
We are using a 16x2 LCD which is 2 lines of 16 character spaces. HELLO WORLD is going to be 11 characters along the top line (the space counts!). Now that we can (sort of) visualize what we need to do, let’s get into the code!
The Code
// Import the Liquid Crystal library
#include <LiquidCrystal.h>;
//Initialise the LCD with the arduino. LiquidCrystal(rs, enable, d4, d5, d6, d7)
LiquidCrystal lcd(12, 11, 5, 4, 3, 2);

void setup() {
  // Switch on the LCD screen
  lcd.begin(16, 2);
  // Print these words to my LCD screen
  lcd.print("HELLO WORLD!");
}

void loop() {
  // put your main code here, to run repeatedly:

}
HELLO WORLD!
Do a quick double check of your code, then hit verify and ensure your board is connected to your PC. Hit upload and take a look at your LCD. If the words aren’t visible, adjust your potentiometer until the words become nice and clear.
Congratulations! Your LCD should display HELLO WORLD.
Extend yourself by printing other words to different areas of the screen. Fiddle with the commands we have listed and familiarize yourself with how the settings effect the display.

