Dual Extruding with FDM 3D Printers is typically reserved for the most expert-level makers. By adding the ability to print with 2 materials, you open yourself up to a spread of conditions that simply didn't exist with a single extruder setup. But those days are over, it appears that our favorite 3D Printer manufacturer, LulzBot has made a tool head that will open the dual extruder door to all makers. We are going to look at this new addition to the LulzBot line-up of tool heads; The Dual Extruder v3 Tool Head. World renown for their reliability, versatility and support, Aleph Object's LulzBot range of 3D Printers and Printer Accessories are among the most trusted 3D Printers ever. The Dual Extruder v3 delivers, improving on every limitation of its predecessor.

I'm pretty excited to fit this into our Taz 6 3D Printer and give it a test drive, but before we dive down that rabbit hole of multi-coloured, soluble supported 3D prints; Let's take a look at where Dual Extruding is at the moment (with the v2 tool head) and what makes this upgraded tool head so great.
Same, Same?
First, let's take a look at what elements of the new Dual Extruder are the same/similar to the predecessors. After all, if it ain't broke...
- As both Dual Extruders feature the same Gantry Mounting design that is on every LulzBot tool head and the same wiring connector; this tool head will be compatible with both the Taz 5 & Taz 6 3D Printers. There are a few bits and pieces that come with the tool head that make it work with a stock standard Taz but rest assured you'll have everything you need right out of the box.

- The same Half Height NEMA 17 Stepper Motors are used to feed the filament into the tool head as were used in the Dual Extruder v2, however, their placement has been altered so they are now side-by-side at the rear of the tool head; transferring the majority of the mass of the tool head closer to mounting plate on the X-carriage.
- The same 40mm Fans have been used for Extrusion Cooling, however, their placement and fan shroud (used to direct the airflow) has been updated to reflect the same design as the Single Extruder v2.1
- Same-sized 0.5mm E3D Extruders, however, the design of the heat break has changed and been combined into one solid unit, but we will look at that later on.
- A similar direct drive filament extrusion system is used on both Tool heads, however, the design of the entire v2 system has been overhauled to allow for a wider range of filaments, better reliability and a better overall user experience.


As you can see most of the hardware is the same (excluding the Idler Blocks but more on that later) in both the Dual Extruder v2 and v3. The biggest changes were to the actual design of the tool head itself i.e. its size, and the placement of the different parts of the tool head. Let's take a closer look at each of the more apparent changes and why they were made.
The Biggest Differences
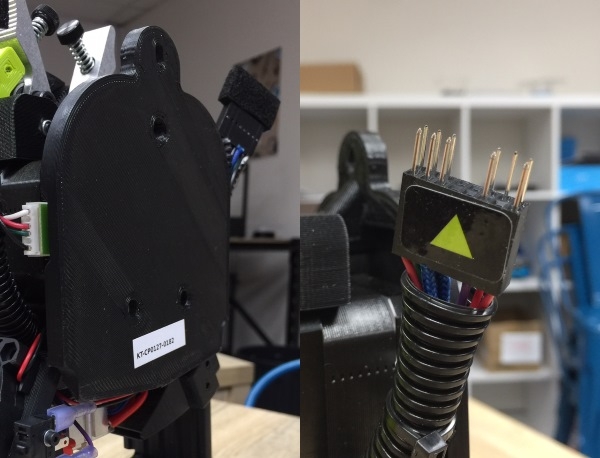
The front of the v2 tool head was open and you could see practically everything. The v3 Tool head is enclosed by a 3D Printed Faceplate (a classic element of LulzBot Printers and tool heads). 
On the front of the new of the tool head, we can see that the labels 'E1' and 'E2' are extruded right into the piece (you mightn't be able to see it in the image as the detail is quite fine). That means you're always going to know which extruder contains which filament when slicing your model. I realise that might sound like a basic upgrade, but if you've used the v2 tool head before you'll know it's quite easy to mix-up the extruders in Cura as there was no reliable way to identify the extruders apart from by memory.
Sleek and precise looking spur gears have been used as filament drive gears on the v3 tool head; rather than the 3D printed herringbone drive gears from the v2. This means that the extruder steps value (known as eSteps) are always the same and always consistent which is massive for reliability.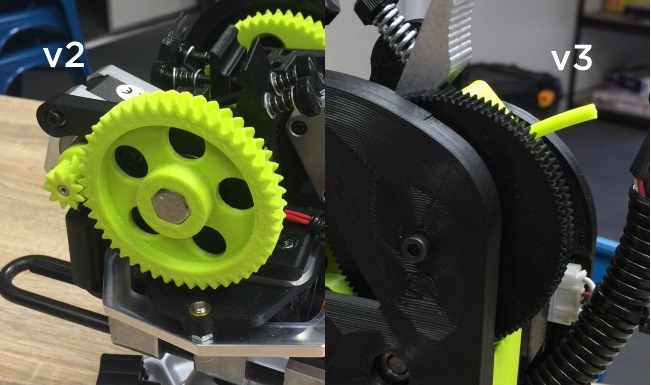
When printing with two filaments you run into the issue where you need to keep both filaments hot and ready to print with, without allowing heat to creep up your extruder, grinding the filament and ruining your print. A shared heat sink for the heat breaks of both of the extruders is mounted to the front of the v3 tool head, with a (comparatively) huge 40mm fan bolted directly to it. This is a massive upgrade to the 2 separate and tiny micro-blowers that were attached to the v2 tool heads 3D-printed skeleton frame via a small screw. I really hope that this has solved the issues with heat creep from the v2 tool head.
When printing with the v2 Dual print head, the 2 extruders were oriented front-to-back and had a separation of around 100mm. This made the size of the v2 tool head far larger than it needed to be and also distributed the weight of the tool head out and away from the X-carriage, causing a cantilevered 'sag' effect when the tool head moved. This introduced issues with levelling the tool head, imposed hard-limitations on maximum print speed (the tool head would 'sag' out of alignment over time) and reduced the usable print bed space by quite a bit. The new side by side extruder positioning (see above) means the majority of the mass in the tool head is closer to the gantry, not to mention the extruders are too. This has huge implications for how you will level the bed/nozzles, not to mention how much more of the print bed you will be able to use. I'm really excited to see how much (if any) print speed might be affected.

The Idler blocks along with the filament drive system have been completely overhauled (pictured above). Now, the tool head features aluminium idlers instead of the older 3D Printed clip and nut/bolt system. Ergonomically, it makes sense that the two idler blocks move toward each other and it feels great to loosen tension off your filament as you can just squeeze the two together. Additionally, this system is designed for ANY 2.85mm filament (Yup, Flexible or Rigid). To minimise issues when swapping between filament types, the v3 tool head comes with an idler jig that accurately tensions filament in the tool head.
Open source FTW.
Easily, the biggest advantage of the new design of the Dual Extruder v3 is the change from a front to back extruder orientation to the side-by-side one. By having the extruders side by side, the overall depth of the extruder has gone from around ~125mm down to ~65mm (Yup, almost halved the size). As both of your extruders (and stepper motors) are now closer to the gantry, they don't suffer from all the mechanical issues of the v2. If you remember, with the v2, you had no choice but to slow down the print speed so the tool head didn't sag mid print and ruin quality, not to mention be constantly falling out of alignment. From an end-users perspective of all of LulzBot tool heads, this is easily my favourite design change.
The filament drive system overhaul makes the whole process of extruding a whole lot more reliable too, as the firmware change automatically accounts for the extruder steps on both extruder motors. So you'll never need to note down the Esteps ever again! Not to mention the aluminium idler blocks teamed with the printed jig, mean that your filaments will always be correctly tensioned; another massive upgrade for reliability. No more skipped steps or ground PLA with this tool head (I hope).
Next up would be the heat break cooling. On the v2, the cooling method was 2 small, but loud, micro blowers mounted flimsily to the tool head with a single screw. Now we've got this big, meaty 40mm fan mounted directly to the heat sink with 4 hex head bolts. Another sensible upgrade that is going to make printing with this tool head far more reliable than it's predecessor.
This tool head essentially replaces the Dual Extruder v2, Flexystruder and FlexxyDually Tool Heads from your 3D Printing arsenal - as it can print with any of those combinations with no issue.
This tool head is a great example of why Open Source Hardware rocks, with improvements on almost every single front. I'm really excited to fit it into our Taz 6 3D Printer and run it through its paces with some soluble support filament. If you're interested in hearing more about this tool head, or anything 3D Printing or Maker related feel free to post up on our forum and start the conversation there!

