A digital multimeter (DMM) is one of the most common tools on a Maker's bench. We use DMMs to take electrical measurements in a fast and relatively accurate way. The reason we call it a multimeter is because they can take multiple types measurements of electrical properties within a circuit. There are DMMs of all shapes and sizes each with their own specific functions. It doesn't really matter what multimeter you are using, there are some best practices regarding the measurement of common electrical properties that we want to cover off on. These include measuring the voltage (V), current (A) and resistance (Ω) measurements, the triad of electrical properties!
We are going to take a look at the best way you can measure each of these properties within an electric circuit. This article will cover:
- How to take Voltage Measurements with a DMM
- How to take Current measurements with a DMM
- How to take Resistance Measurements with a DMM
Let's begin with a quick primer on the layout of a typical digital multimeter before we proceed to those topics.
Consider this image of our Elenco Digital Multimeter.
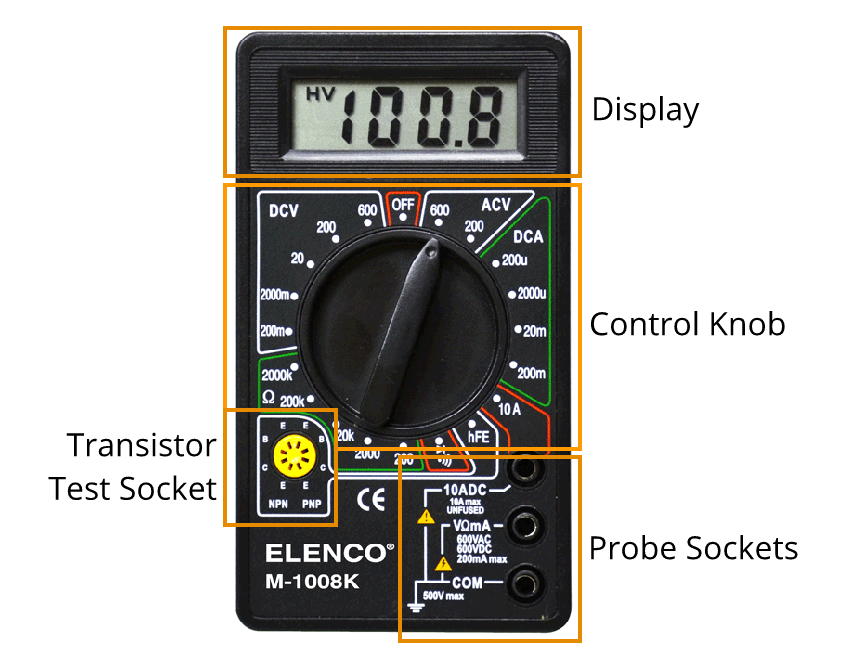
- The Display shows the value of the property you are measuring
- The control knob allows you to select between the different properties. The Ohm Symbol (Ω) represents resistance measurements, with the number labelled referring to the upper bound of that particular measurement. The section labelled with an A refers to amperes and measures direct current within the bounds of the labelled number. The section labelled with a V~ refers to AC voltage readings and V- refers to the DC voltage measurements. Selecting the right mode is very important unless you have an Autoranging meter that will do the work for you!
- The labelled sockets on your DMM are where you plug your banana plug probes into. There are a collection of probes you can get for a multimeter, usually, they will be terminated with the banana plug, making it very easy to plug/unplug them. Note that each socket is labelled as a Voltage, Ampere, Resistance or COM socket. The first three are self-explanatory, however, the COM port refers to the Common socket and is used for the Ground in our testing.
- Component Socket - Some multimeters have test sockets for different components.
Unit prefixes are also an important part of testing and measuring. The prefix is the letter or symbol that comes before the unit, for example, mV, kOhms. Below is a table showing the common prefixes and what they mean.

What do we mean by half digits?
When using a digital multimeter, you will often see a display called a number and a half digit display. What does that mean though, half a digit? It's a measure of the display capability to display a range of numbers. A 3 digit display would be able to display 0-9 in each digit slot, so 000 to 999. The half a digit refers to the leading digit and the range of numbers it can display. Half a digit means the leading zero (the 1 in 1000) can only display a value of 0 or 1. So a DMM with a 3 and a half digit display can display values from 0000 to 1999.
Taking DC Voltage Measurements with a Multimeter
The first thing we need to do is connect a plug to our voltage terminal, which requires that we identify if we are measuring DC or AC voltages. With DIY electronics we will mainly be dealing with DC voltages, so connect the V-- terminal with a test lead and another lead to the COM terminal. Measuring AC voltages with a multimeter can be dangerous, especially when using contact probes. In fact, take a look at a clamp meter or a similar non-contact probe to measure AC voltages to stay on the safe side of mains voltages.
The next thing we need to do is decide on the range that we are measuring unless you have an auto-ranging multimeter. You want to select the voltage range that is above your estimated measurement. For example, if you are expecting a voltage around 5V for example, you will want to select the range that is above that measurement, which would be 20V in the case of our multimeter. Nothing bad will happen if you do select too small a range, you will likely receive a display reading of 1. and will have to up the range to suit your circuit.
The important thing to remember when taking voltage measurements is that you are measuring the electrical potential difference between your Ground probe and your V probe (- and + probes). To do so correctly you only need to have your multimeter in parallel with your tested circuit and it will be able to detect the voltage difference. See the diagram for a reflection of what this would look like.

How to take Resistance Measurements with a Multimeter
Similarly to voltage measurements, we measure our resistance through the component we are testing. However, for resistance, we need to connect our probes to the Ω and COM terminals on our DMM. We use the multimeter to measure the resistance, in Ohms, of a particular component.
To get the best resistance measurement, you'll want to remove the component from the circuit entirely (if it's just the one component). However, that isn't always possible, so instead ensure your circuit is powered off and any capacitors in the circuit are completely discharged before proceeding.
Now, first select your resistance. It won't damage your meter if this is not completely correct, it will return a 1. like we saw in the voltage measurement. Then, simply connect your probes to each side of the component. The display will represent the number of ohms of resistance the component has.

How to take Current Measurements with a Multimeter
Measuring a current with a multimeter is completely different to a voltage measurement. As current is a measurement of the electron flow at a point, we cannot place our meter in parallel and take a current measurement. Instead, we need to place our meter in series with our circuit allowing the meter to take a reading of the electron flow through the meter itself. Go ahead and connect your Probes to the A and COM terminals on your multimeter.
This means that is extremely important that we select the correct range for any current measurements, as there are internal input fuses in place to protect your multimeter. There will blow and require replacing if we have the wrong range selected!
The best way we can take current measurements without blowing one of these fuses is selecting the HIGHER AMPERAGE RANGE and using that measurement to ensure you aren't outside of the highest bound of the smaller measurement range. In the image of the multimeter above we saw there was a 10A fused terminal, so taking current measurements we would err on the side of caution and use that terminal for our measurements.

That's about it for our quick primer on using a digital Multimeter. If you were following along you have learned the basic layout of typical multimeter's, how to take voltage, current and resistance measurements using your multimeter; We even looked at the basics of SI unit prefixes and half-digit definitions, cool! If you have any questions or queries regarding Digital Multimeters, including which ones to buy or where to get replacement fuses or anything in that ball park, get in touch with us. We're here to help!
