Running a virtual Raspberry Pi on your computer can be a neat way to experiment in a Raspbian-like environment without being tethered to a physical Pi. In this video, I'll walk you through the process of installing Raspberry Pi Desktop on a virtual machine. A virtual machine is like having a virtual computer inside your computer. The VM will share the same resources as your real machine (ethernet port or wifi for internet access, a windowed or full-screen program will be the VM's virtual monitor). If you don't follow, all will become clear during the video once you see what's going on.
To get started you'll need:
- Either a Raspberry Pi x86 CD or the virtual disk image file available to download from the Raspberry Pi Foundation.
- Oracle VM Virtualbox - a free, sophisticated VM utility compatible with Windows and Mac.
Below is a summary of the basic settings required for the new VM. Check out the video for a full walkthrough of the process or if you'd like to see how to enable file- and clipboard-sharing between your host-machine and your virtual Pi.
Name: Something sensible and short is a good start.
Type: Linux
Version: Debian (64-bit) (This is what I chose, but other sources indicate that 32-bit versions and other Linux distros work too)
Click Next
Memory size: 1024MB (this is the default and sufficient for most users)
Click Next
Hard disk
Select Create a virtual hard disk now
Click Create
Select VDI (default)
Click Next
Select Dynamically allocated (default)
Click Next
Select 8GB (default)
Click Create
Right click on your new VM entry in the list and click settings.
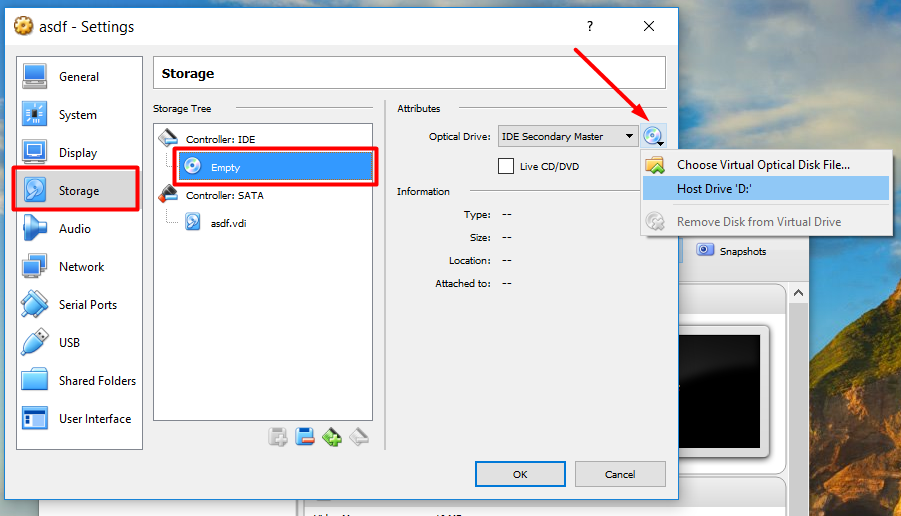
Storage > Controller: IDE: Select the Empty optical-drive entry, and select either the host drive that your CD is inserted into, or browse to the location of your virtual disk image file. I go over this step in more detail at the end of the video.
After attaching the CD/disk image to your VM you're ready to boot!
Click OK, double-click the VM you created to "power on" and you'll be met with an operating system installer prompt. Note that all this is happening on your virtual machine - you're not about the overwrite the operating system that's installed on your computer! Follow along with the prompts to install the operating system. Once complete the virtual machine will reboot.
Further Setup
Our virtual Pi thinks it's a real machine! This means we can't do some basic things yet like resize the window or copy-paste from/to our host machine. This is easily fixed by installing the following VirtualBox guest extensions:
sudo apt update
sudo apt install virtualbox-guest-dkms virtualbox-guest-x11 linux-headers-$(uname -r)
sudo reboot
Now you can enable the shared clipboard from the VirtualBox settings menu (Advanced > Shared Clipboard - Bidirectional).
Once restarted, you can enable file sharing by executing
sudo adduser pi vboxsf
Shutdown again and select the folders you wish to share from VirtualBox settings menu (Shared Folders > Add). The selected directories will appear in your virtual machine in the /media directory with the prefix sf_
Why run a virtual Raspberry Pi?
If you plan on developing a lot of code or applications for Raspberry Pi this can be a very convenient way to do so from the comfort of your regular machine. You also have the freedom to run several machines at once (RAM permitting) or have multiple virtual Pis setup for different conditions.

