There is a new Raspberry Pi! The long-awaited upgrade to the Rasberry Pi 1 Model A+ (Rpi1 A+). In this article, we are going to look at how much improvement the new Raspberry Pi 3 Model A+ (Rpi3 A+) is over the Rpi1 A+ as well as how it stacks up to the Raspberry Pi 3 Model B+. Let's get started looking at the obvious changes to the hardware.
The hardware.
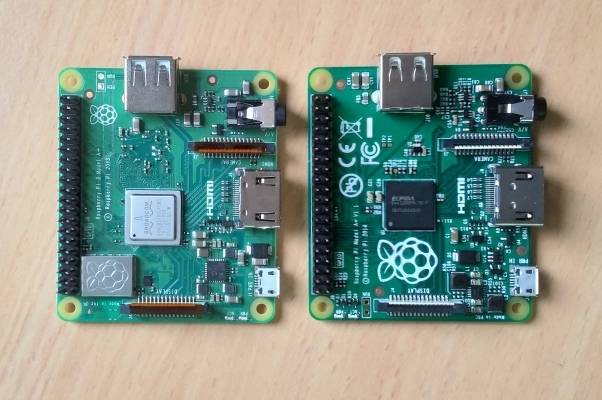
Looking at the boards the most obvious change is the new processor they have used BCM2837B0 which as the ARM Cortex-A53 has four cores compared to the single core in the Pi 1 A+ and is clocked at 1.4GHz compared to the 700Mhz. This adds a whole lot of power to the A+ platform and with Wifi and Bluetooth LE onboard as well the Rpi3 A+ is now ideal for all your low power low-cost projects.
Raspberry Pi Model A+ Comparison

Raspberry Pi 3 Model A+ Vs B+

The Rpi3 A+ has maintained the same dimension and hole spacing as the original and the GPIO remains unchanged so it will into your existing projects without the need to make a lot of changes.
Power usage
As you would expect the Rpi3 A+ can use a fair bit more power, during my tests I recorded the maximum current drawn in three cases, First On boot, second while idle, and running under full load conditions.
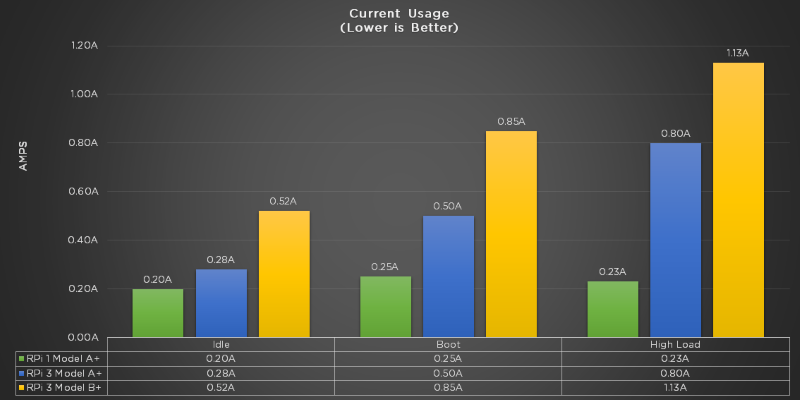
We instantly see that under load and during boot the new Pi3 A+ uses a lot more power than the original, though when it is idle the power usage is about the same. This could mean that with some clever use of code your Rpi3 A+ work under similar power conditions while also providing the extra computing power when needed.
Benchmarking.
Now we get into the fun part! We are going to be using many of the same tests that were used in the Rpi3B+ benchmark tutorial. We are also going to use the Rpi3 B+ to see how well the new Pi3 A+ stack up against it.
The first set of benchmarks we will run will be tested to see how fast the Pis can perform a set of tasks. We are going to start with a lazy benchmark and use the loading of the operating system (The winners in this one were obvious, and the loser was me waiting for the Rpi1 A+ to load).
For the next set of tests we need to install SysBench by running;
Sudo apt-get install SysBench
Once that has installed we run the benchmark with the command.
Sysbench –test=cpu –cpu-max-prime=10000 –num-threads=4 run
This will find every prime number below 10000 using 4 threads, we will run this with –num-threads=1 and 4 (On the Rpi1 A+ we will get the same result as if –num-threads=1 as there is only one core).

In all cases, as expected the new Pi3 A+ absolutely beats the old Pi1 A+ in every category, what may come as a bit of a surprise is how well the Pi3 A+ compares to the Pi3 B+ wherein most of these there is almost no difference between the two of them.
The second set of benchmarks will test how many of an operation can be performed in a second. For these, we will be using Roy Longbottom’s Raspberry Pi benchmarks. Specifically, from them we will be using
- Dhrystone is a benchmark for that will work out how many integer calculations can be performed in a second.
- The Linpack benchmarks test the number of FLOPS(FLoating-point Operations Per Second) by performing large matrix multiplications for single and double precision operations.
We will also use SysBench to test the memory performance for 1Mb blocks with a 2GB transfer.
sysbench –test=memory –memory-block-size=1M memory-total-size=2G run;

In the operations per second, we can see that there is a typical increase of 4x for operations increased per second. strangely The memory performance seems to be the most improved even though on paper the memory amount has remained unchanged, this is due to newer faster ram chips being used and the new Processor being able to access it faster. Overall the New Pi3 A+ is an amazing improvement over the Pi1 A+ but somewhat surprisingly it is also a contented against the Pi3 B+ and at a fraction of the cost and with a much smaller form factor I think we will see a lot more of the A+.
If you have any comments on the benchmarks we have run or had some results of your own that you would like to share, start a discussion in the thread below and we can start a conversation or check out some of our other Raspberry Pi Tutorials.

