Now that we've investigated and explained how How GPS Receivers work we can apply that understanding to some real-world applications of of the ideas. To start, we can use any GPS receiver, an Arduino Uno and some male-to-female Jumper cables. We've chosen to go with Adafruit's Ultimate GPS Breakout module ; the Version 3 module that features 10Hz updates, 66 Channels and operates on 5V logic. We will look at using this board with the GPS Library from Adafruit and a typical Arduino IDE setup. We'll be downloading this library in the IDE and using the functions to manage the NMEA sentences our GPS breakout receives.
Let's set up our hardware first, everything we will do will work as long as we have the Tx/Rx pins attached between our two modules. So grab out all the parts you'll need, the Breakout board requires some soldering for the pin headers:
- Connect 5V from the Arduino to Vin on the GPS Breakout
- Connect GND to GND
- Connect the Rx Pin from the GPS Module to Digital Pin 2 on the Arduino
- Connect the Tx Pin from the GPS Module to Digital Pin 3 on the Arduino
- Connect the Arduino to your PC
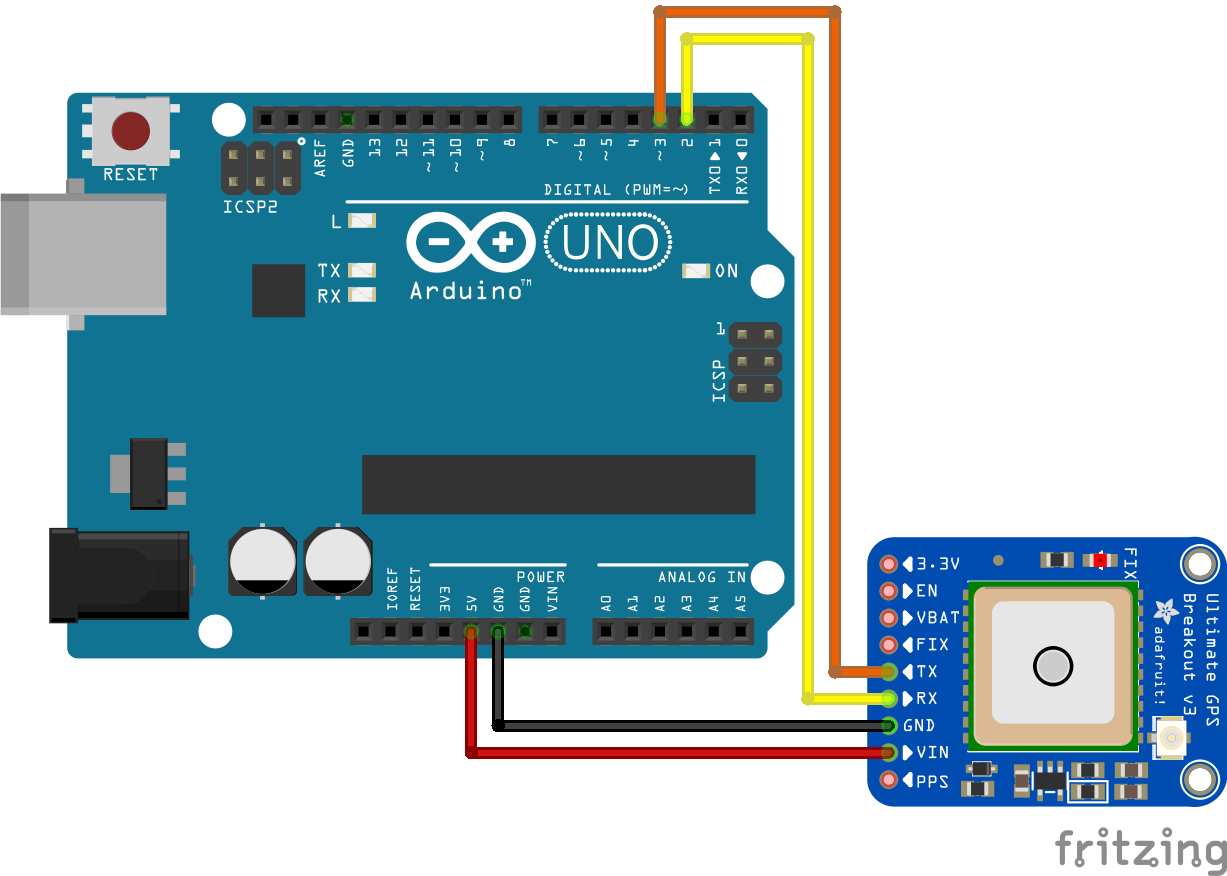
Setup your Arduino and GPS module in this way
GPS Library Essentials
To be able to leverage GPS data with the Arduino Uno we will need to include one library in our sketch:
- Adafruit GPS library - Open up your Arduino IDE and head to your Sketch > Include Library > Manage Libraries window. Search for GPS and select the option, "Adafruit GPS Library".
Use this code, see comments for more information
#include <Adafruit_GPS.h>
#include <Adafruit_GPS.h>
//We can now create our Software Serial object after including the library
SoftwareSerial mySerial(3, 2);

//And finally attach our Serial object pins to our GPS module
Adafruit_GPS GPS(&mySerial);

void setup() {
Serial.begin(115200); //This baud rate will help a lot in printing all of the data that comes from the GPS Module to the serial monitor
GPS.begin(9600);
//These lines configure the GPS Module
GPS.sendCommand(PMTK_SET_NMEA_OUTPUT_RMCGGA); //Sets output to only RMC and GGA sentences
GPS.sendCommand(PMTK_SET_NMEA_UPDATE_1HZ); //Sets the output to 1/second. If you want you can go higher/lower
GPS.sendCommand(PGCMD_ANTENNA); //Can report if antenna is connected or not
}

void loop() {
//Now we will start our GPS module, parse (break into parts) the Last NMEA sentence
GPS.parse(GPS.lastNMEA()); //This is going to parse the last NMEA sentence the Arduino has received, breaking it down into its constituent parts.
GPS.newNMEAreceived(); //This will return a boolean TRUE/FALSE depending on the case.
//Print the current date/time/etc
    Serial.print("\nTime: ");
    Serial.print(GPS.hour, DEC); Serial.print(':');
    Serial.print(GPS.minute, DEC); Serial.print(':');
    Serial.print(GPS.seconds, DEC); Serial.print('.');
    Serial.println(GPS.milliseconds);
    Serial.print("Date: ");
    Serial.print(GPS.day, DEC); Serial.print('/');
    Serial.print(GPS.month, DEC); Serial.print("/20");
    Serial.println(GPS.year, DEC);
    Serial.print("Fix: "); Serial.print((int)GPS.fix);
    Serial.print(" quality: "); Serial.println((int)GPS.fixquality);
//If GPS module has a fix, line by line prints the GPS information
    if (GPS.fix) {
      Serial.print("Location: ");
      Serial.print(GPS.latitude, 4); Serial.print(GPS.lat);
      Serial.print(", ");
      Serial.print(GPS.longitude, 4); Serial.println(GPS.lon);
      Serial.print("Location (in degrees, works with Google Maps): ");
      Serial.print(GPS.latitudeDegrees, 4);
      Serial.print(", ");
      Serial.println(GPS.longitudeDegrees, 4);
      Serial.print("Speed (knots): "); Serial.println(GPS.speed);
      Serial.print("Angle: "); Serial.println(GPS.angle);
      Serial.print("Altitude: "); Serial.println(GPS.altitude);
      Serial.print("Satellites: "); Serial.println((int)GPS.satellites);
    }
}
So far our code has initialized the board to be able to read from our GPS module, and it was writing parsed data to the serial monitor!
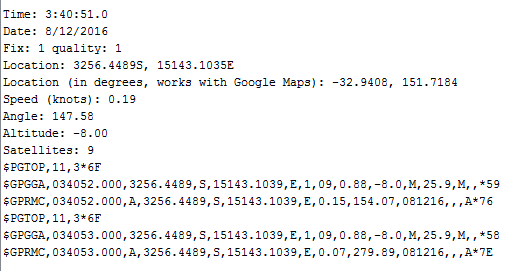
A Sample read of the Serial Monitor using the above code
Logging GPS Data
The Ultimate GPS board also has another feature we will take a look at. The Logging capability that is you can save GPS data to the internal storage and then access it at a later date. It collects your location data once/15 seconds and only while you have a fix. That's going to be particularly handy for recording GPS information in the future. To start logging with our module, we will need to use
GPS.LOCUS_StartLogger();
This function will begin logging data directly into the flash memory of the module. To get the module to dump our data once logged, we can use the following method:
- Upload the following sketch, File > Examples > Adafruit_GPS > locus_dump to your Arduino.
- Open the serial monitor
- Copy all the data under the --- line starting from the $ symbol below
- Paste the data into the Parsing field here
- You now have XML and KML data of your Logs that can to mapping software!
There you have it; now you know how to take GPS data from satellites and parse it using your Arduino. You can even log your data for any length of time using internal storage on the Ultimate GPS module. From here, you could utilise the recorded data by passing it to a GPS mapping application and trace out the path of your trip! All this from an Arduino and GPS Module, how cool is that?! Pick up your own Ultimate GPS Breakout if you haven't got one yet, they are the best way to use GPS! Used this tutorial for a project? Let us know in the comments below! We're always interested in hearing about the fun projects the community is up to! We hope this covered the essential information you needed to parse your NMEA sentences!

