So you've got your Raspberry Pi 3 Model A and need a case to house it in. In this short guide we're going to step through the considerations you should take when designing your own case, as well as provide you with all the files you need to 3D print ours! Don't have a 3D Printer? That's understandable, we've got 3D Printing services that you can use to get one printed and sent off to you. Let's dive in!
You can find the 3D Model files for this case on Thingiverse.
Mechanical Drawings for the Raspberry Pi 3 Model A
The first thing you'll be on the hunt for if you're setting out to design your own case is some mechanical drawings. These will detail all the dimensions that you need to build your case. Below is an mechanical drawing of all of the specifications you'll need, and it's attached at the bottom of this tutorial as a PDF too (along with the other design files that are relevant).
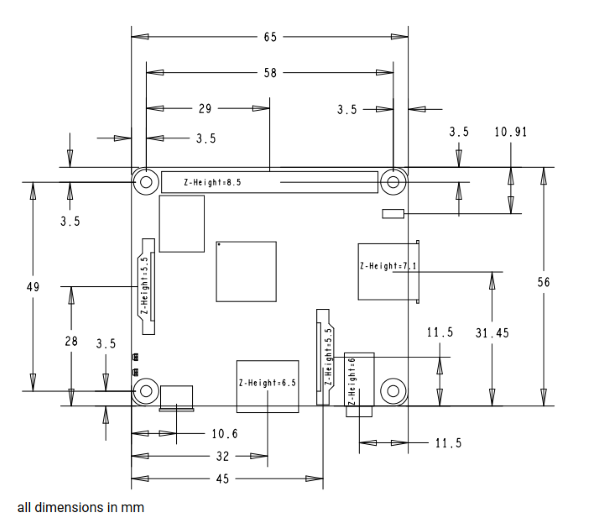
Note that the Z height of the different on-board connectors is included, which will be handy when designing openings in the case.
The SD card isn't included on this image, however we used some calipers and got a measurement for it. It's 12mm x 11.5mm and positioned directly underneath the DSI header on the left hand side of the board (as pictured above).
Designing your Pi 3 Model A Case
As with all 3D printing designs, it's important to take a few things into consideration:
- Minimum feature size - We use walls and features around 1.5-2mm in the XY plane (as the nozzle is 0.5mm). This gives smaller features some needed strength.
- Standoff Height - The board needs to sit off the base of the case. We use a standoff height of 4mm to clear the soldered legs of components as well as the SD card slot.
- Inserting the board - Always remember that you need a way to get the board into the case! As there are multiple parts of the Pi 3 Model A that protrude from the PCB, you'll need the space to insert your board at an angle (or some other way to make sure it can seat correctly)
- Connector Openings - The micro-b USB connector, HDMI connector, 3.5mm jack and USB connector all protrude from the case by ~1-3mm, so make sure that your opening are positioned correctly and holes pressed all the way through your case walls
- Chamfers! - Always remember to use Chamfers where possible to give better access to openings in the case as well as produce overhanging features that don't need support!
- Securing the case together - We've used a basic snap-fit method to click the case together. There are so many ways to get this working though! Be creative.
We went a step ahead and produced a really basic 3D Model of the Pi 3 Model A based on the mechanical drawings, and then used it as the reference for all the important features.

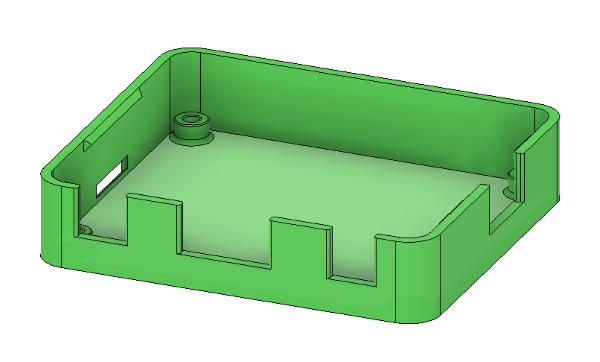
Final Design for the Raspberry Pi 3 Model A Case
Here's a few screenshots of the case design we came up with. It looks pretty basic on the face of it, but it give you access to all the bits you need. In short:
- Access to all connectors - That's the SD card slot, power, HDMI, 3.5mm Jack, USB oonnector and GPIO Pins
- Standoffs to hold board - 4 Standoffs for 2.5mm screws
- Snap fit - Clicks together nicely
- Holes on top - Adds a little ventilation to the case, air flow never hurts!


3D Printing the Case for the Raspberry Pi 3 Model A
Now that your case is designed and you're ready for a first print, you can go ahead and export your Model files as STL files. Simply right click them in the file explorer in Fusion 360 and export as STL. Then load them up in your 3D Printer's slicing software, we use Cura 3.2 LulzBot Edition.
We've designed each model to have a large flat surface that can be printed with no overhangs, so load the models and orient them the right way to ensure a successful print. Our prints using PolyLite PLA on the Taz 6 are both around 30 minutes.
Save the G-Code and hit print! If you've not got a 3D Printer available for printing with, we've got ours permenantly available for maker's around Australia, simply head to our 3D Printing Services page and place an order.


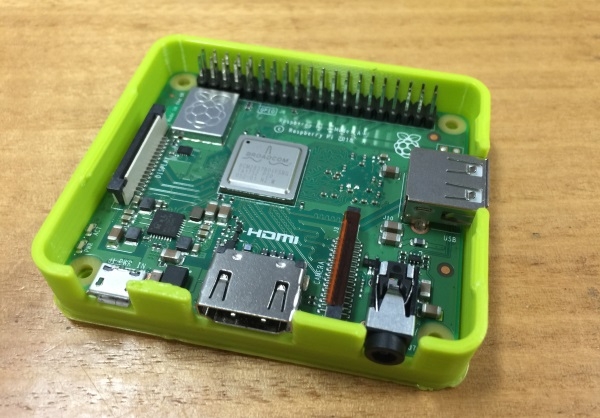
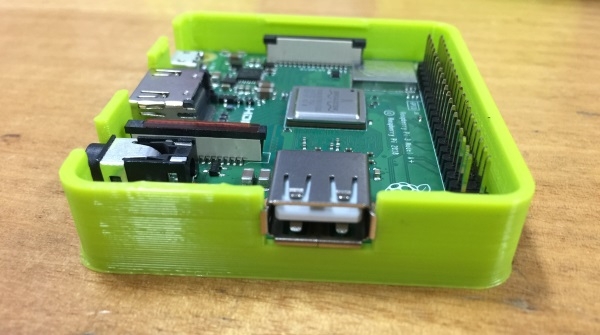
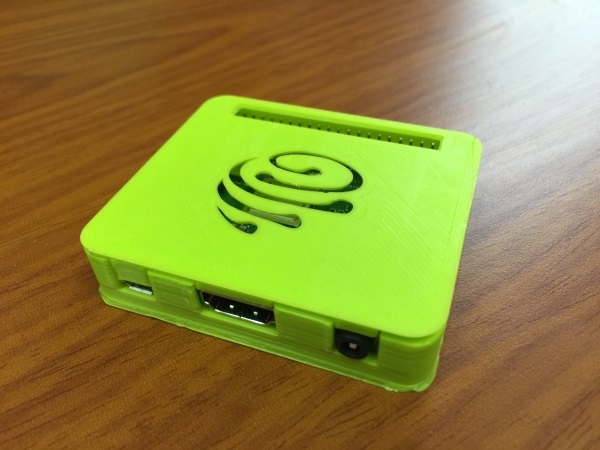
A successfully designed and 3D Printed Case for the Raspberry Pi 3 Model A
We went and grabbed some coffee and lunch and came back to our model files having printed successfully. Pop them off the bed and test your Raspberry Pi 3 Model A for a good fit. Here's some snaps of the finished product.

STL files, Design Files and more
You can find the 3D Model files for this case on Thingiverse.
All of the Fusion 360 Project Files, Mechanical Drawings and the rest are compiled into the attachment below.
Summary
This was our version of 3D Printing a case for a Raspberry Pi 3 Model A . With any 3D designs, you're likely going to approach it from different angles, use different techniques and come up with a different model file. As long as it does what it needs to, we're happy. If you need help with designing models for 3D printing, 3D printing, Raspberry Pi or anything else maker related, we're here to help. Simply leave a comment below, jump on the forum and start the conversation or shoot us an email. We're full-time makers in the heart of Newcastle, Australia and here to help.

