In this tutorial we'll be writing our first bash script for Raspberry Pi. We'll create a directory to keep this and future scripts, write the actual script, and set it up as something that can be executed from the shell.
Scripts are an incredibly powerful tool to have in your toolbox. In essence, a script is just a sequence of commands that you could otherwise have entered into the shell. The power of scripts is that they can be used to make decisions, and execute certain commands based off that decision. Scripts can be scheduled to run at certain times, and can execute trigger other scripts.
In this tutorial we’re assuming you’re familiar with how to use the terminal to navigate the filesystem and create files and directories. Check out our tutorial on Terminal Basics if you’re unsure.
To start, we’re going to create a directory to store our scripts. It’s a common practice for users to keep their scripts in a directory called
/home/pi/bin
so create that directory now.
Writing our First Script!
Navigate into ~/bin and use nano to create a file called first_script
Do NOT use sudo to run nano. If you don’t know what this means, disregard for now.
In the nano editor, enter the following code.
#!/bin/bash
# This is my first script! This is a comment.

echo Hello World # Comments can be inline with code too.
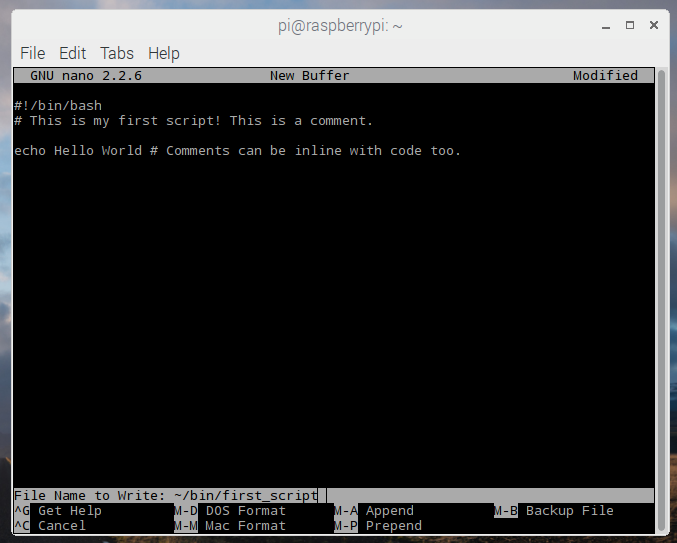
Note that I have explicitly set the directory to save the script. In preparing this tutorial I created the script from a different directory, so I had to explicitly tell nano where I wanted to save the script.
The first line is commonly called the shebang line. It’s our way of indicating that what follows is a script to be executed. On the shebang line, we also specify what interpreter we want to execute the script. This essentially defines the syntax that we may use. Here we are using BASH (Bourne Again SHell). There are other options available; In some examples you may see /bin/sh used instead, which is very similar to bash.
The second line of our script is a comment. Except for the shebang line, if a line starts with a hash (#) then it is just a comment for the programmer. Commenting code is important because it helps us humans figure out what’s going on when we read the script.
Finally, the last line is an echo command. Echo displays the text that follows in the shell – in this case the phrase “Hello World” will be displayed. This line also has an inline comment.
Save the script.
A Foray into File Permissions
From in the ~/bin directory, list the files using ls -l and you should see your brand new script!
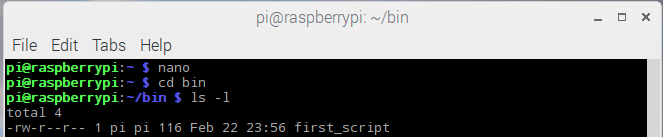
Using the -l argument with ls displays the files in a vertical list format, with more information than just executing ls. In particular, we’re interested in the file permissions associated with our script. These are displayed as the cryptic string of letters and dashes to the left:
-rw-r--r-- 1 pi pi 116 Feb 22 23:56 first_script
Let’s break that first part up into smaller pieces to look at. After the first dash, the remaining text can be broken into groups of three, as follows:

The directory field will be a d if the file is a direcory. r indicates read permission, w indicates write permission and x indicates execute permission.
File permissions are broken up into three groups, the file-owner ( u ), the other users in the file's group ( g ), and everybody else ( o ).
Because the user pi (in this example) created the file, the owner is the only user that has permission to both read and write (modify or delete) the script. Notice how nobody has permission to execute the file yet? That’s what we need to change.
We’re going to grant execute permissions to ourselves, the owner of the script. The command chmod is used to modify file permissions. Execute the following command
chmod u+x first_script
And execute another ls -l
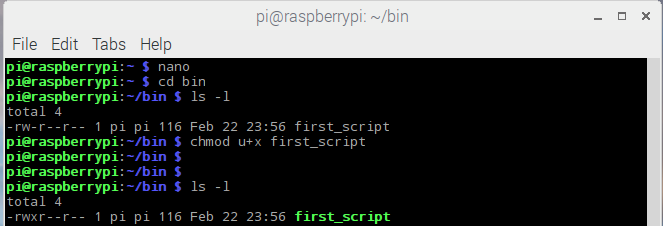
The most obvious thing to notice is that the colour-coding of our script has changed to green. This means that we’re looking at an executable! Looking closer, we can see that the owner-permissions are now for read, write and execute (the x has appeared in the owner-permission section).
Let’s break down that chmod command we issued:
- chmod is the command
- u specifies that we want to modify the permissions for the file owner
- +x means we want to add (+) the execute permission (x)
- first_script tells chmod what file we want to apply these changes to.
Intuitively, if we wanted to remove the execute permission from the file-owner we would instead use the u-x argument.
Aside:
As another intuition-building example, if we wanted pi to have full access, pi's user-group to have read and execute access, and everyone else to have no access, we could execute:
chmod g+rx first_script
chmod o-rwx first_script
This is by no means the most elegant way to achieve that end, and having a dig through the manual for chmod is probably not a bad idea. (execue: man chmod )
When modifying file permissions, it's best-practice to tread as lightly as possible: You probably don't need to grant excecute and write permissions to every user. Usually the owner is sufficient.
Permission to Launch!
Finally, we’re ready to run the script!
Enter the command:
./first_script
You should see “Hello World” appear in the shell!

Well done! So far we've created a place to store our future scripts ( ~/bin ) , we wrote a script and enabled its execution.
In the next tutorial (Coming Soon!) we’re going to play around with some variables and get a feel for how powerful scripts can be.
As always, if you have any questions feel free to raise them in the comments section below, or take a look at our forums.

