The Arduino IDE is an Integrated Development Environment installed to a local computer. We will be using this software to create, edit and upload your project ideas to your Arduino Board. The download is about 150mb, is supported on Windows, Mac, and Linux operating systems and can be downloaded for free here.
Today, I'm going to keep this tutorial short and sweet - we'll cover off on the steps needed to get your Arduino up and running in around 10-15 minutes (maybe faster!). There are many in-depth guides on the internet that go a little further into the actual installation process and you're welcome to check them out:
Bundled into the IDE are drivers for the Arduino board to be seen from your PC. These will be automatically installed as part of the IDE install process. Just connect your Arduino to the PC post-install using the supplied USB cable. Once the green LED lights up on your board, you are all but ready to start making your first Arduino project.
Now to configure the IDE for your board. Head to the menu option 'Tools' then select 'Port' and select the COM port labeled as having an Arduino connected to it. Finally, ensure that the option Arduino/Genuino Uno is selected in Tools>Board. Now we know the IDE is configured to do its thing correctly. Note: If you decide to use a board different to the Uno, you will need to select it during this step.
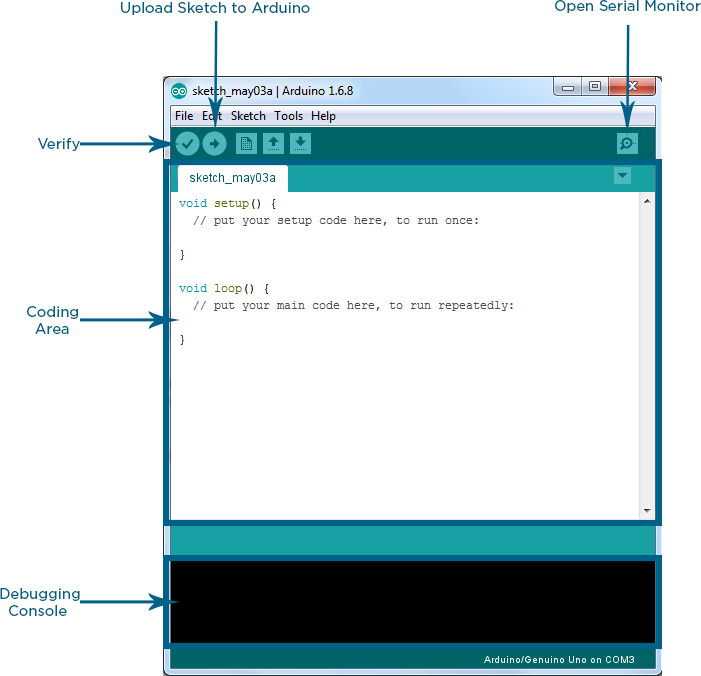
Everything we develop for our projects will happen within the environment we can see below. This includes writing the programs on the computer, checking it for errors and uploading the program to our Arduino board.
So let's open up the IDE and get more familiar with the important parts of the program.
 Each time you start a new project, you will open a new file in Arduino's IDE. We call this program a sketch, and it will contain a set of instructions that tell your board how to interact with connected devices.
Buttons / Objects on the Arduino IDE
The Verify button will check through your code line by line, ensuring there are no programming errors. It will be handy for us to begin troubleshooting issues with sketches using this button.
Upload Sketch will send your verified code to your Arduino. You will see an uploading progress bar appear in your IDE and a success message when upload is complete.
The Serial Monitor button will allow you to see data that is transferred to and from the Arduino board and in some cases allow us to instruct the Arduino in real-time. This is essential in projects, so we will cover the ins and outs of the serial monitor in later tutorials.
The coding area is where the real magic happens! This is where you will type your instructions and comments. Comments will be grayed out, and essentially ignored by the Arduino. As you type commands, variables and functions the IDE will color-code these tags to make your sketch easily readable.
The debugging console will provide you with the line and character number that is causing your program to malfunction. It will also output a program compilation was the successful message. This section will become invaluable as we delve further into Arduino projects.
That’s it for the basics of the IDE. At this point, your Arduino board is ready for its first program, and you have a basic understanding of the IDE. Well done!

