Remote control of your 3D printer is a particularly appealing concept, especially if you've been forced into printing via USB in the past. Using your new 3D printer should be as simple as plugging it in, uploading some G-Code and pressing 'Print'. However, having a laptop or desktop PC cluttering up space around your printer isn't the most desirable option.
In this guide, we are going to explore controlling your printer via a Raspberry Pi running the open source OctoPi Linux Distribution. Think of all the extra bench space and hassle-free prints you could get stuck into. My favourite part of this little project is that we can do it for the fraction of the cost of a fully-fledged PC, get the exact same functionality and even add a streamable webcam to our setup.
This guide will step you through setting up your own remote 3D printer host using OctoPi software. We will also point you in the right direction to get your own 3D printable Pi + camera housings to mount this Raspberry Pi onto your 3D Printer. Being new to Raspberry Pi is not an issue either, the steps are pretty simple and easy to do alongside this guide.
Before we begin, OctoPi is the name of the Linux distribution for the Raspberry Pi that bundles all the software required for remote access and control of your 3D printer. The actual software package that manages control of your printer is called Octoprint. Additionally, there is some basic streaming software for remote webcam control (it can also do time lapses which are cool!) and of course LCD panel support if you are so inclined.
Moving forward, there are obviously some parts and files that we recommend you get in order before starting the tutorial. We have included all the related download links below. If you are more interested in getting a working OctoPi setup with all the bells and whistles as fast as possible we have put together a Kit that is essentially plug and play for a Lulzbot 3D Printer setup.
- PC with Win32 Disk Imager installed (download it here for free)
- A 3D Printer
- An SD Card (the one that comes with your printer will be fine!)
- An SD Card reader (Laptops are equipped with these nowadays if that isn’t an option grab one here)
- A Raspberry Pi with suitable power, and an HDMI cable
- A Raspberry Pi Camera Board
- The latest distribution of OctoPi once downloaded make sure you extract the image file from the ZIP download.
SD Card Preparation: OctoPi Install
Once you have gathered, downloaded and installed all the required software, insert your SD Card into your SD Card reader attached to your PC. We chose to repurpose our TAZ SD card, so we copied all the files that came with it to a directory on our local PC just in case.
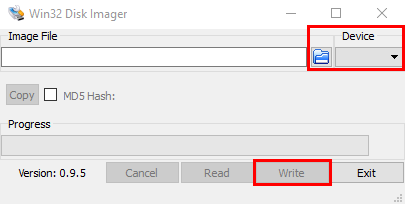
Open up Win32 Disk Imager and select your SD Card from the drop-down menu at the top-right of the screen.
Once that’s done select the browse icon to the left of the device drop down box.
Navigate to your downloaded OctoPi image and select it.
Now you’re back in the main Win32 Disk Imager window, you want to write that image to the SD card using the Write option down the bottom of the window. Confirm the overwrite and wait for it to finish.
 Once your image has been written to your SD card, there is one additional step required to use a Wireless Internet connection.
NOTE: If you are going to be using an Ethernet cable to connect to your Pi you can pretty much breeze over this step. If you are using a Wi-Fi connection you are going to need your SSID (the name of your wireless network) and your wireless network passcode.
Open the file system of your SD card and right click the 'octopinetwork.txt' file and open it with WordPad (or a similar text editor, Notepad++ is pretty awesome). Find the lines commented “## WPA/WPA2 secured” and delete the # from the next couple of lines that have a # after that heading (this is known as uncommenting those lines). Insert your network name and password into their labelled locations and then save the file.
Once, you've entered that data to your OctoPi Network data file, you're all done with your PC steps. For now, safely eject your SD Card from your PC, remove the micro-SD card from its housing and insert it into your Raspberry Pi. Plug in your HDMI cable connected to a monitor, USB keyboard, and mouse to your Pi. Let the Pi boot up and log in using the default Pi user and Raspberry password.
Configuring your RasPi
Run the command “sudo raspi-config” and select the first option of expanding the filesystem. This mightn't be necessary, but I've got into the habit of doing so in the past and it doesn't hurt to do so.
If you are wanting to change any settings here is the place to do it. Some notable options here are:
- Advanced Options > Update
- Enable Pi Camera
- Advanced options > Change Hostname
- Auto-Login to console on Boot
- Enable SSH
When you have finished here, select finish and reboot.
Once your Pi logs back in, simply enter an 'ifconfig' command and locate your local IP address from the inet addr: (this is located under the wlan0 subheading, or eth0 if you are using ethernet.) This is the address you will use to access your Pi from within your local network. It's worth setting this as a Static IP address in your home router's configuration menu, that will ensure that you will have the same IP address associated to that
NOTE: If you are looking to log in from outside your local network, you will need to setup a port forwarding rule in your home router. You would then use your external IP address followed by a colon and the port number your setup in the port forward step. Eg 192.168.0.1:80.

Setting up your Printer Profile and Camera in OctoPrint
Now swap back to your PC and type this local IP address into an internet browser. You will be greeted with an Octoprint screen with a floating User Access prompt. Add a username and password to your printer control, note that this username and password is used to login to the OctoPrint server, which is different to the username password for your Raspberry Pi.
When your login credentials are all setup, you may get some notifications and if one of these is a software update, do that and reboot your pi.
The next step will be to connect the Pi to our Printer. Use a USB cable to do this and power up your 3D Printer.
Log in again from your PC and select the option Settings from your header bar. A floating box will appear with a number of settings for OctoPrint, we are interested in the Printer profile which is the second option in the left-hand menu. You can either edit the default profile or make a new one, either way, we need to fill in some settings for our printer.
- Enter a name and Model for your Printer into the settings section.
- Select a rectangular form factor.
- Enter your print volume measurements, you can get these online or from the data sheet that came with your Lulzbot Taz/Mini.
- Check the Heated Bed option.
- Select Nozzle diameter and use a value of 0.5mm.
- Finally, select the option on the left to Auto-connect on server startup and then click connect.
That’s all there is to set up a printer in OctoPrint. You have now got a wireless printer host for your 3D printer.
As long as you Enabled the Raspberry Pi camera in the Raspi-Config earlier, you can access a video stream of your printer in OctoPrint.
To connect your camera for remote viewing, you will need to get out your Pi Camera Board now and attach it to the Pi's camera port while power is off. Once the Pi is running again, you should see a live stream of your Pi camera board from the Control tab in Octopi. If you find that the included camera cable is too small, we stock 100mm, 200mm and 300mm options.
Now we have a Rpi and camera board, naked on our desktops. If you're feeling a little creative it might be the right time to print some neat little cases for mounting the Pi and the Camera Board to our printer.
We put together all the relevant Pi case and camera mounting STL files for you guys here, but any Pi cases for Taz machines should work as the mounting holes are all the same.
If you want more information on the webcam/stream setup options with OctoPrint, take a look at this Project: Time Lapsing in OctoPrint (Properly!)
Your first print with OctoPrint
The Pi is a great controller, but when it comes to slicing models it can be somewhat lacking in horsepower. We use our desktop PC with Cura (Lulzbot Edition) to load our models and slice them, then we save and upload the G-Code output and to our OctoPrint server our Pi for printing.
Open Cura up on your PC and select your printer model, we're using a Taz 6.
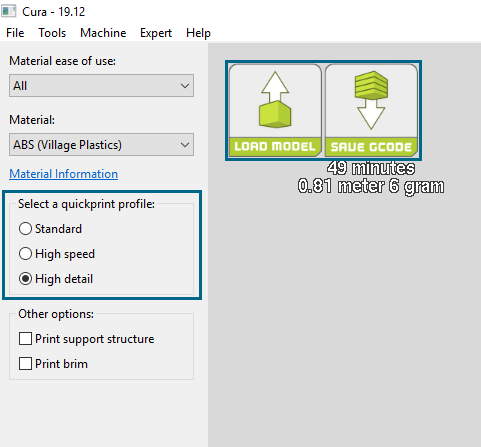
Load your model into Cura and set all your quality settings up how you want them. When complete use the “Save G-Code file” option. Switch back to Octoprint, and on the bottom left of the window, use the upload button to upload your G-Code to your Printer host. When it is finished uploading use the Load and print option below the file name to get your printer to begin printing your case Model!
If you were wanting to pick out a filament, a personal favourite is the PolyLite PLA in Lulzbot Green is a filament that matches the badass looking black/green aesthetic of your Lulzbot.
There should be next to no problems when printing with OctoPi. If you do run into any issues, a quick reboot of your Printer/Pi will usually sort any issues out. If not, head over to the Octoprint Forums and get troubleshooting help there.
Now that your printer is all set up for remote printing, you might want to take a look at a view 3D printer tests to familiarise yourself with all the controls and options available to you.
Also be sure to check out the user manuals available from Lulzbot (or read through the hard copy that comes with a Taz 6) for a comprehensive explanation of the different options when slicing and printing your model.
If you have any issues with this process, leave a comment down below and we can help you get back on track. Enjoy your prints!

