This Raspberry Pi, IoT Doorbell is basically a simple smart Door Bell, which takes a photo of whoever rings it, and emails it to the specified email address, and keeps all the photos in a folder. (along with going Ding-Dong).
Any Problems, just leave a comment/start a discussion below.
Step 1: Parts/ Tools
Here is the list of parts with approximate prices and links, though you don't need to buy these exact parts, or you may already own some components.
NOTE: This project costs around $137 from Core Electronics. Even though this may seem expensive, it is still cheaper than most smart home door bells., Though price can be made cheaper/ more expensive depending on if you are using an Rpi 1/2/0, and your webcam.
- Raspberry Pi 3 Model B - I've linked Raspberry Pi 3, though any should work, it even has WiFi which means your doorbell can be wireless. You can also use the other Raspberry Pi Models and save some dollars (although you will need to get a USB WiFi Adapter in this case).
- Wi-Fi Adapter (you don't need this if you're using an ethernet cable or Rpi 3)
- Pi Case (you don't need this but I recommend it so your Pi 3 doesn't get damaged and roughed up)
- Mini Breadboard (this is for wiring up buttons and other parts.)
- Button (for the doorbell! Wire at the right length for a connection between pi and doorbell)
- 1K resistor (required for button circuit - only one needed)
- Breadboard Jumper Cables (you only need 3 :)
- Pi Camera Board (this Should Work, though not tested Box For the button to be mounted on)
- Tools: Soldering Iron (Recommended) Wire Stripers (Recommended, though you can just use siccors Side Cutters/Sharp scissors Computer Internet
Step 2: Setting Up Hardware
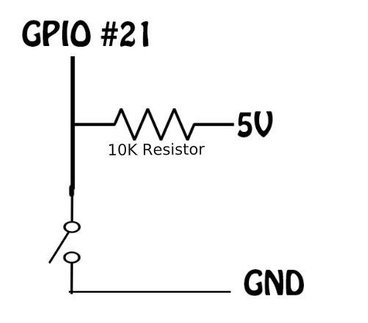

Above are the wiring diagrams. Hardware is pretty simple. Plug your Webcam into the Rasp-pi, along with your selected network interface. Then, using the images as a guide, connect your button and resistors to the pi. With the breadboard image, the orange and blue wires are the wires running the door bell (Project Box with button).
Step 3: Software & Programing
Now This is the harder part. First off SSH into your Pi (Raspbian Wheezy or Later).
--- Wondering how to SSH? See other posts on this thread.
For the "Advanced Users, I have put comments in the code explaining how it works
Follow these instructions (Once in the command line)
Remember to NOT copy the " $ " at the beginning of these commands if you are copy and pasting.
First, make sure your in your home directory (or whatever directory you wish to install the program to ( PS: it is contained in one folder, so it won't go everywhere in your home directory)
$ cd ~
Then we want to download the dbell folder containing all the code:
$ git clone https://github.com/Happypig123123/dbell.git
Now we want to CD into the directory
$ cd dbell
$ mkdir photos
-------VERY IMPORTANT!!!!!! -------
NOTE: If you do not a B+ Model (40pin pi, or Rpi 3), you will need to change the "Button" variable in bell.py from 21 to a # pin number that's available on your pi. TO do this do
$ nano bell.py
and change the Button = 21 line to something like Button = 7
------------------------------------------------------------
Now it's time to start editing the email code.
Step 4: Gmail Setup
For this program to work, you will have to make a GMAIL account (or use a spare one (that Gmail) ) to send the emails to Your Email. Throughout the next steps, I will call this GMAIL account:
I made mine [email protected]
NOTE!
To Google, the raspberry pi is an "Insecure" Device, so we need to let Google let unsecured devices, (i believe this means devices not using https) login. To do this we:
1. Follow this link (opens in new tab), and log in with your "raspberry pi's" Gmail account you just created.
2. Scroll down to the bottom of the page and you'll see an "Allow login from less secure apps" card. Click the switch to change it to yes. (image of no state above)
Step 5: Email Script Customisation
Ok, Now we setup the Gmail account we can now set up the Email Script. I would like to give credit to Gagandeep Singh, for his code is used in the IoTNotify script, And Sentdex, for his tutorial on python email tutorial, which allowed me to understand the process.
For the more advanced programmers who want to know how this works, Check out Sentdex's tutorial ((Paste into URL bar): http://bit.ly/2lOGgmT ) as I have not explained at all how this script works.
Now do this in the command line, in the dbell folder directory.:
$ nano IOTNOTIFY2.py
and change all the values that look like < this >: After you have changed all the values, press Ctr X, then Y to save the document
Step 6: Running the Code:
Do $ python3 bell.py
And the script will repeat forever until you press Ctrl Z or Ctrl C.
NOTE: The script is not set to run on startup, you will have to manually run it each time, though you could find another tutorial on google, to help with running a python script on startup.

