The PiicoDev Sketcher is a fun, interactive toy reminiscent of sketching toys from my childhood. The user draws an image using the two knobs - one for X-control and the other for Y. Turning one knob at a time produces horizontal or vertical lines. The real magic is when you turn both together - creating diagonal or curved lines. Clear the sketch by shaking it!
Bill of Materials
This project does not require soldering - only connecting, configuring and coding.
You can get all the hardware you need from this project wishlist, which contains:
- Raspberry Pi Pico (or Pico W) with headers soldered
- A PiicoDev Expansion Board
- PiicoDev OLED Module
- 2x PiicoDev Potentiometer
- PiicoDev Accelerometer
- 2x 50mm PiicoDev Cables
- 1x 100mm PiicoDev Cable
- 1x 500mm PiicoDev Cable
- A 3-Module Platform to hold everything together

Assembly
Connect the PiicoDev modules in a daisy-chain in the following order. We'll use the default address switch settings for the OLED and 3-Axis Accelerometer. Since there are two smart modules being used (potentiometers) we'll need to assign unique ID switch settings.
- Potentiometer (ID: 0,0,0,0)
- OLED (ASW: 0)
- Potentiometer (ID: 1,0,0,0)
- 3-Axis Accelerometer (ASW: 0)
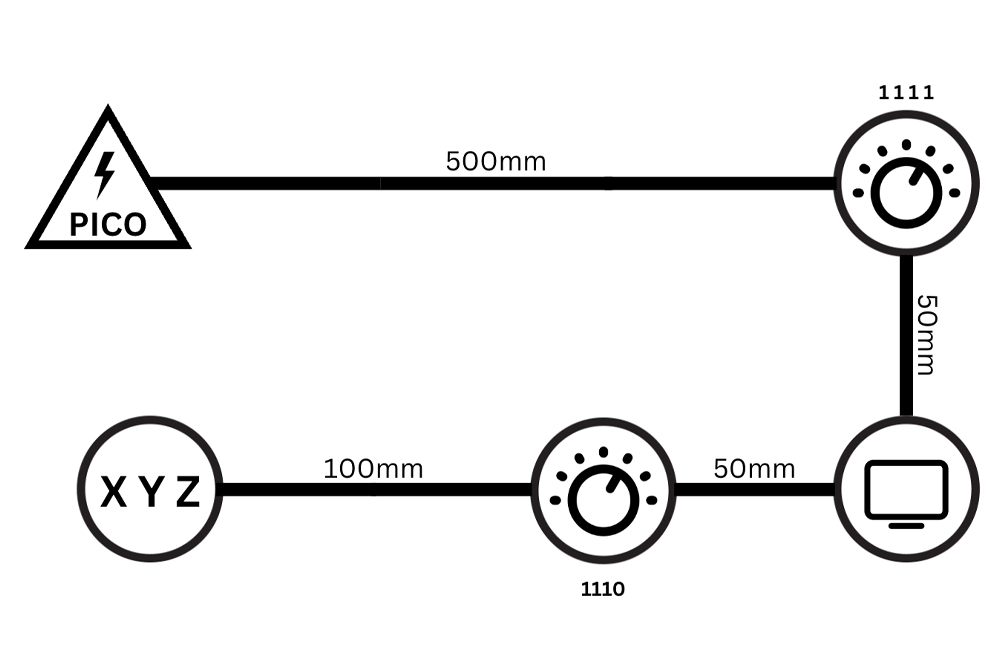
Refer to the video here for the finer details. The trick is to connect the modules such that they fold nicely onto the platform.
Code
While the full code for this project is shown below, we encourage you to code-along with the video so you don't miss any neat programming tips and tricks!
In the video, we develop the basic functionality (creating sketches) and then work on some attractive features like shake-to-clear and an attractive splash screen that is shown on startup.
Download the project files and upload them to your Pico. These are required to run the PiicoDev hardware.
# PiicoDev Sketcher Project
# Use the knobs to draw a picture. One knob controls the x-position of the stylus, and the other controls the y-position
# Shake to clear!

# Import PiicoDev Libraries
from PiicoDev_Potentiometer import PiicoDev_Potentiometer
from PiicoDev_SSD1306 import *
from PiicoDev_LIS3DH import PiicoDev_LIS3DH
from PiicoDev_Unified import sleep_ms
from random import random

# Initialise Hardware
pot_x = PiicoDev_Potentiometer(id=[0,0,0,0], minimum=0, maximum=127)
pot_y = PiicoDev_Potentiometer(id=[1,0,0,0], minimum=127, maximum=0)
display = create_PiicoDev_SSD1306()
motion = PiicoDev_LIS3DH()

# Functions
def animation_reset():
    """ Clear a percentage of all pixels, decaying the image """
    for i in range(5):
        for x in range(WIDTH):
            for y in range(HEIGHT):
                if random() < 0.2:
                    display.pixel(x,y,0)
        display.show()

# Show a nice splash-screen
display.load_pbm('splash.pbm', 1)
display.show()
sleep_ms(2000)
display.fill(0)

x_prev = int(pot_x.value)
y_prev = int(pot_y.value)

while True:
    # Read pots, use as (x,y) pixel coordinate
    x = int(round(pot_x.value))
    y = int(round(pot_y.value))
    y = min(y,63) # Make sure y does not go beyond edge of screen

    display.line(x_prev, y_prev, x, y, 1) # Draw a line (x,y) on the previous frame, and (x,y) on this frame
    display.show()
    x_prev = x
    y_prev = y

    # Check for shaking, clear the display
    if motion.shake(threshold = 20, avg_count=10, total_delay=25): # shake() is blocking for total_delay=25ms, so we don't need call to sleep_ms() in our loop
        animation_reset()
Conclusion
The PiicoDev Sketcher is complete and ready to play with. Intuitive to learn but tricky to master - see what sketches you can create! As is often the way with projects, we achieved a basic result pretty early on. While you could stop here, I couldn't resist spending a bit more time on extra features like shake-to-clear and a splash screen. While totally unecessary, this extra polish was fun to program and makes for a nice result.
If you build this project or adapt it into something else, share it (and your masterpieces) below. Happy making!

