This project turns a cheap exercise mini bike into a virtual bike. I made this project with my brother for a family member who has to do a few months of physical therapy. We wanted a way to motivate them to continue, and try to make it a fun game-like experience. Your pedal speed directly correlates to the play rate of the video. If you stop pedalling the “bike” will coast and slow down to a stop. If you pedal faster your video will play in fast-forward.
It consists of 2 parts. The first is a replacement for the trip computer directly on the minibike which allows us to track the pedalling motion and broadcast this information to the network. The second part is a video player on a computer that can receive these messages and play the video at the matching play rate.
Where possible we tried to use parts we already had laying around and avoid new purchases.
Exploring the bike
Originally I had the idea of attaching 1 or more magnets and using a hall effect sensor to monitor the rotation speed of the bike that way, but when I pulled off the trip computer to look how it works I noticed on the internal wheel there was already a magnet attached. Looking at the trip computer there was a tube that sits next to the magnet. Pulling this off and checking it on a multimeter in continuity test mode showed that it’s just a magnetic switch. This meant that I could use the existing mechanism, and we could just rebuild the housing and put in the custom trip computer.
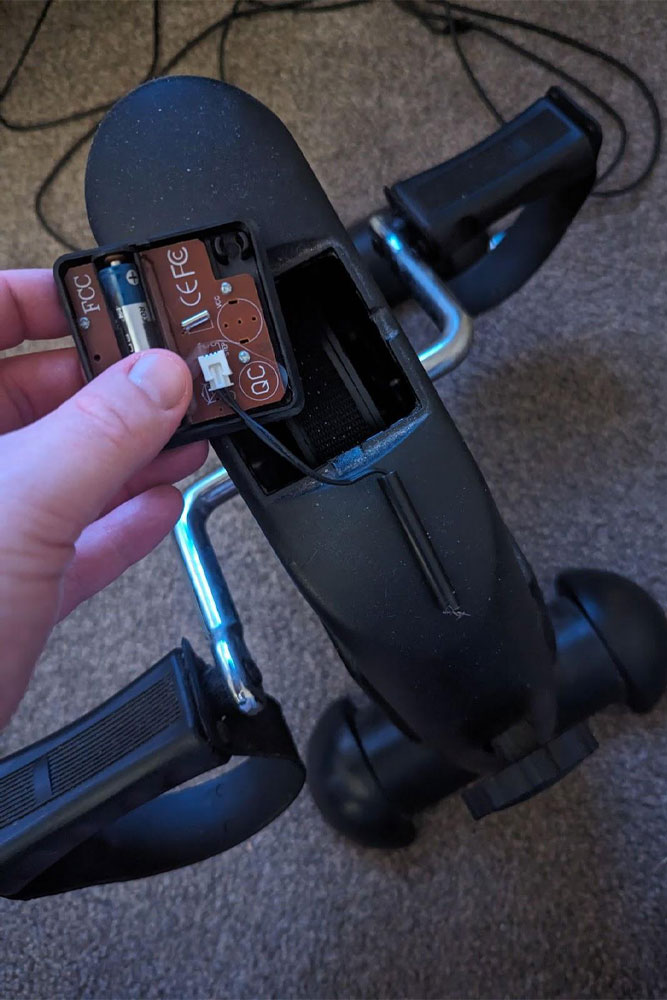
Pictured Above Right: The small silver circle you can see is a magnet on the internal wheel.
Designing the case
My brother was in charge of the case. The first order of business was to match the socket the original computer sits in. This meant that mounting the trip computer is very easy and required no modification to the main bike casing.
The original goal was to be as small as possible, but this ended up being quite frustrating to iterate on. The final design ends up quite bulky but fits neatly on the bike and doesn’t get in the way of the rider. To help with durability as we iterated the build he used heat-press inserts which make it so screws don’t damage the plastic on repeated assembly
The final design is easy to print, easy to work in, and easy to assemble.

Designing the Trip Computer
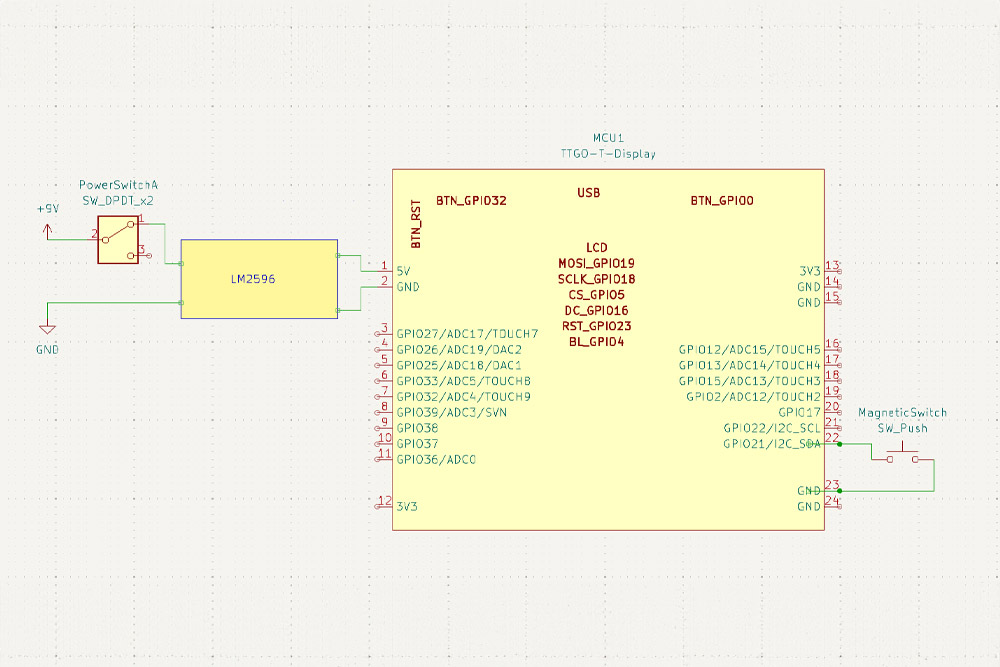
One goal was that we could build this with parts we had lying around. The TTGO T-Display is cheap and has an integrated screen. It has way more than enough grunt to handle a simple trip computer display.
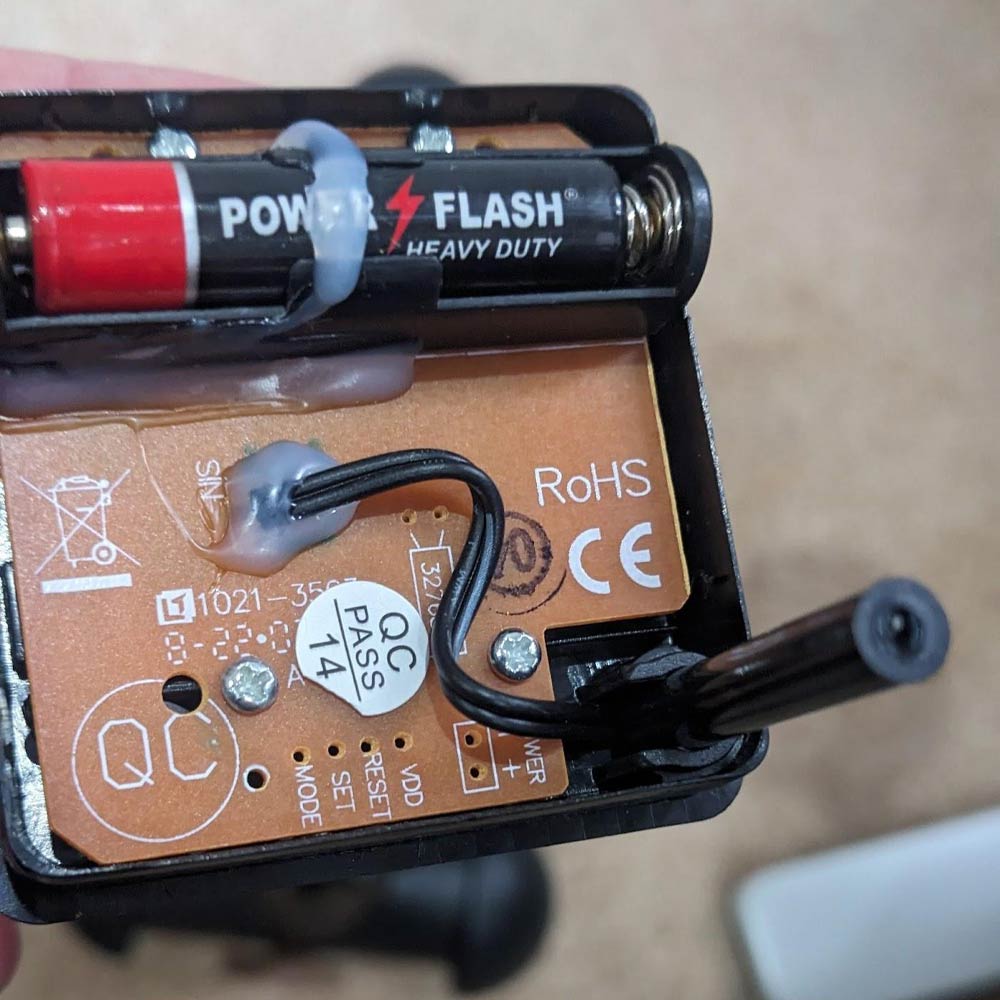
The magnetic switch from the original trip computer could be used directly with the microcontroller pins, just setting one to INPUT_PULLUP so it could use the internal pull-up resistor.
For power, I’m still beginning with the world of microcontrollers and electronics and I don’t trust myself with lithium batteries, so instead I chose to use a 9v battery and a buck converter. The buck converter used can take a wide range of inputs and has an adjustable output voltage. Your input voltage must be a bit higher than your output voltage, so being that we needed 5v out, 9v in seemed appropriate and meant that it was only one battery at a time.
When powering the adjusting the output voltage 5.0v seemed to work but the WiFi was unstable. Bumping the output voltage to 5.1v solved the problem.
The prototyping PCB and the headers aren’t strictly necessary but it gave good mounting options in the case and made it really easy to replace the T-Display when I accidentally fried one.
NOTE: DO NOT CONNECT BATTERY AND USB AT THE SAME TIME!
Designing the software
I wanted to use this project to experiment with LVGL which is a really interesting GUI library for embedded systems.
I wanted the setup process to be dead simple for the rider. By just relying on UDP broadcasts it meant that the laptop and trip computer just needed to be connected to the same WiFi network, and there was no pairing required. The trip computer just broadcasts a packet containing a few characters to confirm its packet type, a packet ID which is incremented on every broadcasted packet, and the number of cycles counted so far. The video player then only processes packets that have a higher ID than the previously received one, so there are no concerns with out-of-order packet delivery.
There are no IPs hardcoded into the microcontroller, it just assumes that you are on a standard /24 network with the broadcast address being x.x.x.255. This means that on basically any home network it will broadcast the packets to all PCs. PCs that aren’t listening for the packets will just discard it.
For the video player on the laptop, I just used the old faithful of Python, PyGame, and OpenCV. PyGame is used for the presentation of the video, and OpenCV is used for its FFmpeg wrapper allowing decoding of all sorts of videos. I did hardcode some limits into the player, the player expects 720p videos but supports any FPS (tested with 30 and 60fps), and codecs don’t seem to be too picky. I tested with h264 and h265 videos.
For every pedal received it bumps the target playrate up. The target playrate is decayed over time towards zero. The actual playrate is then slowly adjusted over time towards the target playrate which gives a much smoother, more naturally changing video playback speed.
The circles on the right side of the screen show the play rate. The green circle is the target of 1x speed playback, and the red circle is the current play rate. These were initially added as a debug view however they ended up being a nice visual feedback for the rider, so they stayed!
I didn’t want the rider to mess about with Python or have complicated running instructions. To achieve this the whole thing is turned into a simple to run .exe with PyInstaller.
I’m happy with the results of the software, it has enough features implemented to be a good experience, and there are no super rough edges, or complicated setups required to do a bike ride. Having said that, I didn’t want the software to become a multi-weekend time-sink, so the code quality reflects the “maker” nature of the project.

Finding videos
There are a huge number of creators on YouTube who do walking tours of picturesque or historic places. I downloaded some videos of areas of sentimental meaning to my family member using YT-DLP and converted them with Handbrake to 720p, h265, CRF29, leaving the frame rate the same as the original, using constant framerate, not variable framerate. This meant that the videos were reasonably good quality while not taking up a huge amount of space. Most of the quality loss is not important since the screen is a bit of a distance away and while pedaling you are rocking a little bit.
Power Reduction
A few weeks after giving the gift I noticed the battery went dead a lot sooner than I’d have liked. I thought of a few improvements to reduce power consumption including looking into WiFi powerstates, MCU powerstates, and reducing the backlight brightness. In the end I settled on just reducing the clock speed of the microcontroller from the default 240 MHz to 60 MHz which resulted in bringing the power consumption from around 83mA to 73mA, which is pretty decent for such a small change. The code for the trip computer really doesn’t do much so I would have liked to go down much lower, but I found the screen would not reliably turn on or initialise at lower clock speeds.
On the T-Display, there doesn’t appear to be direct display brightness control, but it does seem you can control the light through one of the GPIO pins. I’d be interested to see if you can control the brightness via PWM this way, but didn’t have a chance to test this.
Builds 2 and 3
After seeing the finished project my brother and a friend wanted to build the project for themselves, so we found the bike online and ordered a few more. We were able to build the project again twice within a few hours, so it’s not an overly complicated project to replicate.

Parts:
- DC-DC Supply Module LM2596 Buck Converter
- LILYGO T-Display ESP32 Development Board, 1.14 Inch LCD Display, Wireless
- WiFi Bluetooth Module, FLASH 4/16MB, For Arduino
- Mini PCB Prototyping Solderable Breadboard
- 2.1 JST Connector
- Male 2.54mm Bent Pin Header Right Angle Single Row 90 Degrees Needle Connector
- 9V Battery Connector
- 9V Battery
- Round Rocker Switch with LED Indication Red 20A 12V
- Verpeak Mini Pedal Bike with LCD Display
- Wire, M3 screws, filament, heat press inserts, odds and ends

Assembly Instructions
All supplementary files (STLs, PCB schematics & Python files) can be downloaded here.
- Print the case files
- Optionally press in heat press inserts
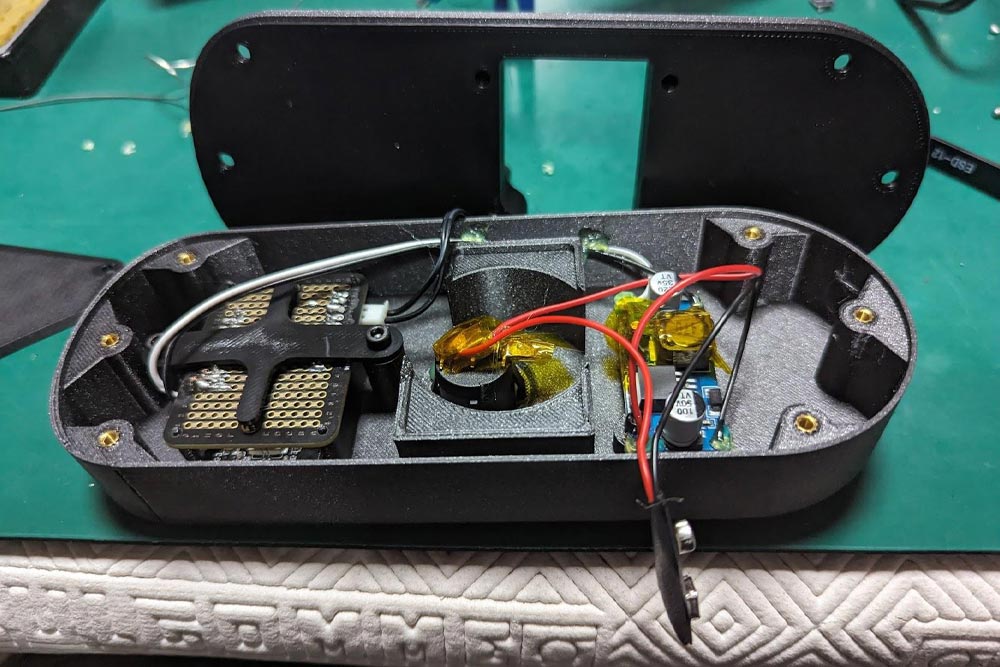
- Assemble the electronics as shown in the diagram below
- Adjust the LM2596 voltage regulator to 5.1v before connecting to the T-Display
- Put Kapton or electrical tape over the regulator adjustment afterward to ensure it doesn’t get changed during assembly
- Make sure the magnetic switch is connected to GPIO 21 (labeled 21 on my T-Display board)
- Optionally add a drop of hot glue on all soldered wire joints to reduce strain on these joints if you are iterating the design a bunch.
- I only had 10-pin female headers so I offset them diagonally to better support the T-Display board
- We have assembled 3 of these now, some of the original trip computers had a JST connector to disconnect the magnetic switch, and for some, we had to cut the wires and add our own JST connector.
- Connections:
- Battery +9v to switch
- Switch to LM2596 IN+
- LM2596 OUT+ to TDisplay +5v (Pin 1)
- TDisplay GND to LM2596 OUT-
- LM2596 IN- to Battery Ground
- TDisplay GPIO 21 to magnetic switch
- TDisplay GND to magnetic switch

-
Flash the firmware to the T-Display as the USB port will be inaccessible once in the case.
-
You can test the firmware by running a magnet past the switch/probe before assembly.
-
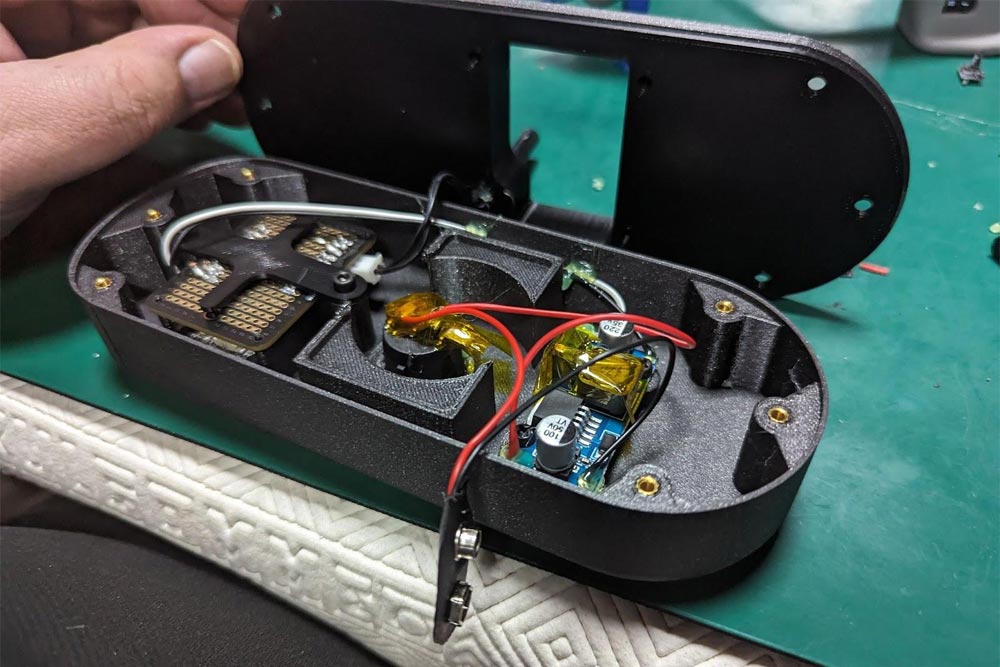
- Install into the case as shown in the picture
- Put Kapton tape over anything you fear might short, such as over the switch where the battery will sit below.
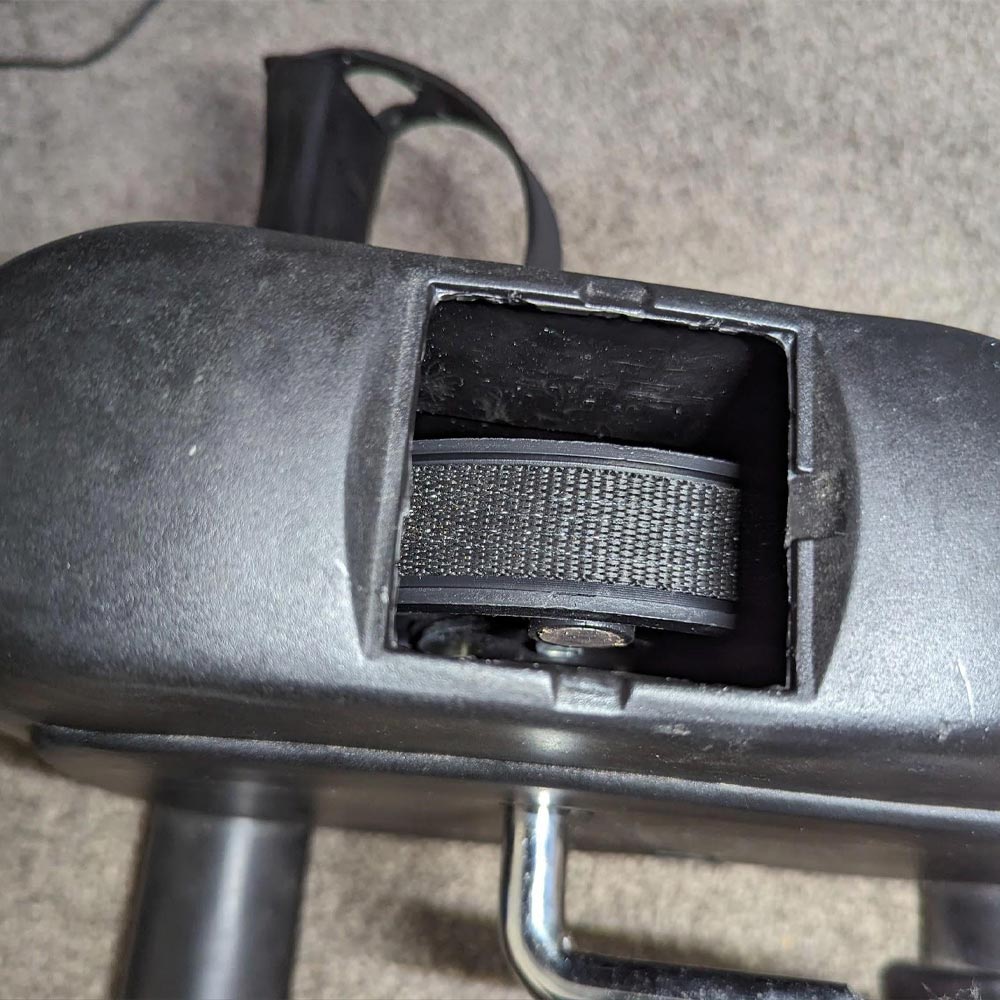
- Make sure you mount the magnetic switch as low as possible in the case so it is as close as possible to the magnet on the internal resistance wheel of the bike
Software
I've included deployment instructions on the software in the repository.
Other bikes
If you are doing this on another bike, I’d look into replacing the magnetic switch with a Hall effect sensor and attaching a magnet or a few magnets to something that rotates with the pedals so you can do very similar tracking. Having more than 1 magnet per rotation will require additional code modifications but should allow a more fine-grained estimation of the RPM being pedaled.
# Copyright (C) 2024 Philip Edwards
import cv2
import pygame
import numpy as np
import time
import sys
import json
import socket
import threading
import tkinter as tk
from tkinter import filedialog

def parse_json_into_pyobject(json_str):
    # Snippet from: https://stackoverflow.com/a/15882054
    from types import SimpleNamespace

    # Parse JSON into an object with attributes corresponding to dict keys.
    new_obj = json.loads(json_str, object_hook=lambda d: SimpleNamespace(**d))

    return new_obj

def load_config(config_path: str = 'config.json'):
    try:
        with open('config.json', 'r') as f:
            json_str = f.read()
            config = parse_json_into_pyobject(json_str)
    except:
        print("Failed to load config file.")
    return config

class VirtualBike:
    def __init__(self) -> None:
        self.config_path = 'config.json'
        self.config = load_config(self.config_path)

        # Initialize playback speed
        self.target_playback_speed = self.config.min_playback_speed
        self.current_playback_speed = self.config.min_playback_speed

        self.last_message_idx = -1
        self.last_cycle_count_rcvd = 0
        self.last_cycle_count_processed = 0
        self.last_packet_received_time = 0.0

        # Set the display dimensions
        self.screen_width, self.screen_height = 1280, 720
        self.render_width, self.render_height = 1280, 720
        self.is_fullscreen = True

        self.should_draw_fps = False
        self.game_running = True

        # the number of ticks when the last frame was drawn (not the video frame processed)
        self.last_frame_ticks: int = 0

        # The time the last video frame was presented. In seconds
        self.last_frame_present_time: float = 0.0

    def toggle_fullscreen(self):
        self.is_fullscreen = not self.is_fullscreen
        if self.is_fullscreen:
            self.screen = pygame.display.set_mode((self.screen_width, self.screen_height), pygame.FULLSCREEN)
        else:
            self.screen = pygame.display.set_mode((self.screen_width, self.screen_height), pygame.RESIZABLE)

    def udp_listener(self):
        # Create a UDP socket
        sock = socket.socket(socket.AF_INET, socket.SOCK_DGRAM)
        # Allow the address to be reused
        sock.setsockopt(socket.SOL_SOCKET, socket.SO_REUSEADDR, 1)
        # Bind to all interfaces on port 5050
        sock.bind((self.config.listen_ip, self.config.listen_port))

        print(f"Listening for UDP broadcasts on post {self.config.listen_port}...")

        while True:
            # Receive data and the address it came from
            data, addr = sock.recvfrom(1024)  # Buffer size is 1024 bytes
            #print(f"Received message: {data.decode()} from {addr}")
            data = data.decode()
            packet_type = data[:4]
            if packet_type != 'VBC:' and packet_type != 'VBR:':
                # Unrecognized packet type, skip it
                continue
            data = data[4:]
            #print(f"Received message: {data.decode()} from {addr}")
            packet_idx, cycles = data.split(',')
            packet_idx = int(packet_idx)
            cycles = int(cycles)
            curr_time = time.time()
            time_since_last_received = curr_time - self.last_packet_received_time
            #print("Time since last received: ", time_since_last_received)
            if time_since_last_received > self.config.packet_reset_time or packet_type == 'VBR:':
                # This was a reset packet
                #print("Resetting packet index")
                self.last_cycle_count_processed = cycles - 1
                self.last_message_idx = packet_idx
                self.last_cycle_count_rcvd = cycles
                self.last_packet_received_time = curr_time
            if packet_idx >= self.last_message_idx:
                #print("Tick")
                self.last_packet_received_time = curr_time
                self.last_message_idx = packet_idx
                self.last_cycle_count_rcvd = cycles

    def start_udp_listener(self):
        # Create and start the UDP listening thread
        self.udp_thread = threading.Thread(target=self.udp_listener)
        self.udp_thread.daemon = True  # This ensures the thread will exit when the main program does
        self.udp_thread.start()

    def draw_speed_indicator(self, surf: pygame.Surface):
        # Draw a circle on the right side of the screen
        clamped_speed = max(min(self.current_playback_speed, self.config.max_playback_speed), self.config.min_playback_speed)
        circle_pct = 1.0 - (clamped_speed / self.config.max_playback_speed)
        # Draw a filled circle
        pygame.draw.circle(surf, (0, 255, 0), (self.render_width - 50, self.render_height / 2), 20)
        pygame.draw.circle(surf, (255, 0, 0), (self.render_width - 50, 50 + 620 * circle_pct), 20)

    def draw_fps(self, surf: pygame.Surface):
        if not self.should_draw_fps:
            return
        current_frame_ticks = pygame.time.get_ticks()
        frame_delta = pygame.time.get_ticks() - self.last_frame_ticks
        self.last_frame_ticks = current_frame_ticks
        fps = 1000.0 / frame_delta
        fps_text = f"FPS: {fps:.2f}"
        font = pygame.font.Font(None, 36)
        text = font.render(fps_text, True, (255, 255, 255))
        surf.blit(text, (10, 10))

    def handle_events(self):
        # Check for key presses
        for event in pygame.event.get():
            if event.type == pygame.QUIT:
                self.game_running = False
            elif event.type == pygame.VIDEORESIZE:
                # Handle window resize event
                self.screen_width, self.screen_height = event.size
                self.screen = pygame.display.set_mode((self.screen_width, self.screen_height), pygame.RESIZABLE)
                self.output_surface = None

            if event.type == pygame.KEYDOWN:
                #print(event.key)
                if event.key == pygame.K_ESCAPE:
                    self.game_running = False
                elif event.key == pygame.K_q:
                    self.game_running = False
                elif event.key == pygame.K_p:
                    self.should_draw_fps = not self.should_draw_fps
                elif event.key == pygame.K_f:
                    self.toggle_fullscreen()
                elif event.key == pygame.K_KP_PLUS or event.key == pygame.K_PLUS or event.key == pygame.K_EQUALS:
                    self.target_playback_speed += 0.25
                elif event.key == pygame.K_KP_MINUS or event.key == pygame.K_MINUS:
                    self.target_playback_speed -= 0.25
                    if self.target_playback_speed < 0.1:
                        self.target_playback_speed = 0.1

    def tick_game(self):
        curr_framedelay = 1.0 / (self.video_fps * self.current_playback_speed)
        next_frametime = self.last_frame_present_time + curr_framedelay
        curr_time = time.time()
        #print(f"Time: {time.time()}, next_frametime: {next_frametime}")
        if curr_time >= next_frametime:
            # Read a frame from the video
            # TODO: Reuse frame buffer to avoid allocations
            ret, frame = self.video_decoder.read()
            if not ret:
                # If the frame is not read, the video has ended
                self.game_running = False
                return

            # Convert the frame to a Pygame surface
            # make sure to transpose array and swizzle from BGR to RGB
            # copy frame to video_surface so a new surface isn't allocated
            pygame.pixelcopy.array_to_surface(self.video_surface, frame.swapaxes(0, 1)[:, :, ::-1])

            # Update the last frame present time with the target frame time
            self.last_frame_present_time = next_frametime
            # Get the target frame length and add that to the next target frame time
            curr_framedelay = 1.0 / (self.video_fps * self.current_playback_speed)

        self.frame_surface.blit(self.video_surface, (0, 0))
        self.draw_speed_indicator(self.frame_surface)
        # draw the current FPS
        self.draw_fps(self.frame_surface)
        # Scale the framebuffer to fit the window
        if self.output_surface is None:
            self.output_surface = pygame.Surface((self.screen_width, self.screen_height))
        pygame.transform.smoothscale(self.frame_surface, (self.screen_width, self.screen_height), self.output_surface)
        # Display the frame_surface
        self.screen.blit(self.output_surface, (0, 0))

        pygame.display.update()

        current_frame_time = time.time()
        delta_seconds = current_frame_time - self.last_frame_time
        #print(delta_seconds)
        # decay the target speed
        self.target_playback_speed -= self.target_playback_speed * self.config.target_playback_speed_decay * delta_seconds
        self.last_frame_time = current_frame_time

        # Process any cycles that have been received
        cycles_to_process = self.last_cycle_count_rcvd - self.last_cycle_count_processed
        for i in range(cycles_to_process):
            #print("Processing cycle")
            self.last_cycle_count_processed += 1
            self.target_playback_speed += 0.25

        # clamp target playback speed to 0.001 and 2.0
        self.target_playback_speed = max(min(self.target_playback_speed, self.config.max_playback_speed), self.config.min_playback_speed)

        # Adjust the current playback speed towards the target playback speed
        playback_speed_delta = self.target_playback_speed - self.current_playback_speed
        self.current_playback_speed += playback_speed_delta * (self.config.current_playback_speed_adjust * delta_seconds)
        if self.current_playback_speed < self.config.min_playback_speed:
            self.current_playback_speed = self.config.min_playback_speed

        self.handle_events()

    def run_game(self):
        self.next_frametime = time.time()
        self.last_frame_time = time.time()
        self.last_frame_present_time = time.time()

        self.start_udp_listener()
        # just to make sure we have a valid last_frame_ticks
        self.last_frame_ticks = pygame.time.get_ticks()-10

        # TODO: Move this to after video load so it can allocate the appropriate size for the surface
        self.video_surface = pygame.surfarray.make_surface(np.zeros((1280, 720, 3), dtype=np.uint8))
        self.frame_surface = pygame.surfarray.make_surface(np.zeros((1280, 720, 3), dtype=np.uint8))
        self.output_surface = pygame.Surface((self.screen_width, self.screen_height))

        root = tk.Tk()
        root.withdraw()  # Hide the root window
        file_path = filedialog.askopenfilename(initialdir=self.config.video_dir, title='Select a video file')

        if file_path != () and file_path != "":
            print(file_path)
        else:
            print("No file selected.")
            sys.exit(0)

        # Create a video capture object
        self.video_decoder = cv2.VideoCapture(file_path)
        self.video_fps = self.video_decoder.get(cv2.CAP_PROP_FPS)
        print(self.video_fps)

        # Initialize Pygame
        pygame.init()
        # Set the window title
        pygame.display.set_caption("Virtual Bike")

        self.screen = pygame.display.set_mode((self.screen_width, self.screen_height), pygame.FULLSCREEN)

        while self.game_running:
            self.tick_game()

        # Release the video capture object
        self.video_decoder.release()
        # Close the Pygame window
        pygame.quit()


if __name__ == "__main__":
    vbike = VirtualBike()
    vbike.run_game()
Future work, improvements, and expansions
There are plenty of ways to improve this project and take it forward. Maybe in the future, I’ll implement some of them. Sharing these ideas in case anyone would like to improve their own build.
- Reduce power consumption
- WiFi power state
- MCU sleep states
- Display brightness
- Rechargeable battery
- Battery Monitor
- Add a simple voltage divider and an ADC to monitor the battery remaining
- Screwless battery compartment hatch
- Smaller housing
- Pack components tighter and reduce overall size
- Better WiFi configuration
- The credentials are hardcoded in the trip computer code. I’d like to utilise some of those projects where the MCU becomes a hotspot that allows you to configure WiFi from your phone if it can’t find the existing configured network.
- Player improvements
- UI
- One button adjustment to target pedaling speed
- Support other resolutions than 720p
- Sound playback
- Either pitch shifting sound, or looping sound in 1-minute blocks
- “Buffering” mode
- The rider is required to pedal enough to maintain a buffer, if the “buffer” runs out the video pauses until the rider has pedaled enough to restore a healthy buffer. Just like the old days of the internet!
- Interval training mode
- Alternate the target play rate through a guided series of high and low-intensity periods.
- UI
- Unreal Experience
- I’d love to make a compatible Unreal Engine experience where the pedal speed just controls the speed moving along a spline through a great-looking environment. I chose videos for this project mainly for the areas that have some sentimental meaning for the rider. An unreal experience wouldn’t be too hard.

