Today we will be making an Arduino circuit that will start playing a noise if the water (or surrounding environment) reaches a certain temperature, in our case, that temperature will be 100° Celsius.
This is a useful little project that takes barely any time at all but will be extremely useful to know when your pasta is ready, or when your kettle is ready to pour some coffee.
In this project, we will be showing you how to use the low-cost waterproof DS18b20 sensor with an Arduino Uno.
Step 1 - You will need:
- A Waterproof DS18B20 Digital temperature sensor
- Any Arduino Compatible Device, we're using the Arduino Uno r3
- 4.7K Resistor (Included in this resistor bundle)
- Any Piezo Buzzer
- A pot/kettle/hot water tap to test with.
Step 2 - Wiring:
Your sensor may have one of these wiring types, depending on which colours you have, hook them up to the listed pins.
- Type A
- Red wire- 5V
- Black wire- GND
- Yellow wire- D2 (Digital Pin 2)
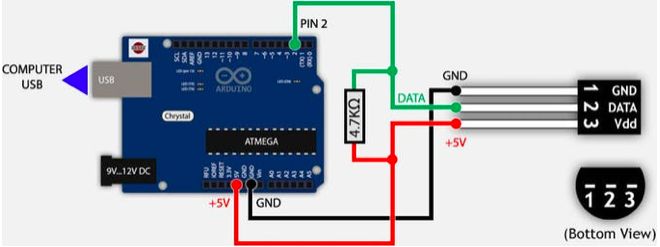
- Type B (Recently there's a series of sensors using this pin mapping. Sorry for the inconvenience.)
- Red wire - 5V
- Yellow wire- GND
- Green wire- D2
After that add a 4.7K resistor between D2 and 5V (as below)
COLOURS IN THIS IMAGE DONT CORRESPOND TO COLOURS OF SENSORS
Also, Wire the buzzer up to digital pin 11 and GND (Doesn't matter which way the pins go).
Step 3 - Instaling the Libraries:
Before you start, download and unzip the following libraries into your library folder, in order to use the sensor with the Arduino board.
- 1- Wire bus - For communicating with our sensor using one-wire interface
- Dallas Temperature - This does all the heavy lifting with calculations
Step 4 - Uploading the Code:
Download sketch zip file (bottom of this page), unzip it and open the .ino file. Now upload it to your Uno.
If everything is connected properly, you should see the temperature being measured and showed in the Serial monitor in the IDE.
You can adjust the variable called alarmTemp to adjust the temperature that the Arduino will start beeping at.
(Note that the temperature sensor can only handle up to 125' C, so don't leave it in the water once it has started beeping (also set alarmTemp lower than 125').
/********************************************************************/
// First we include the libraries
#include OneWire.h
#include DallasTemperature.h
/********************************************************************/
// Data wire for TMP is plugged into pin 2 on the Arduino
#define ONE_WIRE_BUS 2
//Buzzer is pluged into pin 11 & GND(Negative)
#define buzzer 11
// Temp at which it beeps at
#define alarmTemp 97
/********************************************************************/
// Setup a oneWire instance to communicate with any OneWire devices
// (not just Maxim/Dallas temperature ICs)
OneWire oneWire(ONE_WIRE_BUS);
/********************************************************************/
// Pass our oneWire reference to Dallas Temperature.
DallasTemperature sensors(&oneWire);
/********************************************************************/
void setup(void)
{
 // start serial port
 Serial.begin(9600);
 Serial.println("Dallas Temperature IC Control Library Demo");
 // Start up the library
 sensors.begin();
}
void loop(void)
{
 // call sensors.requestTemperatures() to issue a global temperature
 // request to all devices on the bus
/********************************************************************/
 Serial.print(" Requesting temperatures...");
 sensors.requestTemperatures(); // Send the command to get temperature readings
 Serial.println("DONE");
/********************************************************************/
 Serial.print("Temperature is: ");
 Serial.print(sensors.getTempCByIndex(0)); // Why "byIndex"?
   // You can have more than one DS18B20 on the same bus.
   // 0 refers to the first IC on the wire
   if (sensors.getTempCByIndex(0) > alarmTemp) { //If the temp reaches above alarm temp:
     tone(buzzer, 1000, 250);
     delay(250);
     tone(buzzer, 1000, 250);
     delay(250);
     tone(buzzer, 1000, 250);
     tone(buzzer, 1000, 250);
     delay(250);
     tone(buzzer, 1000, 250);
     delay(250);
     tone(buzzer, 1000, 250);
   }
   delay(250);
}
Step 5 - Test it
Play around with some of the variables in your code, put the kettle on and dip your temperature sensor into the water and see if it triggers!
Now you have a Temperature probe, connected to code that will play a tone when it gets to a certain temperature.
Project complete!
If you have any issues, please tell me. :)

