It’s always a fun day when you get hands-on with a device as cool as the 8Bitdo Zero Bluetooth gamepad. 8Bitdo are known are for their re-creations of classic gaming controllers such as the SFC30 and NES30 which bring the magic of NES and SNES gaming systems into the 21st century. 8Bitdo have now branched out and created some new gamepads which take their cues from these classic designs, but with their own unique flavour. Whilst it might not look so distinctive in photos, the Zero (not to be confused with the Pi Zero of course) is possibly the most unique of them all, and that’s because it’s actually incredibly tiny. How tiny? This tiny:
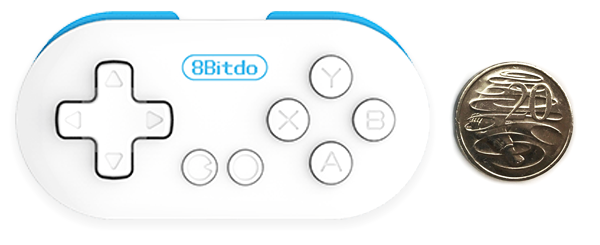
It’s a diminutive 16mm long and 12.8mm high, and it weighs 50g. 50 GRAMS! So anyway, let’s take a look at some of the specs, and then I’ll tell you what I think.
Tech Specs:
- Bluetooth connectivity
- 16mm x 12.8mm x 2.7mm
- 50g
- 180mAh rechargeable LiPo battery
- 18 hours play time
- 1-2 hours charge time
- Compatible with Windows, Android, macOS
- X-input, D-input, and Mac controller modes
- D-pad, ABXY buttons, Start/Select, RL bumpers
Useability
Probably the biggest question that people have of the 8Bitdo is how useable it is. Will my hands cramp up while I’m playing? Will I mash multiple buttons all the time? Will I accidentally swallow it with my steak?
All very good questions, and for the most part, I think it depends on the user. I’ve got hands that are larger than most, but not out of the ordinary, and I found it pretty easy to use. The controls are well laid out, and it’s certainly a playable gamepad, however, you’ll need to get used to holding it with your fingers, rather than the palms of your hands. To give you some idea, when you’re holding it, it’s only slightly smaller than gaming horizontally on an original iPhone or about half the width of a new iPhone.
Something to mention though is that because it’s not an MFi certified device (Made For iOS), it won’t work with most of your iPhone apps, which is a bit annoying, but that’s the nature of a closed-loop platform such as iOS. It does, however, have a pretty nifty feature where it can control the shutter of your phone camera. You just turn it on in the Camera mode as detailed further down, and press any of the buttons to trigger the camera.
It’s got a standard D-pad, the usual ABXY buttons which are laid out differently to a SNES controller, the same configuration as an Xbox controller, plus the Start and Select buttons, and Left and Right bumpers to round it all off. A big box to tick for any gamepad is how the controls feel – are they spongy? Or are the solid with a nice ‘click’. Let’s take a look.
Build Quality

I was quite pleasantly surprised by the build quality of the Zero. The rest of the 8Bitdo line-up is very well made, with a high-quality feel, and premium packaging, so I was expecting it to be good. In place of the smooth, matte laminated packaging box though, was a generic plastic wrapper with a short micro USB cable (it’s really more of a dongle), and a keychain lanyard. So I was a little more apprehensive, however, not to fear. The Zero inherits the same high build quality as its larger siblings, and all of the buttons have a great response to them. They’re not spongy at all but have a good ‘click’ when pressed, and a decent travel, especially considering the size.
There’s very little flex across the gamepad (helped by the wee proportions size), but more importantly, the plastic casing felt rigid and durable enough to avoid any flexing when pressed or squeezed. They’re minor points, but they definitely contribute to the overall build quality, which I’m glad to say is very high.
Connection
Connecting to your devices is easy. You simply hold the start button in for two seconds to turn the controller on, and the LED on the bottom will blink roughly once per second. To pair it with another device, you then hold the select button for two seconds and the LED will rapidly blink. Then you can go to your device’s Bluetooth settings and pair it.
Those steps are taken directly from the 8Bitdo Zero manual, however, when connecting it to my Raspberry Pi running RetroPie, I only had to turn it on with the start button, and I could connect it just from there.
As mentioned earlier, it can also control your camera shutter. Simply turn it on by holding Select straight away (don’t hold Start first), and then pair it with your device, and any button will trigger the camera.
Turning it off can be done by holding the start button in for another two seconds. If you're after more info on configuring your 8Bitdo controller with RetroPie, updating the firmware, or adjusting the mapping, then check out some of our other 8Bitdo tutorials.
LED Status Modes:
The LED located on the bottom of the controller shows the various states of the controller as listed below:
![]()
Controller connected (solid)
![]()
Controller pairing (blinking rapidly)
![]()
Controller not connected (blinking slowly)
![]()
Battery charging (blinking slowly)
![]()
Battery low (blinking slowly)
Verdict
The 8Bitdo Zero is a big win for me. It maintains the hallmarks of the 8Bitdo brand with high-quality controls, good reliability, and fantastic battery life. You can comfortably put it on your keys and slip it into your pocket, and it’s ideal for bringing out for a quick game while on the go. The only downside, which is shared across the 8Bitdo range, is the lack of iOS integration. It’s due to Apple’s strict MFi certifications, and without that, it will only work with a handful of titles from the ‘iCade’ series. So if that’s all you want to use it for, then it might be a deal breaker, but for the price, it could even function as a cool keyring that can act as a camera trigger.

