We have a more recent guide to Stress testing your Raspberry Pi, this guide has been kept here for reference.
Part of the joy that is Raspberry Pi is getting stuck into it at a slightly lower level and finding out exactly what you can do with it if you take a look under the hood. One of the most popular experiments to do with your Raspberry Pi is overclocking it. Overclocking is fairly simple to do on the Raspberry Pi, however, it requires additional cooling in the form of heatsinks and fans to ensure that the Pi doesn't overheat and damage itself. You may also find that your Pi gets hot under heavy usage, and it can be a good idea to cool it down, especially when using intensive processes such as the N64 emulator for RetroPie.
We've broken up the topics of cooling, stress testing, and overclocking your Raspberry Pi into individual tutorials to make it easier to digest. This is the second tutorial of the three: stress testing.
After much research on the internet regarding this topic, it was clear that there was no definitive guide with all of the information in one place, so we hope to answer all of your questions, however, if you want to know more, don't hesitate to get the conversation started in the comments below.
 What is Stress Testing?
 What is Stress Testing?
We had a look at different methods for cooling Raspberry Pi's in our previous tutorial Cooling Your Raspberry Pi, however, it's one thing having your Pi run at a nice 40C when idle, another when it's running at full throttle. Stress testing is an important part of overclocking as it tells you how hot your system runs while under heavy load, and also how stable it is.
Stress testing is simply running a series of processes on your system which are designed to run the CPU at full power, and monitor the temperature and stability of the system. As we talked about in the previous tutorial, 80C is normally the high-temperature limit for most computer systems, so we need to run a stress test to make sure that our cooling is adequate to keep it under 80C. The hotter a processor gets, then less stable it becomes, so a cooler processor will lead to a more stable system.
Without any form of overclocking and stress testing, you need to ensure that your Pi is correctly powered. Whilst you might have a 5V power supply, it needs to be able to handle the extra current draw when the Pi is being maxed out. We recommend the official Raspberry Pi power supply which can push out 2.5A.
Today we'll be using two different stress tests, Stress which simulates real life, high-load usage across all of the Pi's resources, and cpuburn-a53 which maxes out your Pi's CPU completely (not to be used lightly!).
So without further ado let's run through the process of stress testing when you playing with cooling setups and clock speeds:
1. Implement cooling methods (heat sinks, fans etc.).
2. Run STRESS and ensure the system is stable and cool for 10mins of run time.
3. Run cpuburn-a53 and ensure the system is stable and cool for 10mins of run time.
4. Push the clock speed and overclock settings until the system is no longer stable (crash or freeze), then dial overclocking back to the last successful settings.
5. If the system is running too hot, consider adding extra cooling capabilities before trying again.
Whilst we haven't gotten into the specifics of overclocking yet (that's in our next tutorial in this series), it's important to test out the cooling on your Pi first and makes sure that it's doing something. That's the general process for stress testing your Pi, now let's take a look at the specific functions that are required.
How to Stress Test Your Raspberry Pi
Now it's time to find out what your Pi is really made of. Open up a terminal window and enter the following to download Stress and cpuburn-a53:
sudo apt-get install stress

wget https://raw.githubusercontent.com/ssvb/cpuburn-arm/master/cpuburn-a53.S

gcc -o cpuburn-a53 cpuburn-a53.S
Now to run these tests, we're going to be monitoring the ARM CPU frequency to see whether the Pi automatically throttles the speed (indicates temperature of +80C) and the core temperature. Pay close attention to these, and if the temperature gets too hot, be prepared to pull the power. It's a good idea to run these tests on a fresh image of Raspbian to ensure that any important files don't get corrupted in case you need to pull the power (in case of a system freeze, crash or over-temp).
**If you need to shutdown your system while it's non-responsive, try pressing alt + prtscr + b before pulling the power, if that doesn't work, then remove the power supply**
To run Stress, use the following terminal command:
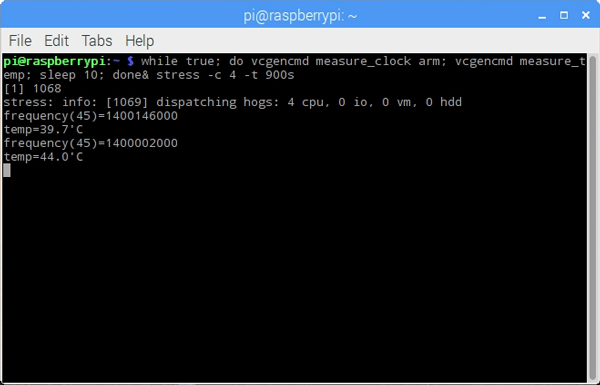
while true; do vcgencmd measure_clock arm; vcgencmd measure_temp; sleep 10; done& stress -c 4 -t 900s
Monitor the CPU frequency and temperature for 10mins and only move on to cpuburn-a53 if the test is run for 10mins without throttling or +80C temperatures.
while true; do vcgencmd measure_clock arm; vcgencmd measure_temp; sleep 10; done& ./cpuburn-a53

You can see how tough the cpuburn-a53 test is. Using a basic cooling setup of a small heat sink and a small, low powered fan, within the 10-second delay between readouts, the temperature jumped 20 degrees! Bear in mind that we ran these tests overclocked to 1.4GHz rather than the standard 1.2GHz, but you get the idea. Ensure you Pi is cooled properly before running cpuburn-a53!
If you pass both of those. Congratulations! You have a stable and efficiently cooled Pi. If not, either dial down your overclock settings or implement additional cooling. It's important to note that cpuburn-a53 is the most intense CPU stress test you can run and doesn't represent a realistic real-life scenario. If you pass the Stress test well, but fail the cpuburn-a53, as long as your system was stable and didn't crash, you can still consider upping the clock speed for stability testing. It's up to you. Have a play around with different settings and find what works best.
And what's our guide for stress testing your Raspberry Pi, it's fairly straightforward, and if you use common sense, you won't damage your board. Refer back to this tutorial for testing cooling and overclock settings. Once you're comfortable with your setup, let's move on to the main event: Overclocking Your Raspberry Pi.

