In this guide, we’re going diving into everything custom RGB on the Pi 500+. If you have one, chances are you have played around with some of the RGB presets that come loaded with it, but we can take things way further. We’ll start with the built‑in terminal commands to play around with presets and effects, then move into custom Python scripts to create your own animations, reactive lighting, and even little games or notification systems. By the end, you’ll have full control over every LED on your keyboard and a bunch of ideas for what to do with them.
Let’s jump in!
If you are chasing the ZIP files containing the code snippets used throughout the guide, you can find them here!
What You Will Need
To follow along with this guide, you will need a:
Installing the RGB Library
As always, lets start by updating our packages and package list with:
sudo apt update && sudo apt upgrade
To handle all of our RGB interactions, we are going to be using the official Raspberry Pi keyboard config library. If you are using Raspberry Pi OS Trixie, chances are this will come pre-installed. You can install the library (or ensure its updated) with:
sudo apt install rpi-keyboard-config
Then very importantly, ensure your keyboard's firmware is up to date with:
sudo apt install rpi-keyboard-fw-update
sudo rpi-keyboard-fw-update
Controlling RGB With Terminal Commands
We are going to start with some basic terminal commands, and keep building up the complexity. It is worthwhile starting basic as most of the commands here will be important in the more advanced sections.
If you hit FN + F4, you will cycle through a bunch of preset colours stored on your keyboard. It's worth noting that by default, the Pi 500+ can hold 7 of these presets.
In the terminal, we can choose which preset we want with:
rpi-keyboard-config preset index 3
This will set the keyboard to preset 3, and we can choose any number from preset 0, to preset 6. This command is essentially the equlivilant of pressing FN + F4, but just doing it through the terminal.
The default effects you see in these presets are nice, but there are plenty of other effects available to choose from!
A quick distinction here: effects are the RGB patterns/colours/layouts programmed into the keyboard, and presets are slots that can store these effects in for convenient access.
Enter the following command to see a list of all the available effects to choose from:
rpi-keyboard-config list-effects
And you can view an effect with:
rpi-keyboard-config effect 25
The line above views effect number 25, but you should play around and view some more, there are some pretty cool ones available! Some of our favourites are 25, 29, and 40.
Some presets also have inputs that can alter how their behaviour. You can set the speed, saturation and hue of the effects with the modified command:
rpi-keyboard-config effect 30 --speed 255 --sat 255 --hue 255
The commands will take a number between 0 and 255. You can set all the options like in the command above, or only set two, or one:
rpi-keyboard-config effect 30 --hue 255
rpi-keyboard-config effect 30 --speed 255 --hue 255
Being able to view these commands through the terminal is nice and all, but if you really want to start customising your keyboard, you can assign an effect to your keyboard's preset slot:
rpi-keyboard-config preset set 2 25
In the command above, we are setting effect number 25 to preset slot 2. You should be able to now use the FN+F4 keys to cycle through the preset slots and see your effect saved in slot 2!
If you ever want to see what effects are assigned to what slot, you can use the following command:
rpi-keyboard-config preset get
By default, preset slot 0 will be empty. This preset slot is the default that will be loaded when the Pi 500+ is powered on - if you assign your favourite effect to this slot, it will automatically be displayed every time you turn on your Pi.
If you press FN+F5 and FN+F6 on your keyboard, you can control the global brightness of your effect. This can also be done in the terminal with:
rpi-keyboard-config brightness 255
The brightness can be set with any number between 0 and 255.
Now, let's start getting into the fun and custom stuff! First, run the clear command to clear all the current LED colours so we can start with a blank canvas:
rpi-keyboard-config leds clear
Let's use a basic command to set all the LEDs on our keyboard a specific colour with:
rpi-keyboard-config leds set --colour "0,255,255"
The command above uses the HSV format to represent colours. If it is not your cup of tea, you can instead choose to use the RGB format with:
rpi-keyboard-config leds set --colour "rgb(255,0,0)"
Both of these commands achieve the same thing; they just use different ways of representing the colour red. Also note that usually the hue value in HSVs range from 0 to 360, in this library it instead only takes a number from 0 to 255. So cyan (which is ussually 180), will be scaled down to 128.
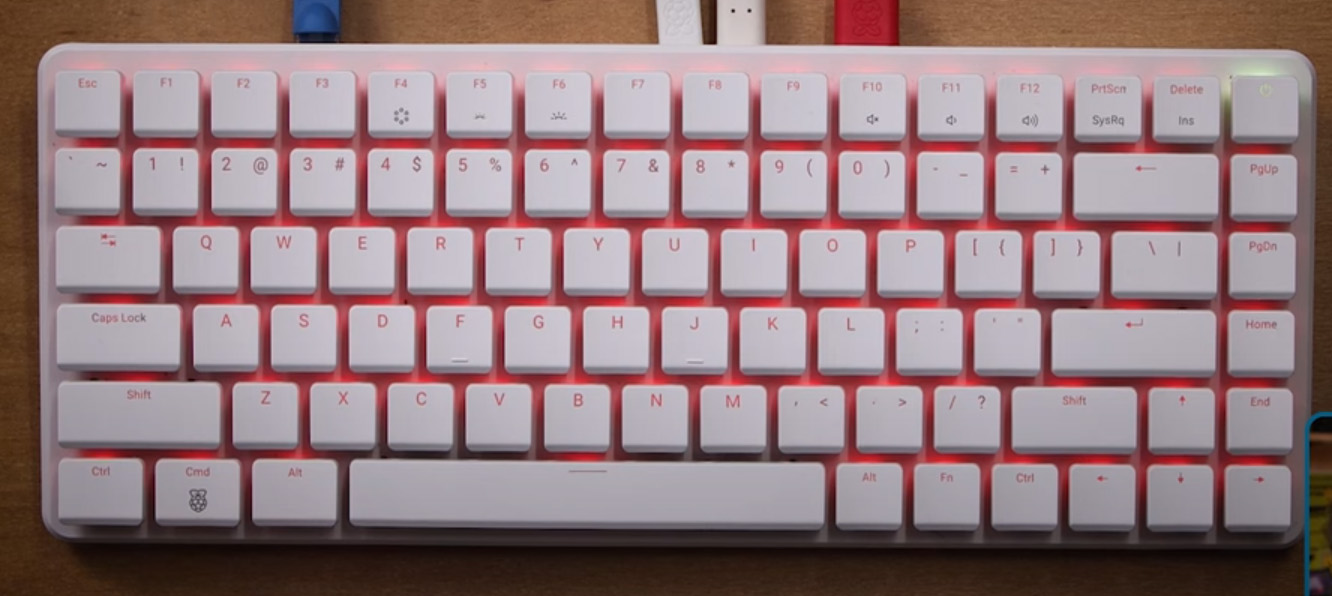
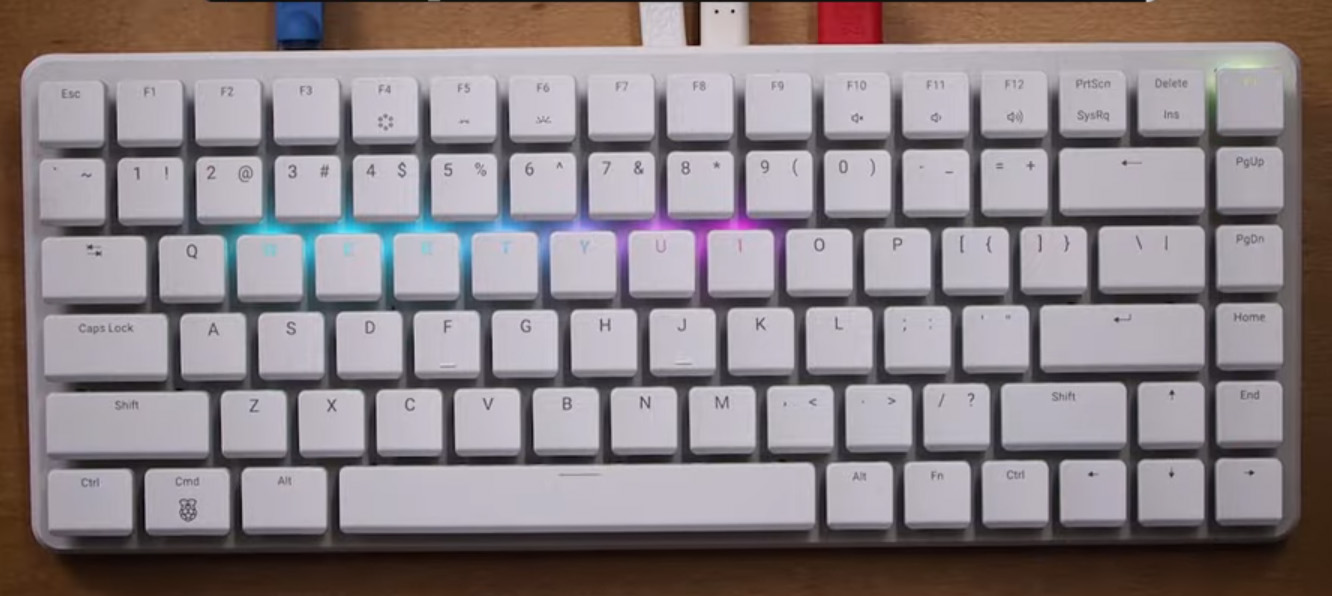
Now let's set individual LED colours! It may be wise to run the LEDs clear command to start with a blank canvas again. Then we can use the following command to set the W key to an aqua colour with:
rpi-keyboard-config led set "2,3" --colour "rgb(0,255,255)"
This is very similar to the previous command, but this time we have a row and column being used to specify which key to light up.
You can generate a nice visualisation of what key has what number row and column with the following command:
rpi-keyboard-config info --ascii
In the image on the right, we went through and assigned some colours with this command. If you have created a custom RGB layout with this and wish to save it, you can do so with the save command:
rpi-keyboard-config leds save
This will save your custom layout as effect 1. Even if you restart your Pi, your layout will still be saved to this effect, and you can also assign it to a keyboard preset slot as usual.
Unfortunately, only one custom layout can be saved at a time - you can only save to effect 1. We will look at how to create unlimited custom layouts with Python scripts later.
Wrapping up, if you ever want to reset all your effects and presets back to the defaults, you can use the following command:
rpi-keyboard-config reset-presets
And just for a bit of fun, you can play a game of Flappy Birds with:
rpi-keyboard-config game
Setting Colours From a Python Script
Let's now move on to doing what we just looked at, but through Python scripts. Why would we want to do this though? What's wrong with the terminal commands method? Well, the biggest drawback is that to takes about a second to update a key colour through the terminal - and we can only update one key colour at a time with a command. With 84 keys on our board, that means to randomly assign a colour to each key, it would take 84 seconds!
With the Python script method, we can update all the keys at once, and we can do so many times a second! On top of that, it's Python! We can make animations, add integrations, and make interactive layouts!
If you haven't done so already, go ahead and download the zip file containing all the Python scripts, and unzip it to a convenient location.
Go ahead and open up simple_colour.py. This script is a stripped-back demo of how colours can be controlled. First, it imports the rpi-keyboard-config library, then initialises the keyboard, and sets the LED control mode (telling the keyboard we are about to start sending it RGB commands). These are the important first steps of any script controlling the RGB.
from RPiKeyboardConfig import RPiKeyboardConfig
import time

# Initialise the keyboard
keyboard = RPiKeyboardConfig()

# Set LED direct control mode
keyboard.set_led_direct_effect()
Then in a while true loop, we start by setting the colour of the W key. Here we set the W key to purple using HSV, and with the same row and column system as the terminal method.
while True:
    # Set LED by matrix position (HSV format: hue, saturation, value)
    keyboard.set_led_by_matrix(matrix=[2, 3], colour=(180, 255, 255))  # Purple
But this does not actually set the colour of the key yet, it instead queues it up. You can use this command to queue up as many key colours as you want, and could queue up a colour change on every single key. To actually push these queued up key colours and update the colours on the board, we use the send_leds() command.
while True:
    # Set LED by matrix position (HSV format: hue, saturation, value)
    keyboard.set_led_by_matrix(matrix=[2, 3], colour=(180, 255, 255))  # Purple
Then after a short delay, we repeat the same process but this time with orange. The end result of this code is that it will flash the W key orange amd purple.
    # Set individual LED by index
    keyboard.set_led_by_idx(idx=33, colour=(20, 255, 255))      # Orange
    # Send LED updates to keyboard (required after setting colours)
    keyboard.send_leds()
    time.sleep(0.5)
There is one slight difference in this line. Here we are setting the W key through its ID rather than with rows and columns. This ID system is just another way of representing the keys. Start on the top row of your keyboard and count the keys from left to right (but do not count the power button). Once you reach the right side of the keyboard, move down a row and continue counting from left to right. If you do this once more, you should land on W and have counted to 33 - so W has an ID of 33.
There is one final helpful command being used in this script as well:
print(keyboard.get_leds())
The command will return the current colour of every single LED on the keyboard. This is an incredibly helpful tool if you are doing anything animation-related, as you can get the current state of the board and animate from that point.
The lines in this demo script are the basic building blocks that you can use to go out and make nearly any custom effects! For example, if you open up and run game_of_life.py, you will have a game of life simulation run on your keyboard in a random colour. This script uses the same fundamental building blocks as the simple demo; it just has extra code deciding which LEDs to light up.
Another example is fire.py. This is a very basic fire simulation that spawns embers and simulates them rising up and changing colour. Again, it uses the same building blocks, and most of the code is dedicated to calculating which keys to light up and what colour.
Now, creating animations like this is a lot of work and can sometimes require a fair amount of math. A great option might be to try and use an LLM like ChatGPT or Claude. If you copy and paste to them any of these demo scripts, they will likely be able to help you generate code for other custom effects.
For example, we were able to take this fire demo script and get it to add something called interpolation. If you run fire_interpolated.py, you will see that this makes animations far smoother, and if you are going to the effort of asking an LLM to help you write code, it is probably worthwhile asking them to add interpolation as well.

At this point, we were wondering how much of a toll this is having on our Pi, and how fast can we update our RGB? To test this, we wrote speed_test.py, which flashes every key a random colour as fast as possible.
Running this, we found that the keyboard was able to update at over 30 fps! This is substantially faster than the roughly 1 key a second through the terminal method.
We also opened up a resource manager with the following command:
htop
While running this code, we found that it used about 5% to 10% of the Pi's CPU - not a huge amount, but not a negligible amount. This usage will of course be more or less depending on how complex your effect is and how fast you are updating it.

A Simple Notification System
Much of the things we did in the terminal can also be done through the library - including setting a preset. In the project folder you will find flash_demo.py. This short script creates a small “flash” effect on the Pi 500+ keyboard that triggers at random intervals — showing how you can temporarily override your normal RGB preset, display an animation, and then bring it straight back. Let’s break it down step by step.
We start by importing the required packages and setting up our keyboard object:
import random
import time
from RPiKeyboardConfig import RPiKeyboardConfig
keyboard = RPiKeyboardConfig()
Here, random and time are standard Python libraries, and RPiKeyboardConfig is the official library that talks directly to the keyboard’s lighting system. The final line initialises that library so we can start sending it commands.
Now we jump into our main loop:
while True:
    # Generate a random number between 1 and 5
    random_number = random.randint(1, 5)
    print(f"Random number: {random_number}")
This loop keeps the script running continuously. Each pass it rolls a new random number between 1 and 5. This is how we decide when to do our “flash” effect — only when the number comes up 3.
Inside that condition, the magic happens:
    if random_number == 3:
        # 1) Save the preset slot index
        current_idx = keyboard.get_current_preset_index()
        # 2) Switch to direct LED mode
        keyboard.set_led_direct_effect()
The first line remembers which preset you’re currently using so it can be restored later. Then we switch the keyboard to direct LED mode, which basically gives us raw control over every LED on the board.
Next we fill the keyboard with random colours:
        # 3) Fill with random colours
        all_leds = keyboard.get_leds()
        for led in all_leds:
            h = random.randint(0, 255)
            s = 255
            v = 255
            keyboard.set_led_by_idx(idx=led.idx, colour=(h, s, v))
        keyboard.send_leds()
We grab a list of all LEDs on the board, generate random colour values for each (using full saturation and brightness), then send those colours to the keyboard. This is the “flash” moment.
After holding that flash for a second, we clear everything and bring back the normal preset:
        # 4) Hold the flash
        time.sleep(1)
        # 5) Clear LEDs
        keyboard.rgb_clear()
        keyboard.send_leds()
        # 6) Restore preset
        if current_idx is not None:
            keyboard.set_current_preset_index(current_idx, save_index=False)
            print(f"Restored preset index {current_idx}")
This brief pause keeps the flash visible, then the script wipes the LEDs and reloads your saved preset so it looks exactly how it did before.
Finally, we wait a second before running the next loop.
    # Wait 1 second before next iteration
    time.sleep(1)
Now, this might seem like a bit of a strange thing to do, but what we’ve actually built here is a simple notification or heads‑up system. You could have your favourite lighting preset running, and then - say the doorbell rings - a Python integration could flash your keyboard to alert you. Or maybe you connect it to Home Assistant to display information on your desk; it’s almost like having a low‑resolution screen built into your keyboard. You could even set up built‑in timers, like a Pomodoro tracker or system reminders. There are countless creative ways to use this approach, and by reading and loading presets, you can make all sorts of interactive lighting effects that suit your setup.
Creating Interactive Effects
We can pre-program fancy LED colours and animations, but we are using Python here - we can do more complex things like reacting to keyboard inputs.
The keyboard library we have been using does natively support detecting key presses, but it also includes a security feature that requires you to press enter and escape to unlock the keyboard before it can detect them - this must be done every time the Pi is restarted.
This is not a major issue, but we are looking at having these Python scripts automatically start on boot up, and this extra manual step is a slight hassle. As a result, we will be using Pynput, which does the same task. You can install it with the following command:
pip install pynput --break-system-packages
In the script snake.py, you will find (as the name suggests) a game of snake that uses pynput for controls. Follow the instructions in the shell of Thonny to get going with it!

Let’s put everything together and make something really cool - a sort of screensaver for the keyboard. Go ahead and open up the screensaver.py script, and you’ll see exactly what’s going on.
There’s quite a bit happening under the hood, but in simple terms, the script watches for keyboard activity, and if it doesn’t register any input for five seconds, it springs into action. It saves the current preset you’re using, gradually fades out the keyboard’s brightness (using the same global brightness command we used earlier in the terminal), and then starts displaying a soft “firefly” animation. As soon as you press a key again, it restores your original preset and brightness — a neat little screensaver, but for your keyboard.

Automatically Running Scripts on Boot
We have this all running out of Thonny just fine, but this is not very practical in day-to-day use. There is a way to make this Python script run automatically on launch so it just does its thing in the background. First of all, we need to have the script in a readily available place, or somewhere we know the path to. If you want to follow along with the exact locations in these commands, copy your Python script to /home/pi (the folder that opens by default when you open the folder browser).
Once it is in there, we will need to use chmod to make it executable with:
chmod +x /home/pi/fire.py
Our script is called fire.py, so you should change this to whatever your script is called. Then, open a new terminal window and edit the crontab file with:
Crontab -e
The first time you do this, you may need to select an editor to use. Enter in 1 to use the nano editor. Once you are in the file, use the arrow keys to navigate to the bottom of the file, and in a new line, enter the following:
@reboot sleep 10 && /usr/bin/python3 /home/pi/fire.py &
You will likely need to alter this line. The user name of our device is "pi", so we have /home/pi/fire.py, but you will need to replace pi with whatever your username is. Again, our script is called fire.py, so you also need to change it to what you have named yours.
Once you have entered this line correctly, hit ctrl + x, then y and then enter to save it. The next time you reboot your Pi, this should automatically start!
Where to From Here?
We now have full control over every LED on the Pi 500+ keyboard — whether that’s by punching in terminal commands, building custom colour layouts, or writing entire animations and interactive effects in Python. It’s wild to think that the keyboard on a compact desktop computer can double as a fully programmable display and input system.
We’ve really only scratched the surface of what this keyboard can do, and you may find uses and applications that put our demos to shame. If you are chasing some more info, the official Raspberry Pi Keyboard documentation goes into a bit more depth about how the system works, and is well worth a read if you want to understand every command available. You can also explore the rpi-keyboard-config Python library on GitHub — this is the same package we used throughout the guide, and there are plenty more features tucked away in there.
If you’re looking for your next Pi 500+ project, we’d highly recommend checking out our “5 Things to Do with the Pi 500+” guide. It’s filled with creative ways to make use of this little all‑in‑one machine. And if you’re more of a hardware person, our Pi 500+ Teardown is a great deep dive into how all the pieces fit together under the hood. Both are linked down below.
And that just about wraps things up. If you make a custom lighting setup, a game, or something completely out‑there using the Pi 500+ keyboard, we’d love to see it — post it in the Core Electronics Community forum and show everyone what you’ve built.
Until next time, happy making!

