You ever wanted an Ad-Free and Bloatware Free Media Streaming Device that can run 4K movies with clean audio that transforms any Screen into a Smart TV. Sounds almost too good to be true but Raspberry Pi, Kodi and LibreELEC OS have swooped in for the save.
It has been a couple of blue moons since Core Electronics has talked about turning the Raspberry Pi microprocessors into media players. Nowadays with the capacity to run five local 4k playback there is no better time to turn your Raspberry Pi 4 into a dedicated single client media centre perfect for theatre rooms and home cinemas. This guide will teach you how to set up Kodi and LibreELEC for streaming local files. Kodi can be used in combination with PLEX as well allowing you to stream media to and fro inside your network. The Raspberry Pi 4 Model B does not transcribe video without dropping frames at 4k so that is a factor to keep on top of. Below are the contents of this guide.
- Kodi and LibreELEC Overview
- Installing Kodi and LibreELEC to Micro-SD Card
- Connections to TV / Monitor and Raspberry Pi
- Initial Set up and Skins
- Playing Media
- Add-Ons Process
- Other Media Streaming OS Options
So by the end of this guide we will have a plug and play device which will enable you to play 4k video and movies easily to your TV. Within the media player, it will totally be possible to add YouTube watching capabilities, other streaming services like Netflix, Stan, SBS on demand, ABC rewind, BBC World News, Twitch, Spotify and interact with PLEX or NAS. Almost everything your heart desires. And if you whip out the Micro-SD card from the Raspberry Pi and put a Noobs SD card you will instantly have a whole computing device with Raspberry Pi OS. Quick hot-swapping Micro-SD cards in and out maximises usability and minimises faffing.
As always if you have any questions, queries or things to add please let us know your thoughts!
Kodi and LibreELEC Overview
Kodi is the media centre system which contains all the features you would desire and expect as well as a whole bunch more. Kodi does need an operating system to run on to operate with a Raspberry Pi. And That’s were LibreELEC jumps in for the save. LibreELEC is an operating system built for the Raspberry Pi, which allows you to turn your Pi into a Kodi media centre.
Previously the focus at Core Electronics for media player operating system has been running OpenELEC. OpenELEC is the original operating system used to run Kodi. It has always been a single person working and improving it. LibreELEC on the other hand has a team keeping it updated and constantly improved. This increased human power results in an easier install process and speedier updates. For these reasons, in late 2020, I would recommend using the LibreELEC route to make a media player with your Raspberry Pi. Crucially LibreELEC is free and Open Source software.
As there are many different ways to skin an onion there are also many different ways to make a streaming media platform with a Raspberry Pi. Below in this guide is a section where I briefly look over other OS options to create media platforms with Raspbian micro-processors.
Installing Kodi and LibreELEC to Micro-SD Card
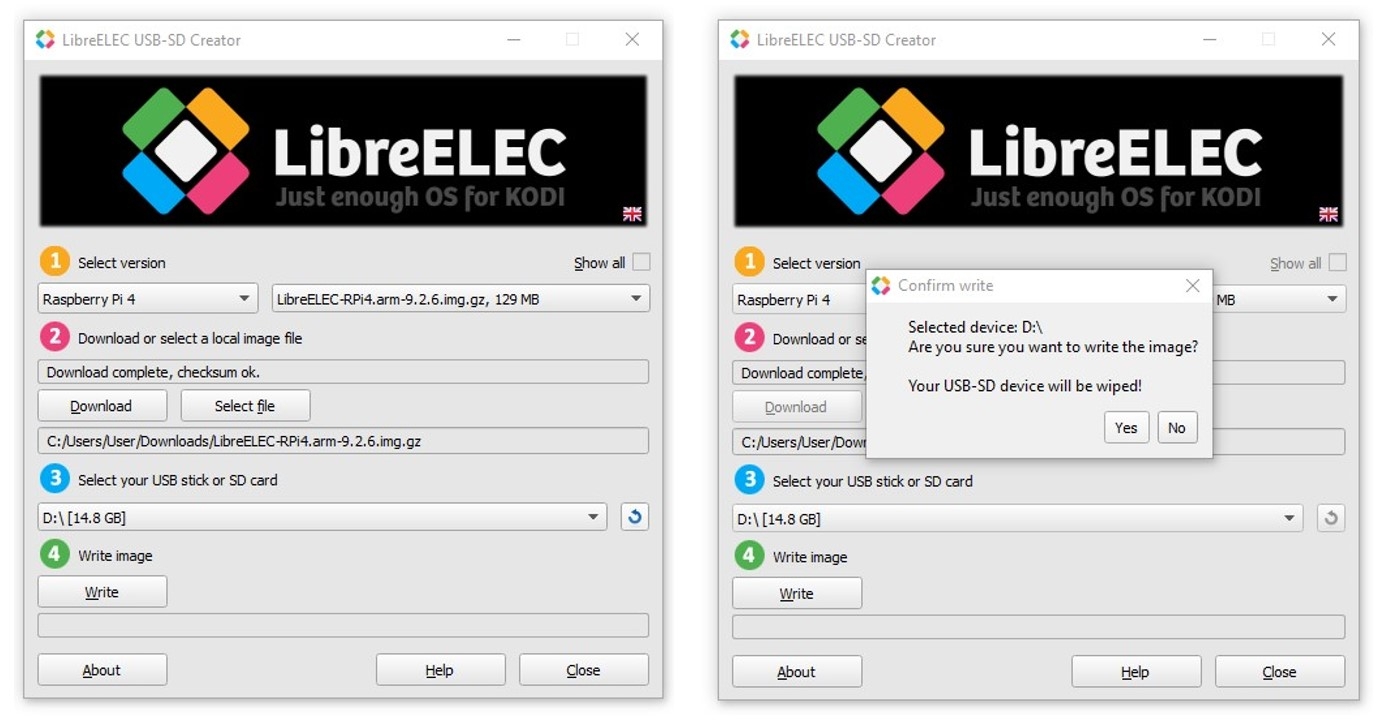
The first step you will need to do is create a bootable Micro-SD Card which has been written with LibreELEC and Kodi. All the tools you need can be found at the LibreELEC Download page. This page will allow you to download the LibreELEC USB-SD Creator. Once this is downloaded it this wizard makes it really easy to download the specific version of LibreElec desired by following through the steps. You can see two steps of the LibreELEC wizard below to get a LibreELEC and Kodi image ready for a Micro-SD for a Raspberry Pi 4. Installing an image to a Micro-SD card will cause all the information on it to be wiped so keep that in mind.
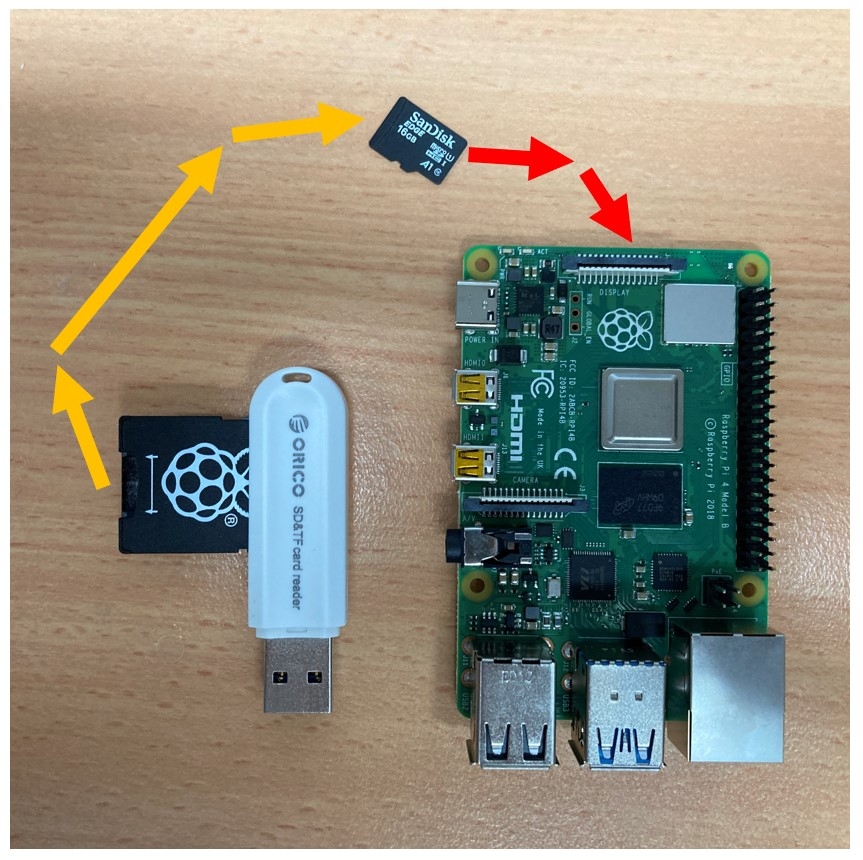
Once you have done this you will have a Micro-SD with everything you need to get up and running with LibreELEC and Kodi on your Raspberry Pi 4. Just safely remove the Micro-SD from your computer and slip it into your Raspberry Pi 4 as you can see in the image below.
Connections to TV / Monitor and Raspberry Pi
Simply connect the Raspberry Pi with the flashed Micro-SD card installed to your monitor with a HDMI to Micro-HDMI Cord. Have power going into the monitor. For the setting up stages having a mouse and keyboard peripheries attached to the Raspberry Pi 4 to make it easy. All these connections can all be seen in the image below. Finally, plug in the USB-C to start the boot process of LibreELEC and Kodi. All these connections can be seen in the image below.
Initial Set up and Skins
The image below is the screen you will see after booting up. Following this, the homepage of LibreELEC will be displayed and a quick wizard will open. The wizard will go through connecting the Raspberry Pi to the internet and locating media for it to access and play. At any stage, you can insert a USB stick or Hard-drive to the Raspberry Pi 4 via the USB plugs (preferably via a blue USB 3.0 Ports as these have roughly 10 times faster speeds) and it will automatically recognise the new device. You can then direct Kodi to recognise certain folders in your external-drive as ones that contain Movies or Music Videos or TV shows etc. Doing so it will display them on the home page for easy access. (For more advance users, tinker away with Addons section and you will be able to scrape the internet pretty much effort-free for movie synopsises and original box-art/posters of each specific movie).
Skins are also easy to install using Kodi offering you numerous different community-created styles so you can have the exact aesthetic that you desire. You can see below the settings for this in the Setting/Interface area. Also, worthwhile consideration is connecting a Bluetooth controller or remote to the Raspberry Pi to streamline your interactions with this setup. Also, a great controller to use for this is 8BitDo SN30 pro+. Also means when you start adding games to it you will have the best controller in the whole world (circa 2020) to do so. Add this in the LibreELEC Settings under Bluetooth. If you are running a NAS or Plex or anything like that you can also connect it to the media centre in the settings options.
Playing Media
And with that, you can start playing media to the connected device. Raspberry Pi 4 set up as a media player like this is fantastic advertisement-free, bloatware-free, never asking for money for a subscription, completely legal, media system. Customisable to exactly how you want it makes for a formidable tool. Much better than fire stick nonsense that just ends up being a landmine for your TV (personal opinion). See below for an image of a list of videos all able to be easily accessed through a thumb drive USB and ready to be played at a click's notice.
Add-Ons Process
There is another fantastic tutorial made by the stupendous Aidan that teaches how to download addons to Kodi so you can have exactly the system you desire. Totally possible to add YouTube watching capabilities, other streaming services like Netflix, Stan, SBS on demand, ABC rewind, BBC World News, Twitch, Spotify. This media player is as customisable as you desire all about ease of use and give yourself exactly what you want with no compromises (and zero ads!).
Other Media Streaming OS Options
There are other media playing OS options for the Raspberry Pi. One of another great one is OSMC. OSMC makes for a fantastic media player OS option however OSMC Is not available currently for Raspberry PI 4 Model B (As of Mid-November 2020). OSMC is the whole Raspbian Pi OS with a Multimedia system running on top of it.


