Ah prototyping, the backbone of maker electronics, well really all electronics. Any successful device, product, or idea doesn’t just appear as a finished concept, it goes through stages of product and one of those is prototyping. In fact, for most maker projects and DIY endeavors our circuits and ideas usually stay in the ‘prototyping’ phase because they aren’t being manufactured or mass produced and a solid prototype is often enough. However, with electronics, there’s more than one prototyping method, and often several stages of prototyping involved. People often ask which one is better, or where to get started with the circuit they have in mind, so without further ado, let’s take a look at some of the most common prototyping methods for circuits and which one is going to be best for you.
Breadboard
First on our list is the humble solderless breadboard. This guy is the unsung hero of multi-million dollar products, right down to DIY YouTube sensations, and is often where every circuit starts off.
There are different styles and layouts of breadboards but the concept is the same. A typical breadboard consists of a 0.1” spaced grid of holes in which you can place component leads (0.1” or 2.54mm is the most common standard for through-hole components). Inside each hole is a spring-loaded metal contact which grabs the wire/lead and strips of these holes are connected together to allow components to be connected together. Almost every breadboard will have numbered rows of 5 holes which are connected together, and every row is electrically isolated. Many also have power rail strips on the outside where all the holes in the rail are connected which makes it easy to power your circuit. Check out the diagram below to see which pins are connected.
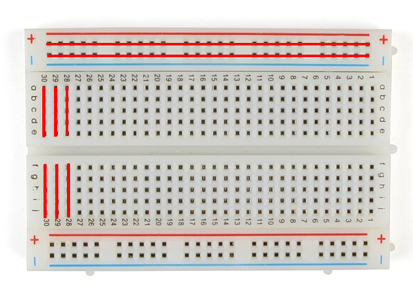
The main advantage of breadboards is that they don’t require soldering so they’re best for getting the bulk of the circuit just right or testing out other people’s circuits before committing to soldering one up. If you're working with breadboards, be sure to get yourself some of the DFRobot Premium Jumper wires. They are easily the best jumper wires out there.
Stripboard
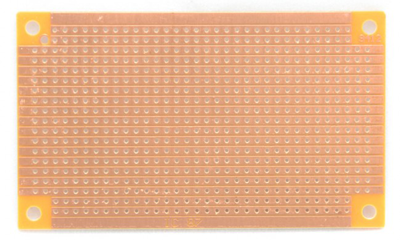
Generally, the next step from a breadboard is stripboard. Stripboard and perfboard are often mixed up, however, it’s important to note the difference. Think of stripboard as a breadboard you solder to. It is a fiberglass board clad on one side with copper traces with 0.1” grid holes that you can insert through-hole components into, and solder them to the board. There are copper strips running in one direction, usually without the breaks you find in a breadboard, although you can get some with different patterns. To create breaks in the strips you can use a small drill bit or a hobby knife to break the strips and create your circuit. Stripboard is great for initial prototypes because it’s quick and easy to use, cheap, and makes reliable connections.
Perfboard
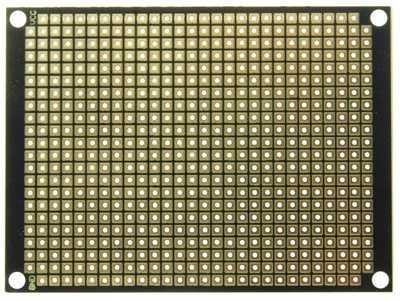
Similar to stripboard, perfboard consists of a fiberglass board with a 0.1” grid for through-hole components, however rather than connected strips, perfboard has a solder pad for each hole that is completely isolated from everything else. There are no connected tracks or traces, you solder the component leads to the pads to secure them, and then either use solder bridges or bent component leads to solder everything up. Perfboard can come as either single sided or double sided with the latter being more expensive, however, because of the construction style, perfboard is generally more rigid and durable for prototypes. It’s also easier to work with, although slightly more time consuming because you have to purposely make each connection, although that generally means less chance of errors (it’s incredibly easy to forget a strip break using stripboard).
 Third Hand
 Third Hand
A third hand isn’t a method for prototyping (or a weird mutation), but we had to include it here as possibly the most valuable tool when prototyping or soldering. A third-hand tool is usually just a series of articulated joints with an alligator clip or clamps on the end with a heavy base which allows you to use it to hold whatever you’re working on, at just the right angle, while you work on it. Super simple, yet indispensable, our pick of the litter is the line from Hobby Creek. Most tools simply use metal arms with ball joints which limit the range of movement, however, the cup/ball design used in Hobby Creek gear makes it incredibly agile and easy to work with. You can choose between two, four, or even more arms to hold this, and they even have a solder fume extractor attachment, which is a must have when soldering.
Our Favourites
Here are some of our favourite products from each category for prototyping with:
So go on, now you’ve got no excuse not to find some fun projects, get making, and create your projects using some of the methods discussed here. We’d love to hear your thoughts on prototyping, so get the conversation started below.

