In this guide, we will be looking at how to set up the Glowbit Orb Snowflake and Bauble Kits. We will be looking at how to get going with the default code they ship with, breaking down how the code works, and learning how to modify it to make your own custom Christmas ornaments.
Let's get into it!
Contents:
Assembling Your Kit
In your kit, you will find a GlowBit Orb containing all the LEDs that we will be lighting up, a Raspberry Pi Pico (the small device that controls the LEDs) a micro USB cable to power everything, and two acrylic diffusers to soften the LED light. You’ll also have some mounting hardware for attaching the diffusers, and a piece of wire to hang the Kit on your tree.
You’ll either have the Snowflake Kit or the Bauble Kit. The Snowflake Kit comes with snowflake-shaped diffusers, while the Bauble Kit includes bauble-shaped diffusers. The code preloaded on the Pico will be slightly different between the two kits, featuring different animations and colours. This guide will show you how to set up and customise either kit however you like.

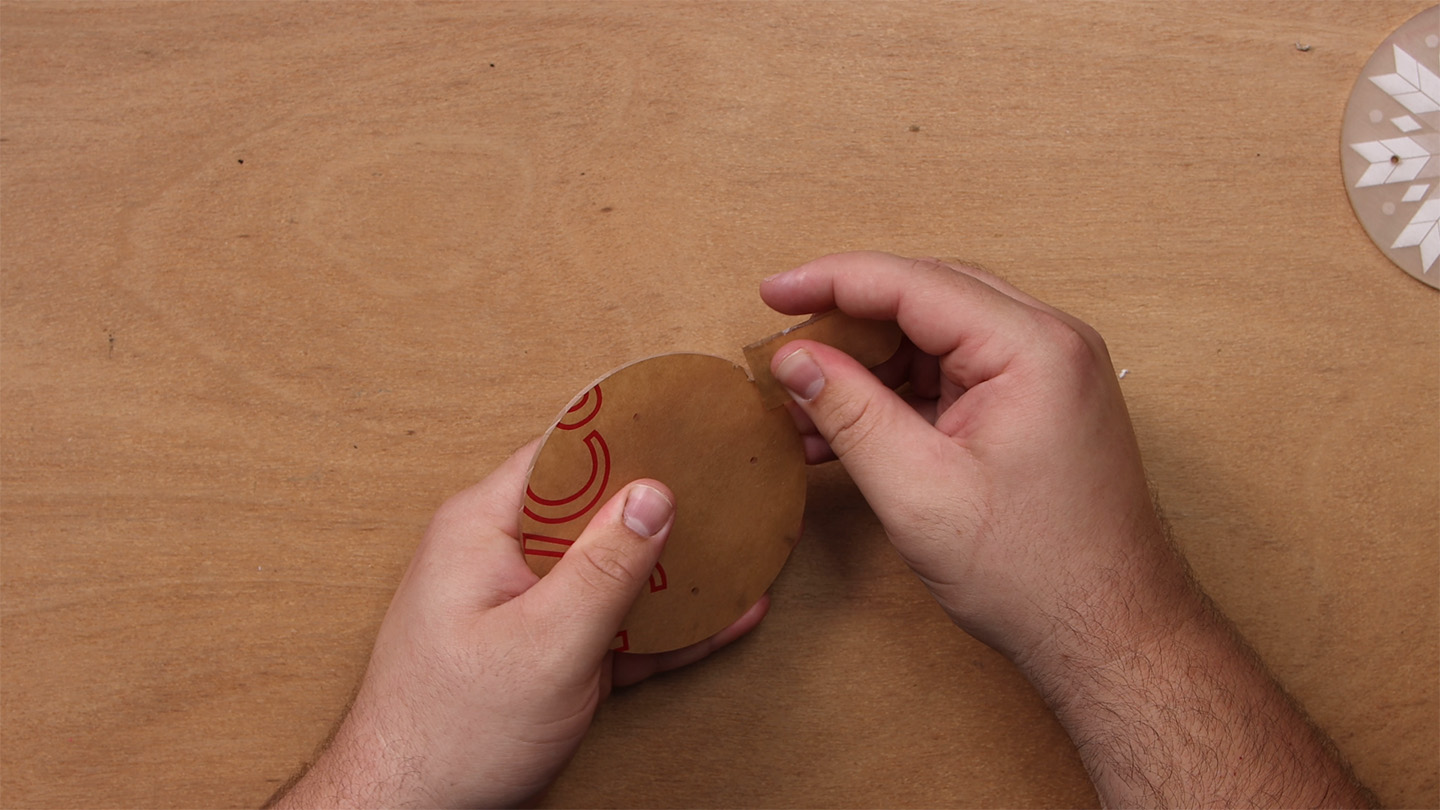
To start, pick a diffuser you like and peel the protective paper off the front. Fingernails can help with this, or you can use the included scraper to help make a start. These acrylic sheets can scratch easily, so avoid using anything metal on them.
Once the protective layer is removed, use the four standoffs and eight screws to mount the plate to the top of the GlowBit Orb, like in the image on the right.
Next, grab your Pico and insert it into the rear headers as shown, making sure it’s seated all the way in.

How you hang your ornament is completely up to you — you might choose some fine tinsel or string, but we’ve also included a piece of wire if you need it. Fold the wire in half, tuck the loop through the top hole, then feed the other end through the loop and pull it tight. Finally, tie off the loose end with a simple knot. The video at the top of this page demonstrates this step well.
Now your orb is ready to hang on the tree! All that’s left is to power it using the micro USB cable, which plugs into the Pico. We recommend a USB power source that can provide up to 2 amps at 5 volts. A standard USB wall charger will work perfectly, and if you’d like a portable option, a phone battery bank should do the job as well.
And there you have it — your little bauble or snowflake is ready to shine on the tree!
Setting up Thonny and Exploring the Code
If you’re happy with the default animations, be our guest! But since this is a fully programmable LED panel, let’s go ahead and learn how to modify it.
To do this, you’ll need to install a program called Thonny, which works on Windows, macOS, and Linux.
Once Thonny is installed, connect your Pico to your computer. In the bottom right corner of the Thonny window, you should see the Pico appear as a connected device.
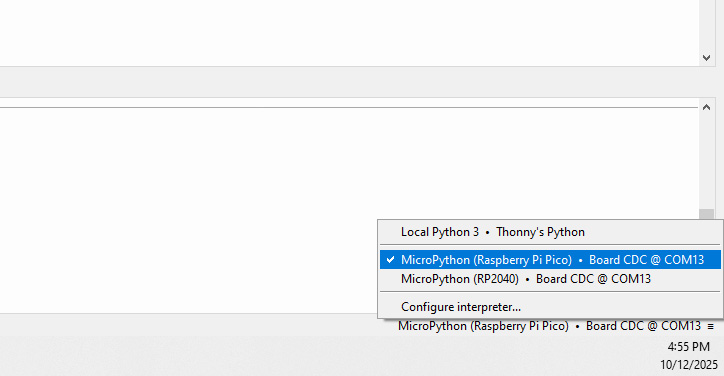
After selecting your Pico's COM port in this section, go to View → Files to see all the code stored on the device. Here you’ll find files like orb_extensions, glowbit.py, and petme128.py. You can ignore these as they’re part of the libraries that help control the LEDs. What we’re interested in is the main.py file. This is the file that runs automatically whenever the orb is powered on.
In this example, I’m using the Bauble kit, so my main.py will come with the bauble code saved in it. If you open the examples folder, you’ll find the default code for both the Bauble and Snowflake kits. If you wish to try out the default code of the other kit, you can copy the contents of these examples into your main.py and save it. If you now power on your Pico again, it will automatically run the code from the other kit.
We recommend avoiding any changes to the example code snippets so you’ll always have the original demos available for future reference. If you accidentally modify or delete them, you can download all of the default code again from our GitHub page for this project.

Let's start by taking a look at how the bauble code works. Don't worry, the snowflake code is very similar, and we will also be looking at it later on.
Our code starts by importing the required orb libraries, as well as the time library. It then sets up an object for the orb which lets us send all our commands to it:
from orb_extension import Orb
from time import sleep

orb = Orb(preset='pico')
We then go ahead and define some colours. You can use any variable name you desire, but we are just calling them top and bottom colour for our bauble pattern. We also define a blank colour:
top_colour = orb.rgbColour(255, 0, 0) # Red
bottom_colour = orb.rgbColour(0, 255, 0) # Green

blank_colour = orb.rgbColour(0, 0, 0) # All 0's to turn LEDs off
Then we go ahead and use one of the first helpful functions from the library - the segment_by_axis function. This splits the GlowBit orb in to two sections, and we call these sections above and below in this case. Each LED on the board has a number assigned to it, and this function puts each of these numbers in a nice order for each half:
above, below = orb.segment_by_axis(0, include_center=False)
Up next, we define two functions - action_A and action B. We will come back to these in a second, but these are where we will put our colours or animations we wish to use.
With some good manners, our code goes ahead and calls another helpful function, clear_ornament, which clears all the LEDs (turning them off). After that, we enter into our infinite while True loop, which runs the code inside of it forever. In this loop, we tell it to run the code we place in action_A and sleep for 0.5 seconds (which will hold the final result of action_A for 0.5 seconds). Then it tells the Pico to run whatever code we put in action_B then sleep another 0.5 seconds:
while True:
    action_A()
    sleep(0.5)

    action_B()
    sleep(0.5)
This is the setup or "framework" for our custom code, and all we need to do is program our desired behaviour in action_A and action_B. For now, let's just look at how it works first. Starting with action_A it uses a for loop to create a smooth animation cycle. If you are implementing any sort of animation, chances are it will use a for loop. The first loop cycles through each pixel in the "above" list and turns it on with the Pixelset function, and it sets it to "top_colour", which we set at the beginning of the code. When we used the function segment_by_axis, it automatically put the LED numbers in the right order to create a smooth sweeping effect. This loop has a 0.02-second sleep, which controls how fast the sweep happens. Set this to 0.5 or something longer to see what is really going on here:
def action_A():

    for pix in above:
        orb.pixelSet(pix, top_colour) # Setting them to the first colour
        orb.pixelsShow()
        sleep(0.02)
Then we have the same function, but this time it sets the bottom half of the bauble, and do so with what we assigned to "bottom_colour". We also have a line just before this loop. This line is just flipping the order of the "below" list. If you replace "reverse_below" in the for loop line with just "below", you will see that the sweep moves in the wrong direction. By reversing the list with this line, we reverse the rotation of the list:
    reverse_below = below[::-1]

    for pix in reverse_below:
        orb.pixelSet(pix, bottom_colour) # Setting them to the second colour
        orb.pixelsShow()
        sleep(0.02)
So our code calls action_A which sets the red and green, then it calls action_B, which clears these colours. Action_B, is nearly identical to action_A - the only difference is that when it sweeps, instead of setting it to top_colour, or bottom_colour, it sets it to blank_colour which clears it!
def action_B():

    for pix in above:
        orb.pixelSet(pix, blank_colour)
        orb.pixelsShow()
        sleep(0.02)

    reverse_below = below[::-1]
    for pix in reverse_below:
        orb.pixelSet(pix, blank_colour)
        orb.pixelsShow()
        sleep(0.02)
And that is how our code works, so lets look at how to modify it!
Changing Colours and Setting Pixels and Lines
We've hinted at it so far, but let's now take a proper look at how to modify our Orbs. Continuing on with the bauble example, the easiest thing we can do is change the colours at the top of the code. These lines just take an RGB value, and a quick Google search will find you an RGB colour picker if needed. In the following example, I change the default red and green to blue and orange:
"""
bauble_example.py - Patterns suited for the Bauble artwork

"""

# Preflashed Demo - Colour wipe and blank

from orb_extension import Orb
from time import sleep

# Initialise Pico Orb - configures brightness to our tested values, pin number etc
orb = Orb(preset='pico')


# NEW COLOURS SET HERE ---------------------------------------------------------------------
top_colour = orb.rgbColour(252, 173, 3) # Red
bottom_colour = orb.rgbColour(3, 181, 252) # Green

blank_colour = orb.rgbColour(0, 0, 0) # All 0's to turn LEDs off

# Pre-defining the above and below pixels, the helper function does A LOT
above, below = orb.segment_by_axis(0, include_center=False)

# Action Functions

def action_A():
    # This function sweeps our defined colours on

    # Sweep through the pixels on the 'top' of the orb
    for pix in above:
        orb.pixelSet(pix, top_colour) # Setting them to the first colour
        orb.pixelsShow()
        sleep(0.02)

    # Reverse the order of pixels for the below half
    reverse_below = below[::-1]
    # Sweep through them in the reverse order
    for pix in reverse_below:
        orb.pixelSet(pix, bottom_colour) # Setting them to the second colour
        orb.pixelsShow()
        sleep(0.02)


# The same sweeping action but turning the LEDs off
def action_B():

    for pix in above:
        orb.pixelSet(pix, blank_colour)
        orb.pixelsShow()
        sleep(0.02)

    reverse_below = below[::-1]
    for pix in reverse_below:
        orb.pixelSet(pix, blank_colour)
        orb.pixelsShow()
        sleep(0.02)

# Ensure all LEDs are clear to begin with
orb.clear_ornament(show=True)

# Start our infinite loop
while True:
    action_A()
    sleep(0.5)

    action_B()
    sleep(0.5)
We could also get creative and add some extra colours to choose from. In this modified version of the code, we create two new colours, "top_colour2" and "bottom_colour2", which are purple and yellow, respectively. Then, we change it up a bit. In action_B, instead of using "blank_colour", we use our new colours to create an animation that swaps between the two colour palettes:
"""
bauble_example.py - Patterns suited for the Bauble artwork

"""

# Preflashed Demo - Colour wipe and blank

from orb_extension import Orb
from time import sleep

# Initialise Pico Orb - configures brightness to our tested values, pin number etc
orb = Orb(preset='pico')


# Colours defined as RGB tuples = (R, G, B)
top_colour = orb.rgbColour(255, 0, 0) # Red
bottom_colour = orb.rgbColour(0, 255, 0) # Green
top_colour2 = orb.rgbColour(169, 3, 252)
bottom_colour2 = orb.rgbColour(227, 252, 3)

blank_colour = orb.rgbColour(0, 0, 0) # All 0's to turn LEDs off

# Pre-defining the above and below pixels, the helper function does A LOT
above, below = orb.segment_by_axis(0, include_center=False)

# Action Functions

def action_A():
    # This function sweeps our defined colours on

    # Sweep through the pixels on the 'top' of the orb
    for pix in above:
        orb.pixelSet(pix, top_colour) # Setting them to the first colour
        orb.pixelsShow()
        sleep(0.02)

    # Reverse the order of pixels for the below half
    reverse_below = below[::-1]
    # Sweep through them in the reverse order
    for pix in reverse_below:
        orb.pixelSet(pix, bottom_colour) # Setting them to the second colour
        orb.pixelsShow()
        sleep(0.02)


# The same sweeping action but turning the LEDs off
def action_B():

    for pix in above:
        orb.pixelSet(pix, top_colour2)
        orb.pixelsShow()
        sleep(0.02)

    reverse_below = below[::-1]
    for pix in reverse_below:
        orb.pixelSet(pix, bottom_colour2)
        orb.pixelsShow()
        sleep(0.02)

# Ensure all LEDs are clear to begin with
orb.clear_ornament(show=True)

# Start our infinite loop
while True:
    action_A()
    sleep(0.5)

    action_B()
    sleep(0.5)
Now, let's go ahead and look at two helpful functions we can use to change this up even more! The first is the pixelSet function. We use this function in our loops to set the colour of each LED. But we can also use it freely to assign any colour value we want, to any LED on the board. As we mentioned before, each LED on the board has a different number associated with it. If you start counting from the LED on the very outer left of the board (starting at 0), and count your way around the outer ring in a clockwise direction, you should reach 23 (and because we started counting at 0, you should have counted 24 LEDs). These are the numbers that match each LED. Once you have finished the outer ring, move one ring inwards, and count around again. Continue this pattern, and you should reach the final LED in the middle, which has a number of 42.
Let's use this to modify our code! Add the following line to your colours at the top:
WHITE = orb.rgbColour(200, 200, 200)
Then add this line immidiately above your while True loop. You should now have the animation running with the middle LED light up white!
orb.pixelSet(42, WHITE)
Now the goal here is to fill the entire middle line with these white LEDs, and we could manually fill each LED with the pixelSet function by finding each LED number. However, there is a smarter way to do this with the set_line function. This function takes in a number, and a colour. The line it draws will start at that LED number you provide, and draw a line from their, throught the middle of the Orb, all the way through! Replace the pixelSet line with the following to see that in action:
orb.set_line(0, WHITE)
And that is how you can start modifying our Orb! Now the colours and patterns we've chosen here aren't very elegant, but they show you how to get going creating your own, so have a play around. There is one more function that we really want to explore, but to do that, we will need to look at the snowflake code.
orb.set_line(0, WHITE)
Setting Ring Colours
The snowflake code is exactly the same as the bauble code, with the only difference being whats inside action_A and action_B, and some different colours defined at the top. The snowflake example is actually a tad simpler as we just set static colours without any animations. To do so, we use a new function called set_ring. This function sets an entire ring of the Orb to a certain colour. "Ring 0" is the outer most ring, "ring 1" is the next one in, and so on until you get to the middle dot, which we call "ring 3". With this function, we set two different colour layouts in the A and B action frames, and then simply alternate between them.
Let's however do something more interesting and add more action frames! To do so, we simply copied action_B twice and called the action_C and action_D. Then we ensured that in while True loop, we called our new action frames. We also added a 4th teal colour, and used the ring functions to have each colour start on the outer edge, and continuously move inwards. Here is that code if you wanna test it out!
"""
snowflake_example.py - Patterns suited for the Snowflake artwork
"""

# Preflashed Demo for the Snowflake Kit - swaps between 'frames' of coloured rings

from orb_extension import Orb
from orb_extension.animations import CometAnimation, FlameAnimation, step_comets
from time import sleep, ticks_ms

# Initialise Pico Orb - configures brightness to our tested values, pin number etc
orb = Orb(preset='pico')


# Colours defined as RGB tuples = (R, G, B)
DARK_BLUE  = orb.rgbColour(0, 0, 150)
LIGHT_BLUE = orb.rgbColour(30, 200, 255)
WHITE      = orb.rgbColour(200, 200, 200) # Slightly less intense white
TEAL       = orb.rgbColour(3, 252, 190) # Slightly less intense white

# Action Functions

def action_A():

    orb.set_ring(0, DARK_BLUE)
    orb.set_ring(1, LIGHT_BLUE)
    orb.set_ring(2, TEAL)
    orb.set_ring(3, WHITE)
    orb.pixelsShow() # Update pixels

def action_B():

    orb.set_ring(0, LIGHT_BLUE)
    orb.set_ring(1, TEAL)
    orb.set_ring(2, WHITE)
    orb.set_ring(3, DARK_BLUE)
    orb.pixelsShow() # Update pixels

def action_C():

    orb.set_ring(0, TEAL)
    orb.set_ring(1, WHITE)
    orb.set_ring(2, DARK_BLUE)
    orb.set_ring(3, LIGHT_BLUE)
    orb.pixelsShow() # Update pixels

def action_D():

    # The outer ring is 0, next in is 1...
    orb.set_ring(0, WHITE)
    orb.set_ring(1, DARK_BLUE)
    orb.set_ring(2, LIGHT_BLUE)
    orb.set_ring(3, TEAL)
    orb.pixelsShow() # Update pixels

while True:

    action_A()
    sleep(0.8)

    action_B()
    sleep(0.8)

    action_C()
    sleep(0.8)

    action_D()
    sleep(0.8)
And with that, we have expored the essential functions you need to get out and customise your GlowBit Orb to how you would like!
Where to From Here?
Obviously, the next step is to play around and make your own palettes and animations, but there may be a few more things you wish to check out! First of all, on our GitHub page for this project, you will find some more functions (such as a cool comet animation), as well as a few other, more in-depth and advanced ones for niche uses. We have all of the required libraries and ready-to-flash UF2 files available as a Zip file.
Once Christmas is over, you can either pack your Orb away with the rest of your decorations or repurpose it for another project until next year.
We designed this with more versatility than just being a Christmas ornament. The outer ring has 24 LEDs, and the inner ring has 12. This means it can easily be repurposed as a clock, timer, or even a circular gauge display. Many devices use circular indicators — and now, you have your own LED matrix in that shape! Just trying to get those creative juices flowing for after Christmas.
And if you are looking to learn more about the Pico, we have an entire comprehensive course to check out. We start at an absolute beginner level and work our way to some really funky things like hosting a webpage and Wi-Fi access points from it!
Regardless, we hope you use this to make something nice for your tree, and if you do make anything cool with it, or need a hand with anything from this guide, feel free to comment on the forum at the bottom of this page.
Until next time, happy making!

