In this tutorial we’ll be getting familiar with basic use of the Raspberry Pi terminal. We’ll cover navigating the file-system, making directories, writing and editing text files, and just touch on the use of wildcards.
To get started with this tutorial your Pi could be plugged into a monitor, keyboard and mouse, or you could be accessing it via SSH if that’s already been setup.
If you’re accessing your Pi via SSH then you’re naturally already in a terminal session. If you’re working directly on your Pi, open up a terminal session. You can do this either by
- finding the Terminal icon in the Application Launch Bar

- clicking the Pi (start) button > Accessories > Terminal.
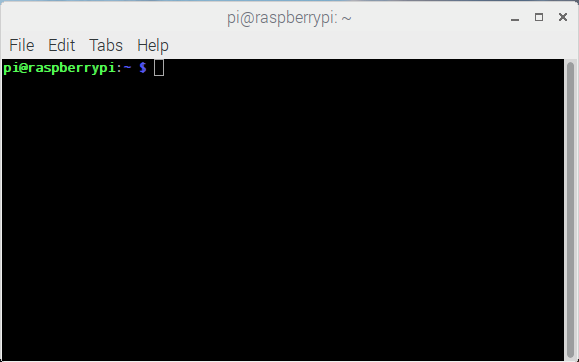
At this point we’re looking at some text followed by a cursor. This is a shell program called Bash. There are plenty of other shell programs but Bash is super popular and will likely be what you find on most Linux systems and Macs. Here, pi is the username and raspberrypi is the hostname, the machine we’re working on. ~ ("tilde") is the current working directory. $ is the prompt, Bash’s way to tell us that it’s ready for us to enter commands.
Jargon recap: The terminal is what we’re using to access our Pi. This could be an SSH session which is a remote connection. If we have a monitor plugged into the Pi then we’ll be using the terminal emulator program that comes with the operating system.
The shell is the program that takes in our commands and processes them.
Filesystem and Listing Files
The filesystem is the structure that contains everything on our Pi; The operating system files, pictures, music, code and programs all exist in the filesystem and is organised into directories. You might be used to calling directories “folders” in other operating systems.
Let’s begin by typing the command to Print Working Directory. Type pwd and press enter. This prints the full directory path for the directory we’re currently accessing. It should read something similar to /home/pi.
This is the default working directory when you power-up your Pi. Tilde (~) at is used as a shorthand for the current user directory, /home/pi.
/ is the root of the filesystem. It’s the top-level directory under which everything else is nested.
home is where all the home directories are stored. If you have multiple user accounts then their home directories will appear here.
We can list the contents of this directory by entering ls.
You should see a few entries like Desktop, Downloads, Pictures arranged in a table. These are colour coded depending on what kind of entry they are. For this tutorial we’re running a pretty clean installation of Raspbian, so the only contents of the /home/pi directory are a few folders, which makes them all the same colour.

Aside: we can also list all the files, including hidden files with ls -la command. Listings with a . before their filename are entries that are normally hidden.
Create a Directory
Let’s create a directory to play around in for this tutorial. Enter
mkdir Sandbox
into the terminal, and enter ls again
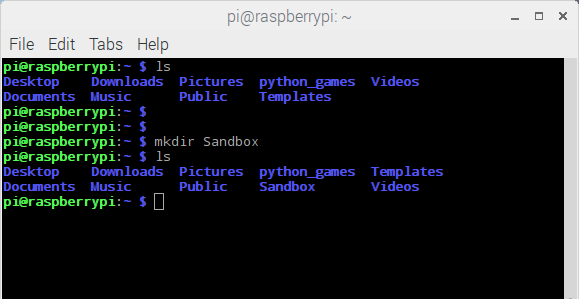
Alright! We can see that we’ve successfully created a directory.
Now we’re going to experiment a bit with file paths and how the tilde (~) shorthand can be useful.
Enter the following commands:
mkdir Sandbox/Test_1
mkdir /home/pi/Sandbox/Test_2
mkdir ~/Sandbox/Test_3
These commands will make three new directories in Sandbox. Don’t worry if you don’t see any feedback on the terminal just yet.
The first command uses a relative path. It means “Whatever directory I’m currently in, there’s already a directory called 'Sandbox', and inside it I want to make a directory called 'Test_1'.”
The second command uses an absolute path. It specifies the exact location of where you want the folder to be created. No matter where your working directory is, executing this command will create Test_2 in exactly the specified location.
The third command is similar to the second, except referenced from /home/pi by invoking the tilde (~) shorthand.
Moving About
Let’s now enter the Sandbox directory with the Change Directory command, cd
cd Sandbox
Enter ls to show the contents. We can see the three folders we created, and we can also see the prompt has changed to ~/Sandbox to tell us our current location. You could try pwd again to display the full path.

We can move back “up” the directory path by one level by entering cd ..
The double-stop “..” is like saying “one level above me” so this will take us back to the user (pi) directory.
(we could also have used cd ~ which will always take us to the user directory)
Creating and editing files
At some point you’re going to need to interact with text files. This could be to write code, edit some configuration settings or to schedule events. We can create and edit text files from within the terminal using a program called nano. There are many other terminal-based text editors available, but nano comes pre-installed on raspbian and is reasonably friendly to use.
If you’re not already in the Test_1 directory, navigate there now. If you’ve gotten lost exploring the file-system already, you can always enter cd ~/Sandbox/Test_1
From here, just enter the command nano to enter the text-editing environment.
Type something simple like “Hello World”
Notice at the bottom of the window we have our command menu. One entry is ^X Exit which refers to the key sequence Ctrl+X. Hold the Ctrl key and press X and we see a prompt to Save modified buffer - this is just to save the changes we made. Strike the y key for yes and we’re prompted to enter a file name to save this text file as. The same rules apply as for directory navigation. We could save the file as textfile to save it from where we opened nano, or we could enter a relative or absolute path like ~/Sandbox/Test_1/textfile to save it to anywhere we feel like.
Use either option and press enter. We’re dropped back into the shell environment. Execute ls and we see our shiny new text file. By executing nano textfile we can edit its content too. If we enter this command without textfile existing yet, then nano creates an empty file called textfile and we immediately start editing it.
Deleting Files and Directories
We’re going to delete textfile using the remove command rm. Enter:
rm textfile
Notice how we didn’t get any warning, or any indication that anything happend? Type ls and see that Test_1 is now empty. The shell environment assumes we know what we’re doing. This also means we need to be careful!

Move up a directory (cd ..) into the Sandbox again, where our Test_1,2,3 folders are. We’re going to delete all of them. Try to rm Test_1. We get a message from rm saying rm: cannot remove ‘Test_1’: Is a directory.
To delete a directory we need to invoke an argument in rm, to do a recursive remove. This is reserved for deleting directories, and everything inside them.
Enter:
rm -r Test_1
and then ls to see the results.

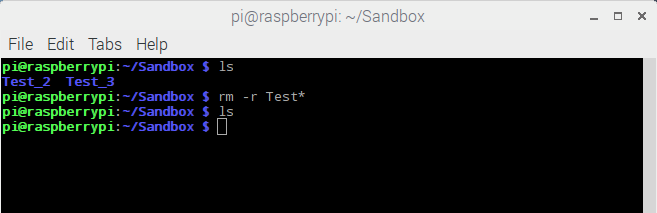
Wildcards
We’re going to delete the other two test folders, but we’re going to be clever about it and use wildcards. A wildcard is a character that can substitute for any other character in a search. We can use the question mark (?) to substitute for exactly one character, or the asterisk (*) to substitute for any number of characters.
To demonstrate, from within Sandbox, we’ll run
rm -r Test*
Using ls, we can see that this command has deleted both Test_2 and Test_3 directories. The * character substituted for _2 and _3 in the file names. Since the command matched both directories, both were deleted with one command.
We can use wildcards in any situation that involves files and directories.
For instance, navigate back to /home/pi with cd ~.From here we can jump into the Documents folder by executing cd Doc*
Wildcards are incredibly powerful tools, and their use cases can be quite involved. If you want to learn more about them perhaps perform a search for “regular expressions”.
Conclusion
By now we have some basic tools to help us with our future projects. The commands covered in this tutorial are a cornerstone to getting as much out of your Pi as possible.
It’s worth noting that each terminal window can be thought of as a task environment, so if you need to multitask you just open another instance of the terminal.
If you have any questions, feel free to enter them below. You can also find other topics in our forums.

