Out of the box, a LulzBot 3D Printer comes tuned to perform exactly as you need it to. But over time we flash new firmwares, take our printers cross country, swap tool heads, perform cold pulls and a whole swathe of other things that could slowly take our printer out of alignment. With automatic levelling beds, we know that our printer will compensate for any discrepencies on the Z-axis, however, there's one setting that needs to be entered that controls the quality of your first layer. It's known as Z-offset. By default, the team at LulzBot will have this dialled in for you (you can see it on the QC sheet that comes with the printer), however, we're going to show you how you can fine tune it to get the most out of your 3D printer. We're using the LulzBot printers, but the practice of fine tuning this setting will work with most printers. After all, the first layer is the most critical element of a successful 3D Print.
Note: This process isn't usually required, as LulzBot printers come ready to go and do not require any tweaking to print with. This guide is for tweaking a Z-offset after swapping out tool heads, etc.
A quick sanity check
You might have found this guide for a number of reasons, one of which being that your printer mightn't be auto-levelling how you expect or perhaps your first layer looks all smooshed and not quite right. That's a technical term by the way, smooshed. In any case we're going to be using a simple rectangle model to tune our 3D Printers first layer. Before we can do that, it's worth levelling our X carriage axis and cleaning off our nozzle to make sure the auto-level function of the printer is working as well as it can.
Get your tool head to the rough middle of the X-axis and set the Z height of the printer to somewhere around the middle
(~150mm for the Taz 6, ~75mm for the LulzBot Mini 2)

Take a ruler and measure from the bottom of the X-axis to the bed on each side of the tool head
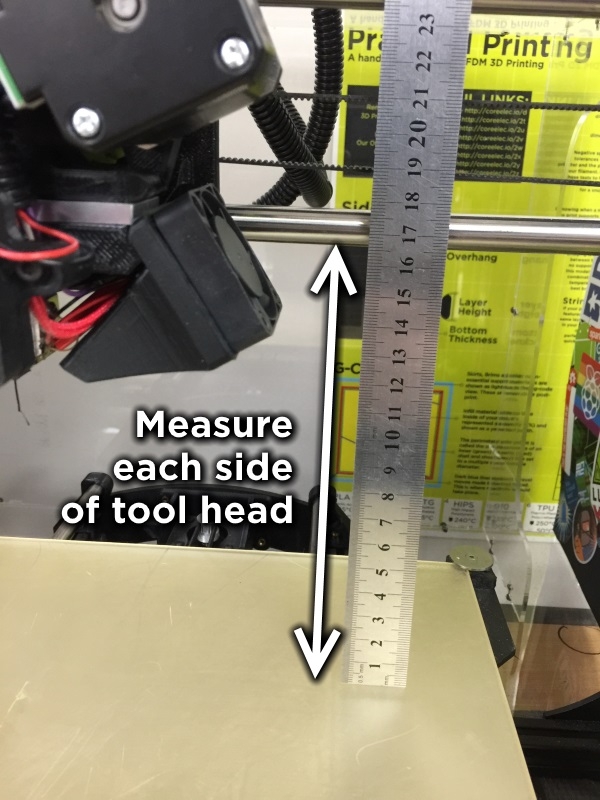
Rotate the Z-axis couplers by hand to make this measurement as even as possible

Finally, take a scotch-brite pad and give your nozzle a quick brush to clean it up.

The perfect first layer
The Z-offset refers to the distance the X-axis is offset in the Z direction from the zero point (the washers used in the Auto levelling process). This means that an offset of -1.5 is as close to the bed as you can print, leaving little to no space for actually printing your first layer. This technically should mean that whatever we are printing our first layer at (usually a little thicker than our print resolution) should be able to be added to the Z-offset to get the perfect value. It's a good place to start, but sometimes it isn't as perfect as we might like.
There are three outcomes a first layer:
Nozzle is too close ('smooshed' first layer with ridges from nozzle pressing into print)

Nozzle is too far (Unpressed layer with poor adhesion)

Nozzle is well positioned (layer is slightly pressed to the bed, smooth surface on top and bottom, well adhered to bed with no artifacts)
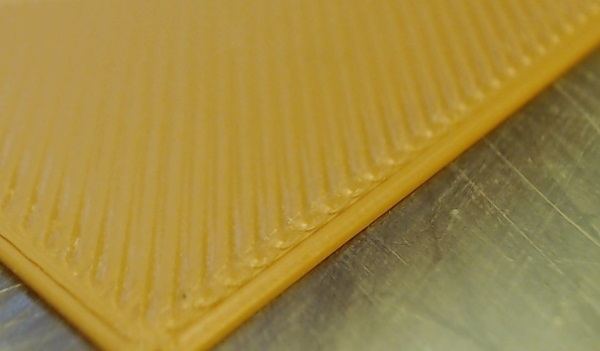
We're going to aim to have our Nozzle perfectly positioned for our filament, which is PolyLite PLA. It's worthwhile noting that your ideal Z-offset will change a small amount depending on the filament you use, the printer you're using and a bunch of other things. I'd recommend doing this as part of the setup when loading a new filament, just to fine tune your setup.
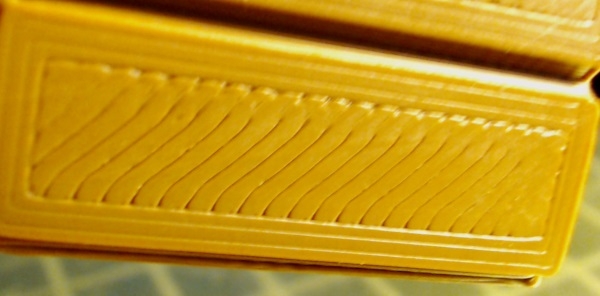
To demonstrate that Z-offset will change with filament type, here's an image of the exact same printer, printing with a different filament using the same settings as the ideal image above (the brown rectangle)

It looks good, but I'd say that it could be raised a little as it looks a little too pressed by the nozzle.
In any case, let's look at how we can tune it up.
Testing model & slicing
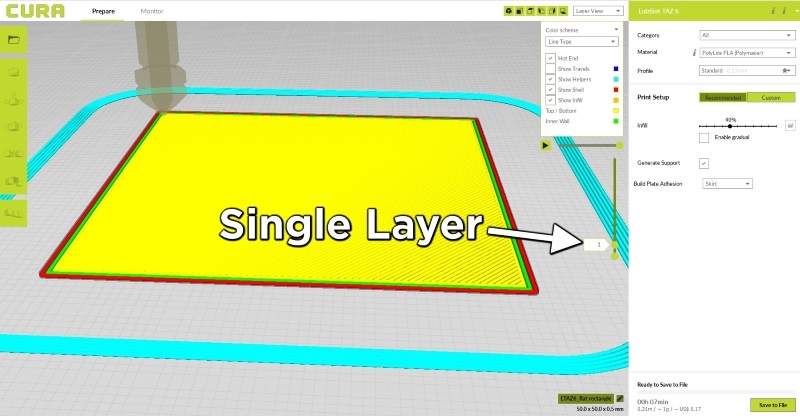
We're using a really basic model for this, a flat rectangle. It's essentially one layer, 50mm square. This gives us enough time to tune our layer and see the results while the printer is operating. If you're using a larger or smaller nozzle, you might need to change the size of your rectangle in the Z-direction so that it's only one layer. Just use the Cura scale settings for this.
You can download our flat rectangle from the tutorial attachments if you need one, otherwise just whip one up yourself. It's easy to do and I'd say it's worth making your own (you'll use it a tonne if you start to do this process regularly).
Printing and tweaking
The process for this is to change your Z-offset whilst the printer is printing the first layer to get it as close to perfect as possible. This prevents you having to print 15 of the models, and as long as you're sensible there's no risk to the printer. Load the file up and start printing it.
As your skirt is layed down, navigate to the Z-offset setting. It will be listed under Tune > Advanced Settings > Z-Offset or Probe Z-Offset.
You will see the following image, with the icons showing you how to raise/lower the nozzle as the print proceeds.

Using the first layer images above, tweak your Z-offset (move the nozzle up/down depending on what you see) to change what you see printing. It usually takes me 1-2 prints to get my offset close to perfect. Just keep a keen eye on what's happening as the printer lays down the first layer.
When you remove the layer from the print bed, you should see nice evenly space lines on the underside of the model.
Your first layer is set
And that's how you can quickly and easily tune your first layer on a LulzBot 3D Printer. The process is quite similar on other printers with a Z-offset too. Bear in mind that if you don't have an auto-levelling printer, having your print bed level is much more critical to achieve first layer success.
Once you have learned the process, you will get a feel for it and it will take no time to dial it in when you load a new filament. The process is really easy and makes a big difference to your models. We'd love to hear how you went following the process above to tune up your printer. Let us know below!

