Hello everyone, how awesome are the Teensy boards from PJRC? Super awesome. And as with any product that has been around for a few years, and gone through various iterations, there’s now a few different boards to choose from, which can make it confusing when planning your next project. Today we’ll be looking at the 4 different boards that exist in the current generation of Teensy boards: 3.2, 3.5, 3.6, and LC.
If you’re still wondering what the Teensy platform is, check out some of our other Teensy tutorials. But for now, let’s take a look at some of the key differences between each board:
 Teensy 3.2:

The 3.2 is a smaller board (compared to the 3.5 and 3.6) with 34 I/O pins, a beefy 3.3V regulator, and 5V tolerant pins, it’s able to support add-on boards such as the ESP8266 with ease. With a Cortex-M4 processor capable of running at 96 Mhz, the 3.2 is the best Teensy board if you’re after something compact, but powerful.
Teensy 3.5:

Earlier in 2016, PJRC announced the arrival of two new Teensy boards, the 3.5 and the 3.6, and they really step up the game in terms of power and connectivity. The 3.5 retains the 5V pin tolerance of the 3.2, and ushers in a 120 Mhz Cortex-M4 processor with a dedicated Floating Point Unit. The board also has a native microSD card slot which can be used to store data, audio, and much more. 62 I/O pins (42 of which are breadboard compatible through the header pins), plus much more.
Teensy 3.6:
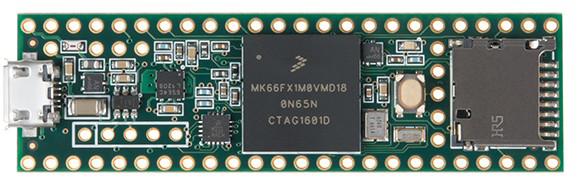
Identical in form factor to the 3.5, the 3.6 packs a 180 Mhz (HUGE!) with a dedicated Floating Point Unit, along with USB High-Speed (480 Mbit/sec) communication, touch sensitive inputs, extra hardware peripherals, and ports, at the expense of the 5V tolerance, which means that anything above 3.3V will definitely damage your board.
Teensy LC:

The LC (Low Cost) is the ‘junior’ member of the Teensy family. We say ‘junior’ because even this low-cost model brings to the table an ARM Cortex-M0+ processor clocked at 48 Mhz, 27 I/O pins, plus stacks of hardware ports and peripherals. If your project doesn’t require crazy clock speeds and an intense number of ports, the LC is a perfect choice.
That was a brief overview of the different board models, so if you’re after more detailed technical info, check out our table below:
|
|
Teensy LC |
Teensy 3.2 |
Teensy 3.5 |
Teensy 3.6 |
|
Clock Speed |
48Mhz |
96Mhz |
120Mhz |
180Mhz |
|
RAM |
8K |
64K |
192K |
256K |
|
Flash |
62K |
256K |
512K |
1M |
|
I/O Pins |
27 (all on headers) |
34 (24 on headers) |
62 (42 on headers) |
62 (42 on headers) |
|
Pin Voltage |
3.3V |
3.3V (5V tolerant) |
3.3V (5V tolerant) |
3.3V |
|
EEPROM |
256 Bytes |
2K |
4K |
4K |
|
Connectivity |
USB, Serial, SPI, I2C, I2S |
USB, Serial, SPI, I2C, CAN, I2S |
USB, CAN, I2C, SPI, Ethernet, SD, I2S |
USB (High Speed), CAN, I2C, SPI, Ethernet, SD, I2S |
|
Timers |
7 |
12 |
14 |
14 |
|
PWM Outputs |
10 |
12 |
20 |
20 |
|
Analog Inputs |
13 |
21 |
25 |
25 |
As you can see, each Teensy board is incredibly well featured in terms of both power and connectivity, and with prices ranging from $25 to $48, every Teensy board represents an incredible value for money, especially given the Arduino compatible bootloader that is on every chip. All of that power is coupled with the flexibility of the Teensy and Arduino libraries.
Hopefully, this has helped with your decision on which Teensy board is going to best suit your project. For more project ideas and info, check out our other Teensy tutorials and projects section!

