Imagine being a builder without a hammer, or a car without a brake, this is kind of useful, but nowhere near as useful as it could be. This is like being a maker/DIY’er/enthusiast without being able to solder. Sure you can breadboard your designs and use modules, but eventually, you’re going to hit a wall. Soldering is an essential skill for anyone working with electronics, and knowing how to solder properly can be invaluable. Today we’re going to take a look at the equipment, techniques, and knowledge required to solder through-hole components and boards properly. And the best bit is, it isn’t that hard! Whether you’ve never soldered before, or looking for a refresher course, this tutorial is for you.
What is Soldering?
First up, what actually is soldering? It’s a good question and there’s a lot of misconceptions floating around when someone mentions soldering. The word solder refers to two things:
- Solder (noun): a metal alloy with a low melting point used to join wires
- Solder (verb): the process of joining components together using heat and solder
Soldering is the process of joining two pieces of metal together with solder which is like conductive, metallic glue. When you solder, you’re not melting the metal you’re soldering to, or fusing it together, but you’re heating both pieces of metal up to allow solder to flow between them and create a strong, permanent bond. Without sufficient heat, the solder won’t properly bond to the metal you’re soldering. It’s important to note that whilst soldering is a durable electrical connection, not a strong mechanical one. If you’re soldering wires together, or other components, the strain shouldn’t be on the solder joint. So now let’s take a look at what this solder stuff is.
 Solder
 Solder
As we talked about before, solder is the glue of electronics. It’s a metallic alloy which has a very low melting point (only a few hundred degrees) and is highly conductive. Traditionally solder was made of a lead-tin alloy (typically a 60/40 ratio) because lead has the ideal melting point and conductivity required for soldering, but eventually people worked out that lead is actually quite bad for you. So in the mid-2000’s a new standard called RoHS (Restriction of Hazardous Substances) was bought it for electrical equipment which had to be lead-free (Pb-free). So some clever people got together and created a new, lead-free alloy suitable for soldering which consists of tin and a bunch of other elements, called lead-free solder (no prizes for guessing that one). So we have two types of solder, leaded and lead-free, both with slightly different properties. So which is should you use?
Generally speaking, leaded solder is easier to work with due to its lower melting point and will give you better solder joints than standard lead-free solder, however, whilst the amounts you’re exposed to during typical solder work are incredibly minimal, exposure to large amounts of lead is bad for you.
On the other hand, lead-free solder has a slightly higher melting point than leaded solder and is a little harder to work with. But most lead-free solder comes with a ‘rosin core’ which contains a compound called ‘flux’. Flux is a chemical which helps the solder flow and improves the qualities of the solder. This rosin-core solder makes lead-free solder almost as good to work with as leaded solder, but without the lead. Some people prefer leaded, others lead-free, so it’s up to you, either will work fine for regular soldering, however, you’ll want to set your iron about 50 degrees (C) hotter if you’re using lead-free solder due to the higher melting point. We've got both types in stock so you can decide which one is going to be best for you:
Speaking of iron temperatures, let’s take a look at how a soldering iron works, and what temperatures are best for soldering.
Soldering Irons
 Soldering Irons
Alas, the humble soldering iron. It’s the workhouse of electronics benches and creator of amazing projects. Nowadays there are lots of different irons to choose from, depending on the features you want, however getting a quality soldering iron will make it a much easier and a more rewarding experience, and will last much longer if you take care of it. If you’re doing a lot of soldering, it’s worth investing in a high-quality solder station with an adjustable temperature control, however, for every-now-and-then kind of jobs, a standard all-in-one iron will do the job. If you’re not sure which iron is going to be best for you, check out our Choosing a Soldering Iron tutorial where we look at the Hakko FX-888D and Hakko 60W Red soldering irons. However no matter what type of soldering iron you have, the concept is the same. Electricity is used to produce heat using a heating element (often ceramic), and the heat is then transferred to the metal tip of the iron. The handle of the iron (also known as a pencil, or wand) is usually made of insulating plastic and rubber to keep your hand cool while you solder. Speaking of tips, there are 3 basic types available, each has a unique purpose:
- Conical tip
- Chisel tip
- Hoof tip (Bevel tip)

Each different tip is designed to maximize the heat transfer to the components. But for general through-hole soldering, a good conical or chisel tip is hard to beat. Get one that’s fine enough for small components and tightly spaced pads, but not too fine as it will reduce the amount of heat it can transfer to the parts you’re soldering.
During the process of soldering, a process called oxidization will occur on the surface of your soldering iron’s tip. This is a dark build up that covers the normally shiny tip surface. Before soldering, after every couple of solder joints, and after leaving the iron for a few minutes, wipe the tip on a damp (not wet) sponge or brass wool to remove the surface impurities. You can also use a solder tip cleaner, which chemically cleans the tip of your iron when the oxidization is severe. After extensive use, the tip may begin to develop holes or other wear, at which point, it’s time to replace the tip.
When soldering, you want to use the side of the tip, not the very point, as that’s how you get the best surface area contact, and hence heat transfer. If you have a heat adjustable iron, you want to set your temperature to between 300-350 degrees for most soldering. Now whilst a soldering iron and some solder is the bare minimum required to solder, a few pieces of extra equipment will go a long way to making a high quality, safe, and enjoyable soldering experience.
Other Tools and Gear
As we talked about above, you will, of course, need some solder and a soldering iron, but here are a few tools that we’ve personally gone through a curated as our recommendations for setting up your soldering workshop:
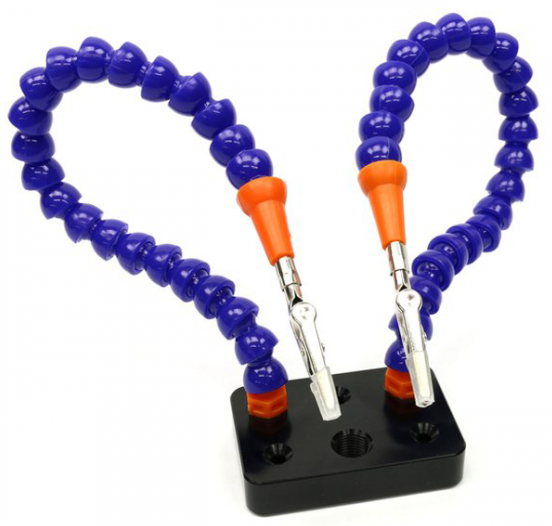
- Hobby Creek Mini Hand: Having something to hold what you’re working on is a must. When soldering you’re holding the iron in one hand, solder in the other, and soldering to a loose board sitting on your desk isn’t fun. Check out its big brother the Third Hand as well.
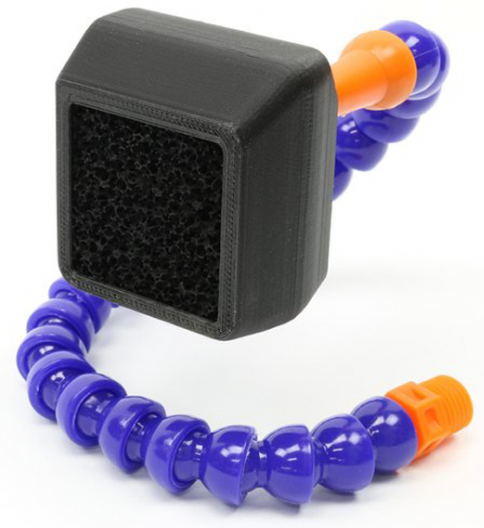
- Hobby Creek Fume Extractor: Even if you’re soldering with lead-free solder, soldering still gives off a small amount of fumes and smoke which most people would rather avoid inhaling. This USB powered fume extractor screws into your existing Hobby Creek base and is perfect for creating a clean workstation.
- Side Cutters: You’ll need these to remove the excess component leads and clip wires.
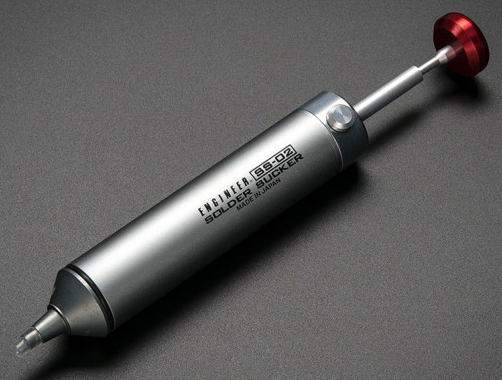
- De-soldering Pump: As we’ll look into in a separate article, often you’ll need to de-solder something, be it a misplaced component, or excess solder causing a bridge. A quality de-soldering pump goes a long way.
- Copper Braided Wick: Similar to the de-soldering pump, a braided wick is used to remove solder from a joint.
- Safety Glasses: Soldering consists of molten metal and hot materials, so protecting your eyes is a must. They don’t have to be fancy, every hardware store has them, but a pair of safety glasses should always be worn whilst soldering.
- Multimeter: More commonly used for measuring voltages and current, a multimeter can also measure conductivity so you can see whether two surfaces are electrically connected or not. A basic multimeter is invaluable for finding bad solder joints that aren’t making a proper connection.


Now that we know what we’re dealing with, and we’ve got the right equipment, let’s take a look at creating a good solder joint.
Walk Through of Solder Joint
A good solder joint will form a solid, durable connection that will last a long time and a poor solder joint may not even make a connection at all, so it’s vital to learn how to form a proper solder joint. A good solder joint comes from heat being applied to both surfaces you’re soldering to, and a nice even distribution of solder, without excess. A good solder joint will have a smooth, shiny finish to it, even after cooling, whereas a cold/dry joint will be dull and rough. For a good solder joint, we’re aiming for a nice volcano like shape from the PCB to the lead. Take a look below at some comparisons of nice clean solder joints vs. cold solder joints:
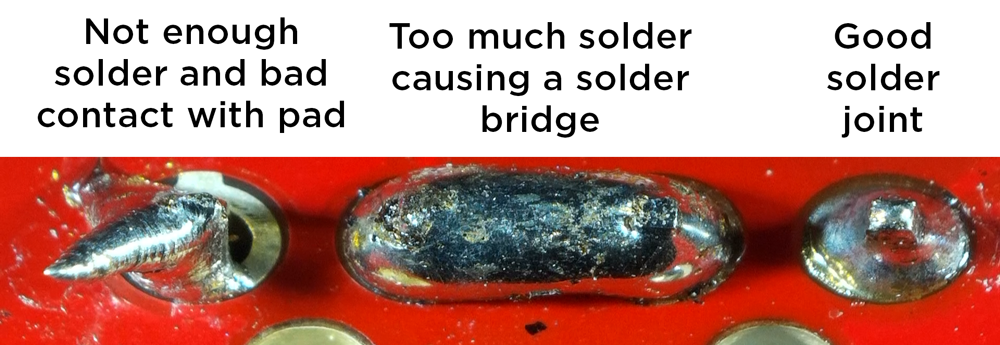
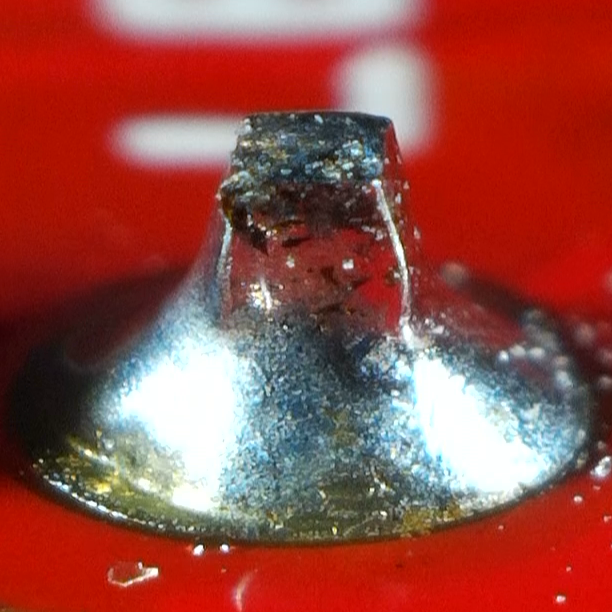 You can see a few different joints above while soldering a 4 pin male header. The one on the left didn't have a good contact between the iron and the pad, as a result, the solder hasn't flowed into the hole correctly and hasn't formed a reliable connection. On the two middle pins, I used too much solder which made a solder bridge across the two pads, shorting the circuit. The one on the right demonstrates a good solder joint. Notice the smooth, shiny surface and the nice conical shape. This means there is solder that has flowed properly into the pad, adhering to both the pin and pad, and the perfect amount of solder was applied. The image to the right shows that solder joint from a flatter angle, and you can see the conical shape of the joint.
Note the brown marks on the surrounding board and solder joint; that's just a small amount of the flux left over from soldering. It's only visible extremely close up and is just a by-product of soldering.
Now let’s walk through the steps of getting a perfect solder joint.
- Ensure that you’re iron is at full heat (ideally around 350 degrees).
- Before soldering ensure that your tip is clean of oxidization, and ‘tin’ the tip by applying a small amount of solder to the tip and wiping to remove excess. Solder is an exceptionally good conductor of heat, so tinning the tip will help to transfer heat quickly.
- Touch the tip of your soldering iron to make contact with both the wire lead and the pad, then bring the solder to the joint and allow it to flow into the joint. It’s important that you melt the solder on the joint, not the soldering iron as this will allow solder to flow into the joint create a reliable connection.
- First remove the solder, then the iron to allow the connection to cool. When soldering components and PCBs, you want to aim for the whole process to take no more than a couple of seconds to avoid damaging the components and/or the PCB because of excess heat.
- When you remove the soldering iron from the joint, drag the iron up along the component lead. This will help to draw any excess solder away from the joint and give a nice, conical finish.
**Be sure not to disturb the solder joint before it has cooled and solidified otherwise you'll end up with a cold solder joint that hasn't properly bonded to the metal as shown below**

By MyName (Coronium (talk)) - Own work, CC BY-SA 3.0
And that’s really all there is to it folks. Soldering, like any skill, requires practice and perseverance to master, so the best way to improve your soldering ability is to get practicing. Prototyping boards such as stripboard and perfboard aren’t ideal for working on your soldering at first because of the unique way the copper tracks are laid. The best way to learn is on a simple, widely spaced board without expensive components that can be damaged from excess heat. To get started with soldering we’ve put together a list of fantastic and fun kits that will not only create awesome projects and gizmos but are fairly easy to solder and get started with:
- SparkFun Benchtop Power Board Kit
- WeevilEye - Beginner Soldering Kit
- Simon Says - Through-Hole Soldering Kit
- Electronic Dice Kit
Once you've got the hang of simple through-hole soldering, be sure to check out our other tutorials on more advanced soldering techniques including desoldering and SMD soldering. If you found this tutorial useful, let us know in the comments below and get the conversation started with your fellow makers!

