I'm an amateur musician but a pretty serious classical & jazz pianist, and this project arose out of my interest in exploring the difference between writing music for synthesisers and music for piano. I work as a mathematician, so I am also very interested in the mathematical underpinnings of music and harmony. The Euclidean allows me to directly experiment with mathematical models that drive melody, harmony, and rhythm.
The Euclidean is a custom-built subharmonic synthesizer and polymetric sequencer inspired by Euclidean Rhythms, the Moog Subharmonicon, and standard subtractive synthesis. It presents the beauty of mathematical precision in music. If curious, take a look at the paper by Godfried Toussaint. It describes the incredible relationships between the Euclidean algorithm and the music of various cultures from all over the world.
With a traditional synth, a single patch can be quite an interesting and dynamic sound. With the Euclidean, a single patch is actually quite a fully fledged and self-complete musical idea (especially when the sequencer cycling is enabled). The 30 second samples of the built-in presets on my own web page illustrate this quite well. They are each just set and hit play.
Contents
Theory
Subharmonic Synthesizer
Given a frequency ƒ, its harmonics are the frequencies 2ƒ, 3ƒ, 4ƒ and so on. The presence and relative amplitudes of these harmonics in a wave are what give it a particular character. Analogously, the subharmonics of a frequency ƒ are ƒ ⁄ 2, ƒ ⁄ 3, and ƒ ⁄ 4, etc. Setting a sub-oscillator to one of these frequencies guarantees a harmonic relationship with the primary frequency.
The Euclidean has two independent 4-voice oscillator sections, each with 2 (detunable) voices for the primary oscillator and 2 voices for the sub-oscillator. The frequency for the primary oscillator can be set to any note in a 3-octave range from middle C, and the sub-oscillator frequency is specified by a divisor from 2 to 16.
Polymetric Sequencer
A polymeter is when 2 or more different meters, each based on the same beat unit, are played together. They will move in and out of alignment at a rate that depends on the least common multiple of their lengths, leading to potentially complicated but repeating rhythmical patterns.
When the different meters have the same length, they are called polyrhythms.
The Moog Subharmonicon is a modern synthesizer that uses polyrhythms to selectively trigger across two 4-note sequencers. Very interesting musical patterns are created by the changing interleaving when the rhythms share no small common divisors.
To build on this, the Euclidean produces three independent meters that can be combined to generate an enormous variety of interesting and unusual, but nevertheless natural rhythms. The beats within each rhythm are distributed according to the Euclidean algorithm (and so are often called Euclidean Rhythms), thus giving the device its name.
Putting it all together
The musical output of the EUCLIDEAN results from the interaction of each of these aspects.
Euclidean rhythms use the Euclidean algorithm to determine how to best allocate a variable number of beats within a bar of arbitrary size. This relationship has only recently come to light, as detailed in this brilliant paper.
Each oscillator has an associated 4 step sequencer, where each step can alter either or both the primary oscillator frequency and the sub-oscillator divisor, thus producing both a melody and a bass line. Progression through the steps is by selected aspects of the rhythm — specifically a beat from any one of the three available meters, or an offbeat.
Since the sequencers are independent, different rhythms will produce interweaving melodies that develop over the full range of the polymeter.
Additionally, drum sounds may be overlaid, where a different percussion instrument is optionally associated with the beats from the three meters and the offbeats.
Other aspects of sound production are via standard subtractive synthesis — with an AD envelope, a low-pass resonant filter, an LFO, and some effects. MIDI integration makes for even richer musical expression by allowing keyboard interaction to transpose the sequences, or play one of the oscillators manually while the other is driven by its sequencer.
Parts
- Teensy 4.0
- Teensy Audio Adapter Board
- Adafruit 1.8" Color TFT LCD display
- SparkFun Multiplexer Breakout - 8 Channel (74HC4051)
- I/O Expander IC (MCP23017)
- Custom PCB - Note the GitHub Repo Link
- An Optoisolator
- Here's a link to the Full Bill of Materials
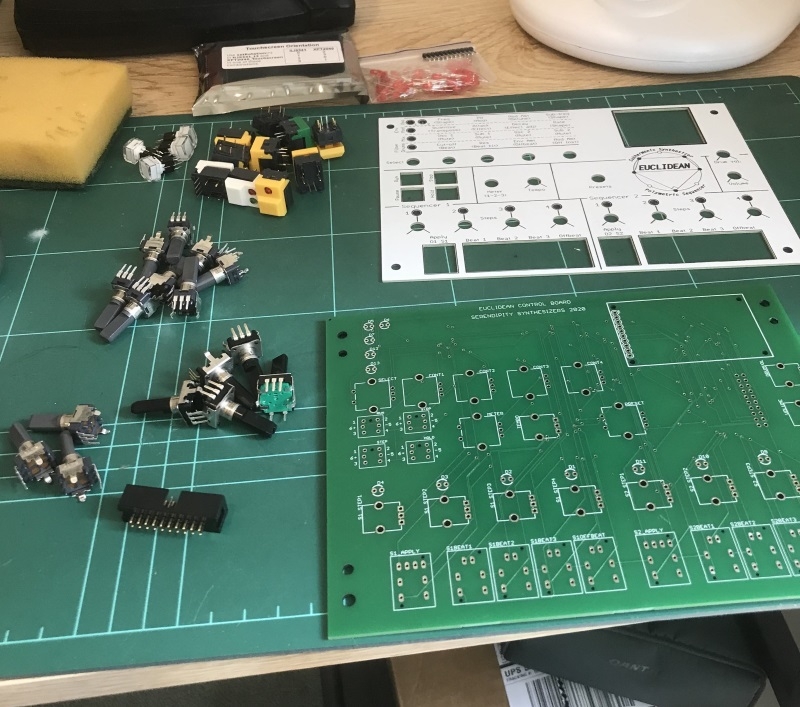
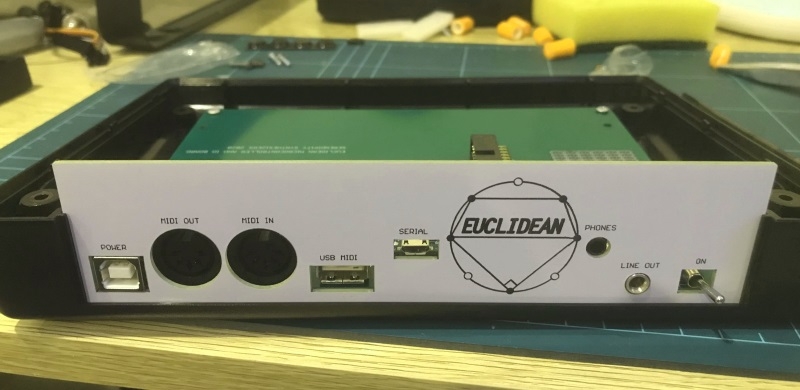
The Euclidean uses a Teensy 4.0, the Teensy Audio Shield with an associated library, an Adafruit 1.8” TFT LCD, a DeMux breakout (74HC4067) with port expanders (MCP23017), various LED switches plus encoders and potentiometers, with a variety of other standard components. The PCB was manufactured by JLCPCB, and the panel is just another PCB made with a white solder mask.


Assembly
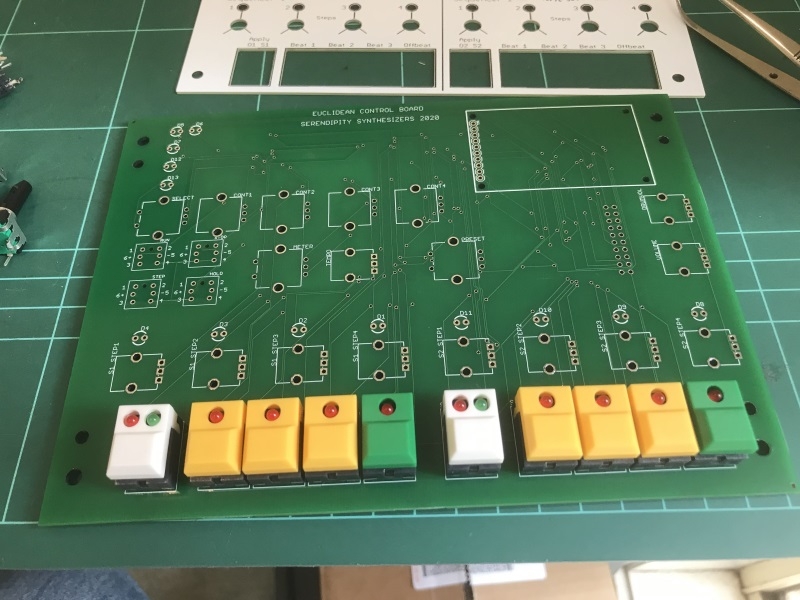
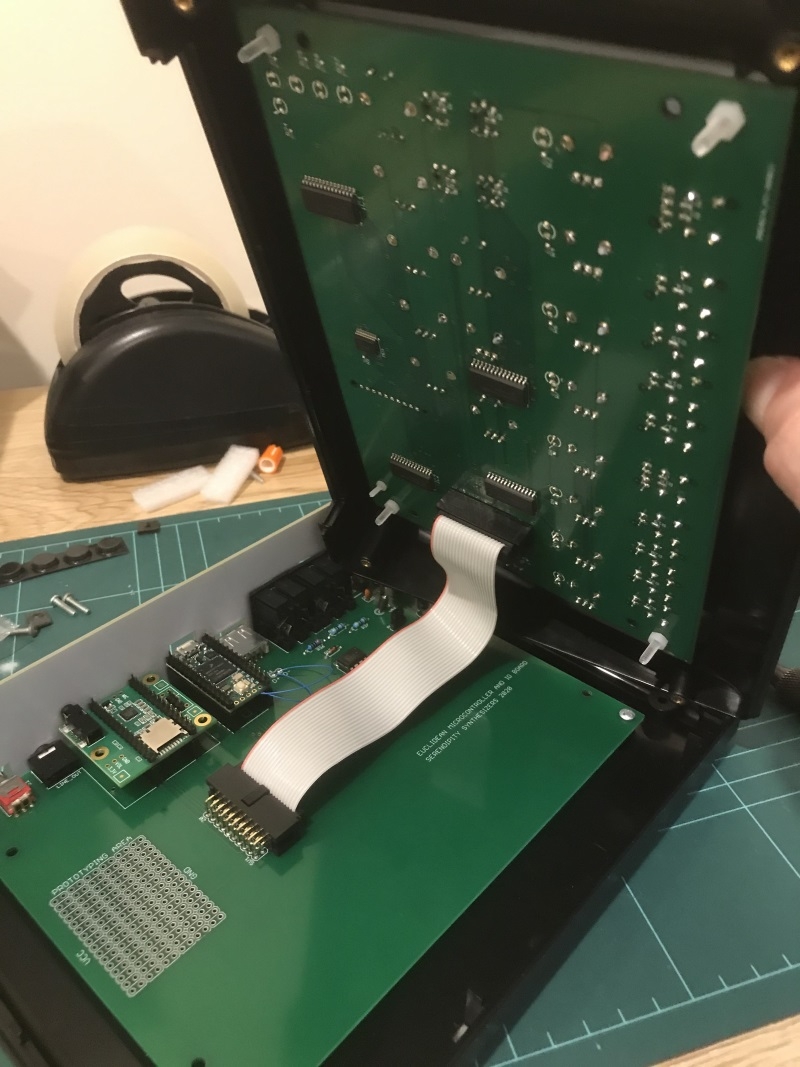
The EUCLIDEAN is comprised of 2 boards — an upper board with the pots, encoders, switches and their associated chips (MCP23017s for the switches and encoders, and a CD74HC4067 for the pots), and a lower board with the Teensy 4.0, the Teensy Audio Shield, plus the MIDI I/O and power circuits. The two boards are connected by standard a 20pin cable with 2x10 headers.
Although the boards can simply be stacked vertically, they are designed to fit the Pactec PT-8 enclosure.
Two additional boards function purely as panels — a top panel for the controls and a rear panel for the connections.
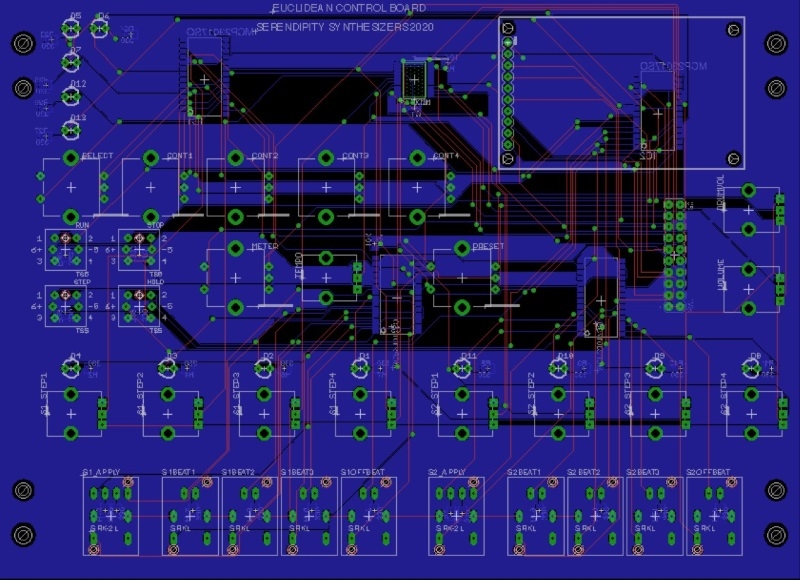
- Upper layout and schematic

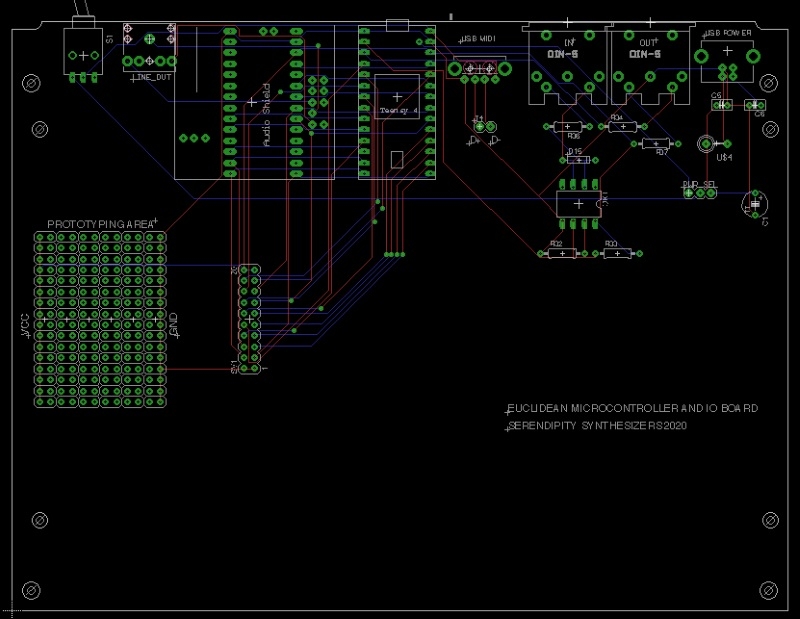
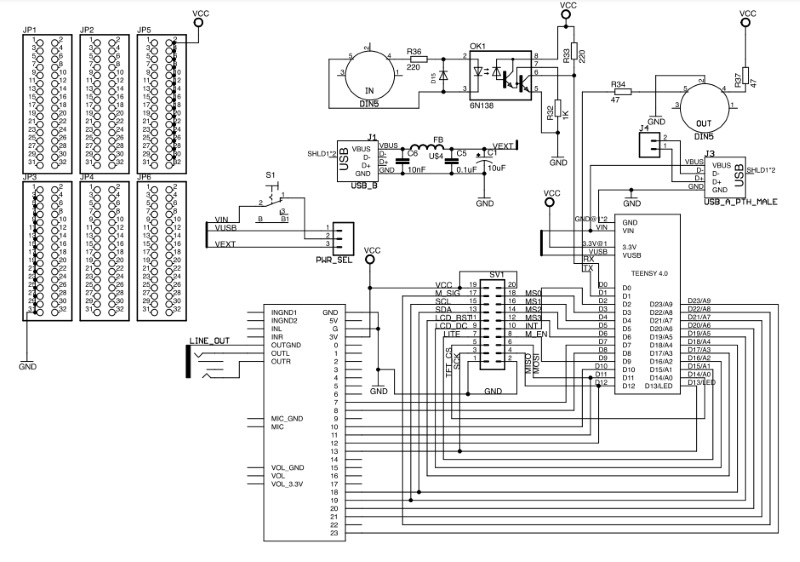
- Lower layout and schematic
Building the Lower Board
Follow these steps to construct The EUCLIDEAN lower (microcontroller, audio, and I/O) board.
At each stage carefully check continuity according to the schematic, orientation of components, and ensure there are no short circuits.
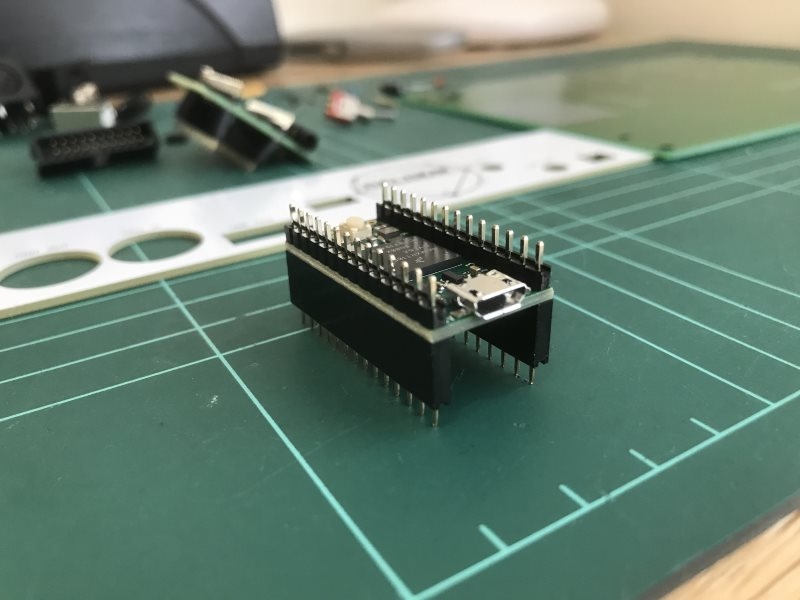
Step 1: Solder the pin headers to the Teensy and Audio Shield as follows in the image below to ensure proper alignment with the rear panel holes when placed in the sockets

Step 2: Solder the resistors and diodes first

Step 3: Solder the other low-profile components next

Step 4: Solder the capacitors and ferrite-bead for the power input circuit
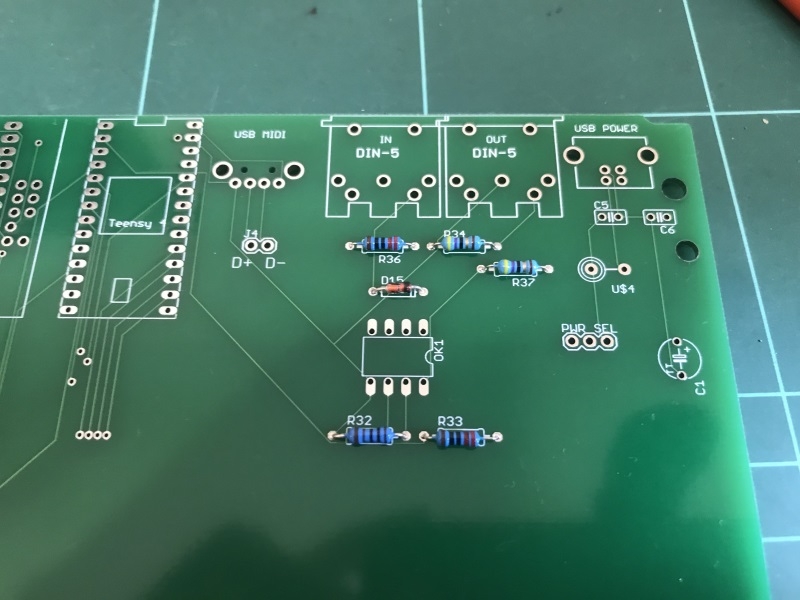
Step 5: Then solder the MIDI, USB and interconnect sockets

Step 6: Solder the sockets for the Teensy and Teensy Audio Shield, taking care to keep them vertical. Also, the power select header to choose between power from the dedicated USB power input (best when complete because you can provide enough current to drive a MIDI controller from the USB MIDI port), or the Teensy USB input (more convenient if regularly re-programming the Teensy)

Step 7: Cut between the pads as shown to disconnect the USB voltage and the Teensy voltage input

Step 8: Then solder wires to connect the USB host pads and the USB voltage

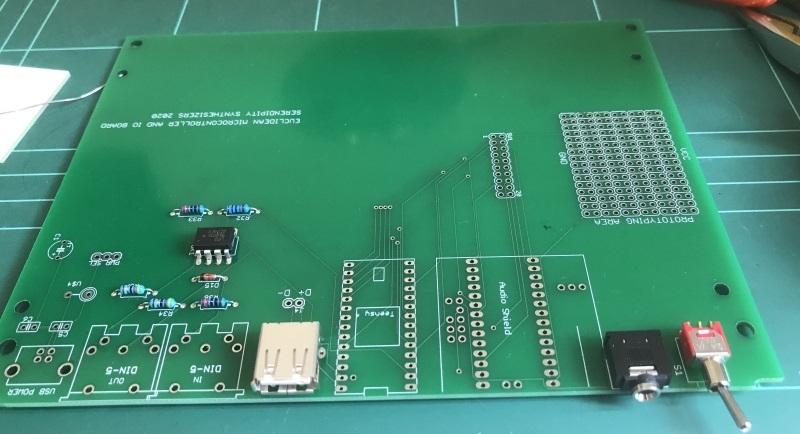
Step 9: Place the Teensy and Teensy Audio Shield into their sockets to complete the lower board. The prototyping area provides a line of ground holes, a line of 3.3V holes, and multiple other 2.54mm holes, and could be particularly useful for providing additional controls connected to the extra pins on a Teensy 4.1

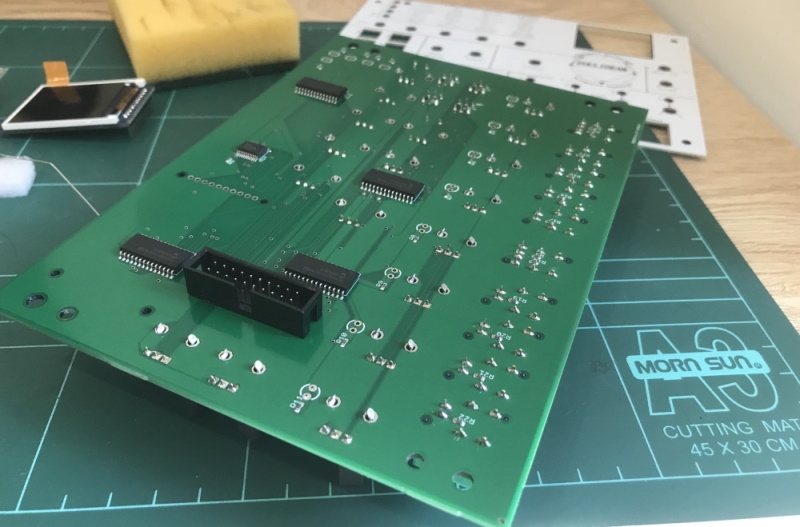
Building the Upper Board
Follow these steps to construct The EUCLIDEAN upper (controller) board.
Step 1: Solder the PB86 switches — take care with the LED polarity (the ground pin is on the right-hand side for all diodes except the two LED switches where the inner two pins are ground)

Step 2: Solder the switches, rotary controls, using the panel to ensure that the diode height is correct

Step 3: Solder the interconnect socket and the diodes, using the lower panel to ensure the diode height is correct

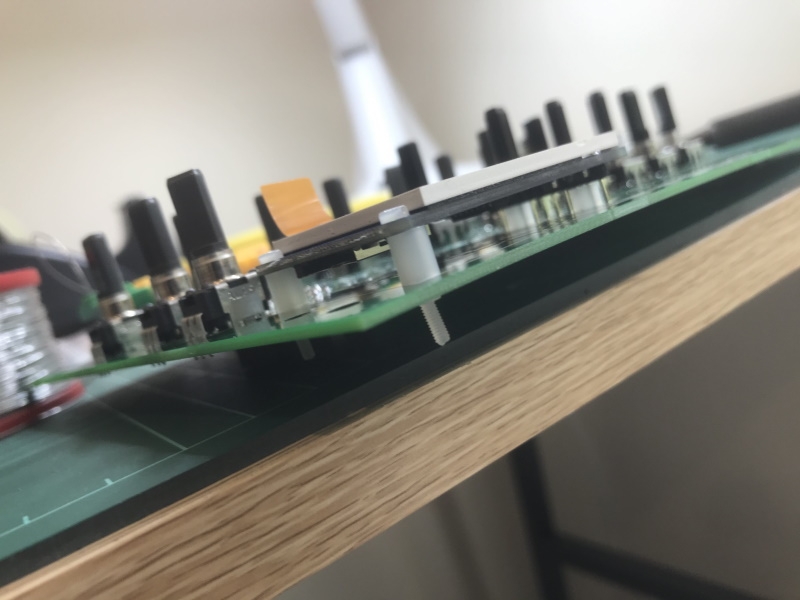
Step 4: Solder the LCD pins, add spacers to adjust the height, check alignment and all diode heights. Check all rotary controls turn easily and widen holes if necessary (Optionally add a bypass capacitor to the MUX)

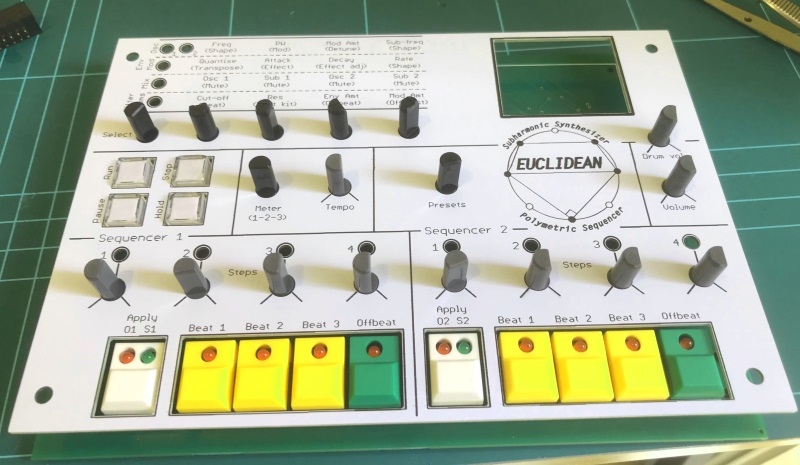
Step 5: Secure the top panel and upper board to the enclosure and add the knobs, Secure the rear panel and lower board to the enclosure

Step 6: Add the connecting cable, then complete the enclosure

Operation
The Euclidean features two independent primary oscillators supporting various waveshapes, each associated with a sub-oscillator with a frequency determined by dividing the primary frequency by an integer from 2 to 16. It can perform frequency modulation, pulse width modulation, quantization.
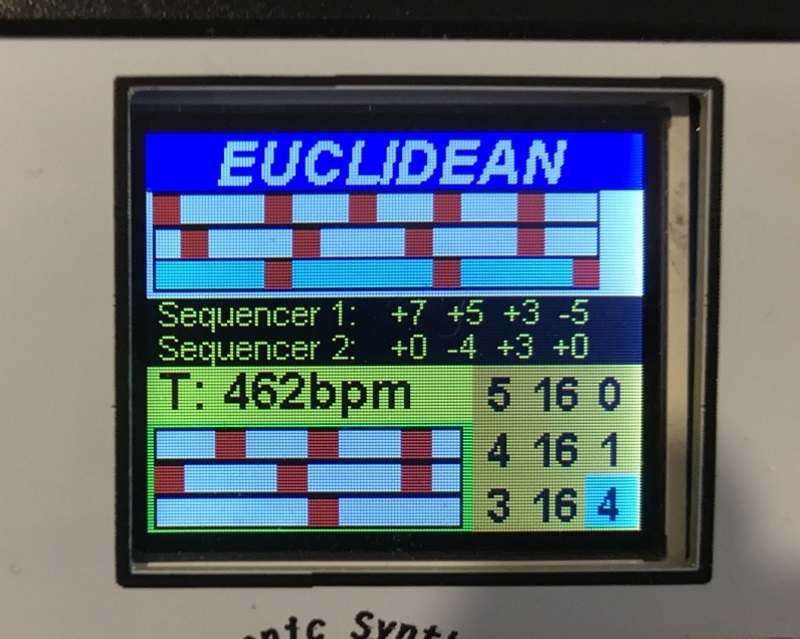
The Euclidean uses an AD (attack-decay) envelope, can perform LFO (low-frequency oscillation) with multiple waveshapes, has a resonant low-pass filter with (positive and negative) envelope and LFO modulation, includes Chorus, Flanger, Delay effects, three independent "Euclidean Rhythm" generators, two independent 4-note sequencers with each driving one of the oscillators and various combinations of rhythm events.
There are +/-24 semitone steps for each sequencer. The Euclidean also supports MIDI and Serial integration.

Demo of presets
Making a patch
MIDI keyboard integration
The Specifications
- Two unison primary voices (detunable - light, medium, heavy)
- Waveshapes: Sine, Triangle, Square, Sawtooth, Variable Width Pulse (Triangle, Square, and Sawtooth waves are bandwidth limited for anti-aliasing)
- There are two unison sub-voices that have their frequency determined by dividing the primary frequency by an integer from 2 to 16
- Sub-oscillator waveshapes: Sine, Triangle, Square, Sawtooth
- Independent level control of each oscillator (and toggle to mute)
- Optionally quantize the frequency to any: 12-note chromatic scale, 8-note diatonic major or minor scale, 5 note pentatonic major or minor scale, 8 note just intonation major or minor scale, 8 note Pythagorean major or minor scale.
- Transposable +/- 24 semitones via a panel control, or arbitrarily via a MIDI keyboard.
- Optionally modulate any: oscillator frequency, pulse width, filter cut-off, within the waveshapes, Sine, Triangle, Square, Sawtooth, Reverse Sawtooth, Sample and Hold
- Low-pass resonant filter
- Adjustable cut-off frequency
- Adjustable resonance
- Positive and negative adjustable envelope response
- There are three independent AD envelopes, one for both oscillator groups, and one for the filter all with common settings
- When being played manually, the envelope becomes ASR (Advanced Sampling Recorder)
- Effect presets (slow/medium/fast) Chorus, Flanger, Delay, Chorus with Delay, Rhythm
- Three independent "Euclidean Rhythm" generators, set the number of main beats, and the bar length for each (maximum bar length is 32, tempo ranges from 30bpm to 1200bpm)
- Sequencers
- Two independent 4 note sequencers
- Specify offset for each step from -24 to +24 semitones
- Apply to main frequency, sub-frequency divisor, or both (when applied to the sub-frequency divider, the offset is divided by 3, i.e. from -8 to +8)
- Sequencer 1 drives oscillator 1, and sequencer 2 drives oscillator 2
- The sequencers can be set to progress on a beat from any of the 3 rhythms, offbeats, or both.
- The sequencer play mode has three states:
- Run: Progress as specified according to the rhythm
- Hold: Play and hold a single step, useful for individual oscillator tuning
- Pause: Repeat the current step until pressed again, useful for joint oscillator tuning
- Presets
- Up to 64 unique presets can be saved on an SD card
- MIDI
- If any sequencer is inactive (either because stopped or not set to advance) then the corresponding oscillator (and sub-oscillator) will play according to an incoming MIDI note.
- If both sequencers are active, played MIDI notes transpose the sequences.
- COMING SOON: incoming/outgoing MIDI clock
- Serial connection
- A serial connection allows some control from a computer
- Presets can be queried and restored from backup using serial commands
Links
- Full bill of materials required
- GitHub Repository
- My Website
- The Euclidean build guide
- Using the Arduino IDE to program a Teensy
- More Synth Tutorials by Ken
Want to learn more about synthesizers and terminology? Check out this tutorial from Andertons Want to learn more about my synthesizer? Check out my website
Here's a link to the current repository. Please email Core Electronics if you have any requests.
This is still very much a work in progress, but I'm really happy having reached a milestone where it is so usable and fun!
Ken :-)
I'm an amateur musician but a pretty serious classical & jazz pianist, and this project arose out of my interest in exploring the difference between writing music for synthesisers and music for piano. I work as a mathematician, so I am also very interested in the mathematical underpinnings of music and harmony. The Euclidean allows me to directly experiment with mathematical models that drive melody, harmony, and rhythm.
The Euclidean is a custom-built subharmonic synthesizer and polymetric sequencer inspired by Euclidean Rhythms, the Moog Subharmonicon, and standard subtractive synthesis. It presents the beauty of mathematical precision in music. If curious, take a look at the paper by Godfried Toussaint. It describes the incredible relationships between the Euclidean algorithm and the music of various cultures from all over the world.
With a traditional synth, a single patch can be quite an interesting and dynamic sound. With the Euclidean, a single patch is actually quite a fully fledged and self-complete musical idea (especially when the sequencer cycling is enabled). The 30 second samples of the built-in presets on my own web page illustrate this quite well. They are each just set and hit play.
Contents
Theory
Subharmonic Synthesizer
Given a frequency ƒ, its harmonics are the frequencies 2ƒ, 3ƒ, 4ƒ and so on. The presence and relative amplitudes of these harmonics in a wave are what give it a particular character. Analogously, the subharmonics of a frequency ƒ are ƒ ⁄ 2, ƒ ⁄ 3, and ƒ ⁄ 4, etc. Setting a sub-oscillator to one of these frequencies guarantees a harmonic relationship with the primary frequency.
The Euclidean has two independent 4-voice oscillator sections, each with 2 (detunable) voices for the primary oscillator and 2 voices for the sub-oscillator. The frequency for the primary oscillator can be set to any note in a 3-octave range from middle C, and the sub-oscillator frequency is specified by a divisor from 2 to 16.
Polymetric Sequencer
A polymeter is when 2 or more different meters, each based on the same beat unit, are played together. They will move in and out of alignment at a rate that depends on the least common multiple of their lengths, leading to potentially complicated but repeating rhythmical patterns.
When the different meters have the same length, they are called polyrhythms.
The Moog Subharmonicon is a modern synthesizer that uses polyrhythms to selectively trigger across two 4-note sequencers. Very interesting musical patterns are created by the changing interleaving when the rhythms share no small common divisors.
To build on this, the Euclidean produces three independent meters that can be combined to generate an enormous variety of interesting and unusual, but nevertheless natural rhythms. The beats within each rhythm are distributed according to the Euclidean algorithm (and so are often called Euclidean Rhythms), thus giving the device its name.
Putting it all together
The musical output of the EUCLIDEAN results from the interaction of each of these aspects.
Euclidean rhythms use the Euclidean algorithm to determine how to best allocate a variable number of beats within a bar of arbitrary size. This relationship has only recently come to light, as detailed in this brilliant paper.
Each oscillator has an associated 4-step sequencer, where each step can alter either or both the primary oscillator frequency and the sub-oscillator divisor, thus producing both a melody and a bass line. Progression through the steps is by selected aspects of the rhythm — specifically, a beat from any one of the three available meters, or an offbeat.
Since the sequencers are independent, different rhythms will produce interweaving melodies that develop over the full range of the polymeter.
Additionally, drum sounds may be overlaid, where a different percussion instrument is optionally associated with the beats from the three meters and the offbeats.
Other aspects of sound production are via standard subtractive synthesis — with an AD envelope, a low-pass resonant filter, an LFO, and some effects. MIDI integration makes for even richer musical expression by allowing keyboard interaction to transpose the sequences or play one of the oscillators manually while the other is driven by its sequencer.
Parts
- Teensy 4.0
- Teensy Audio Adapter Board
- Adafruit 1.8" Color TFT LCD display
- SparkFun Multiplexer Breakout - 8 Channel (74HC4051)
- I/O Expander IC (MCP23017)
- Custom PCB - Note the GitHub Repo Link
- An Optoisolator
- Here's a link to the Full Bill of Materials
The Euclidean uses a Teensy 4.0, the Teensy Audio Shield with an associated library, an Adafruit 1.8” TFT LCD, a DeMux breakout (74HC4067) with port expanders (MCP23017), various LED switches plus encoders and potentiometers, with a variety of other standard components. The PCB was manufactured by JLCPCB, and the panel is just another PCB made with a white solder mask.
Assembly
The EUCLIDEAN is comprised of 2 boards — an upper board with the pots, encoders, switches, and their associated chips (MCP23017s for the switches and encoders, and a CD74HC4067 for the pots), and a lower board with the Teensy 4.0, the Teensy Audio Shield, plus the MIDI I/O and power circuits. The two boards are connected by a standard 20-pin cable with 2x10 headers.
Although the boards can simply be stacked vertically, they are designed to fit the Pactec PT-8 enclosure.
Two additional boards function purely as panels — a top panel for the controls and a rear panel for the connections.
- Upper layout and schematic

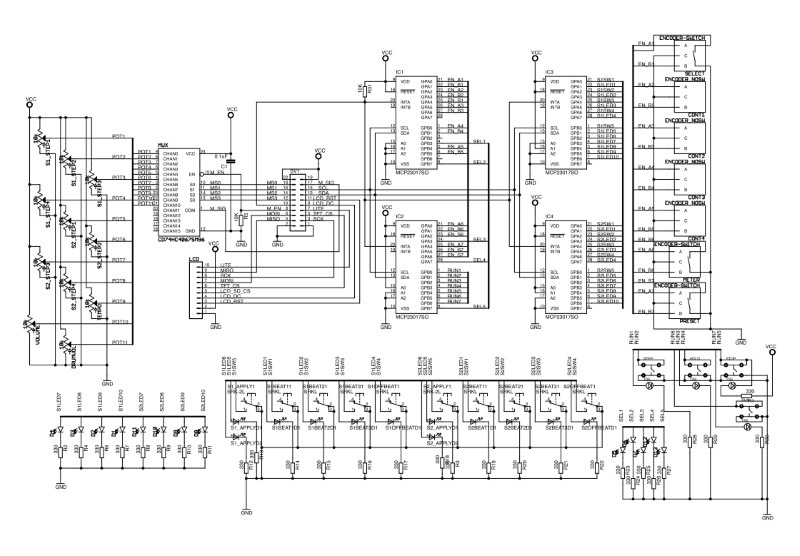
- Lower layout and schematic


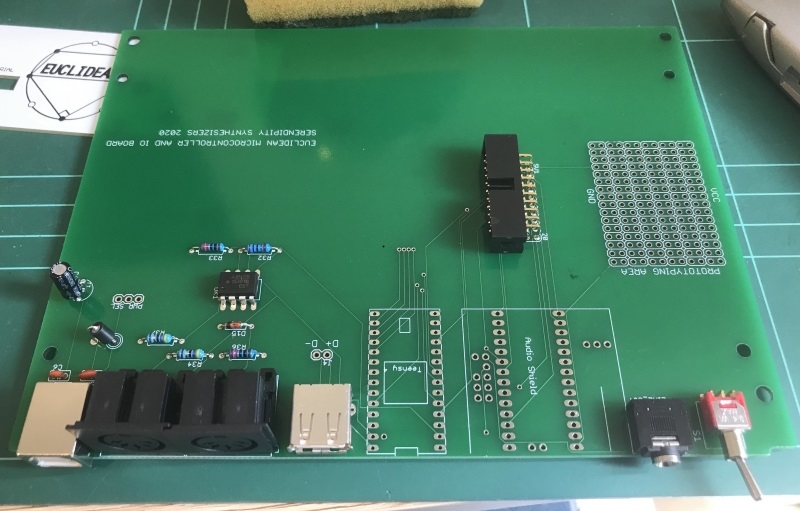
Building the Lower Board
Follow these steps to construct the EUCLIDEAN lower (microcontroller, audio, and I/O) board.
At each stage, carefully check continuity according to the schematic, orientation of components, and ensure there are no short circuits.
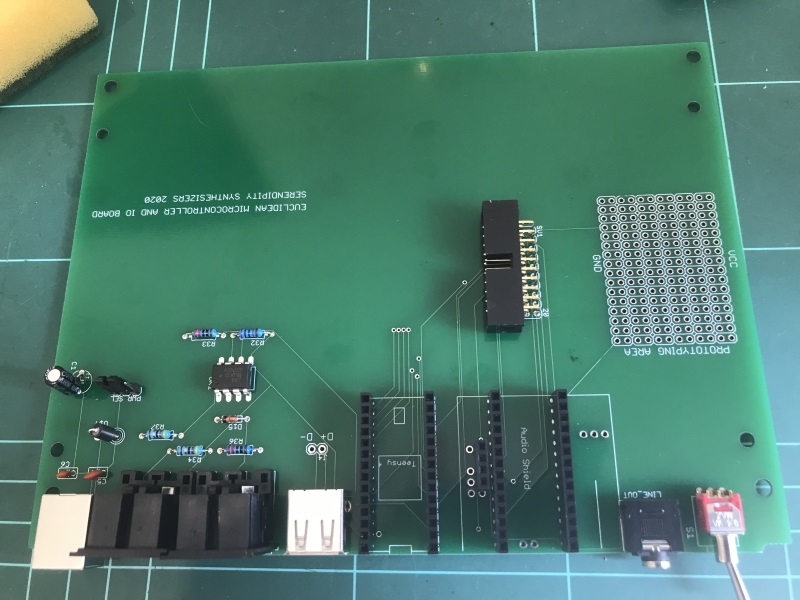
Step 1: Solder the pin headers to the Teensy and Audio Shield as follows in the image below to ensure proper alignment with the rear panel holes when placed in the sockets
Step 2: Solder the resistors and diodes first
Step 3: Solder the other low-profile components next
Step 4: Solder the capacitors and ferrite-bead for the power input circuit
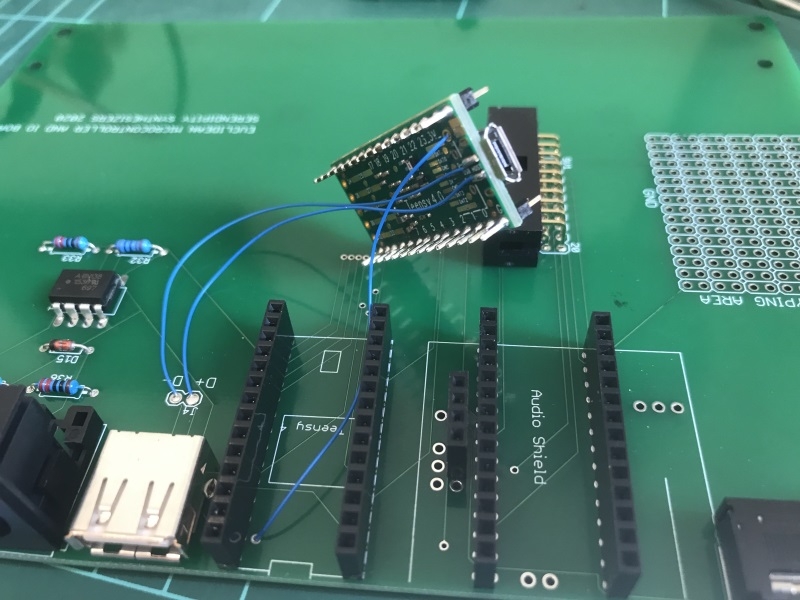
Step 5: Then solder the MIDI, USB, and interconnect sockets
Step 6: Solder the sockets for the Teensy and Teensy Audio Shield, taking care to keep them vertical. Also, the power select header to choose between power from the dedicated USB power input (best when complete because you can provide enough current to drive a MIDI controller from the USB MIDI port), or the Teensy USB input (more convenient if regularly re-programming the Teensy)
Step 7: Cut between the pads as shown to disconnect the USB voltage and the Teensy voltage input

Step 8: Then solder wires to connect the USB host pads and the USB voltage
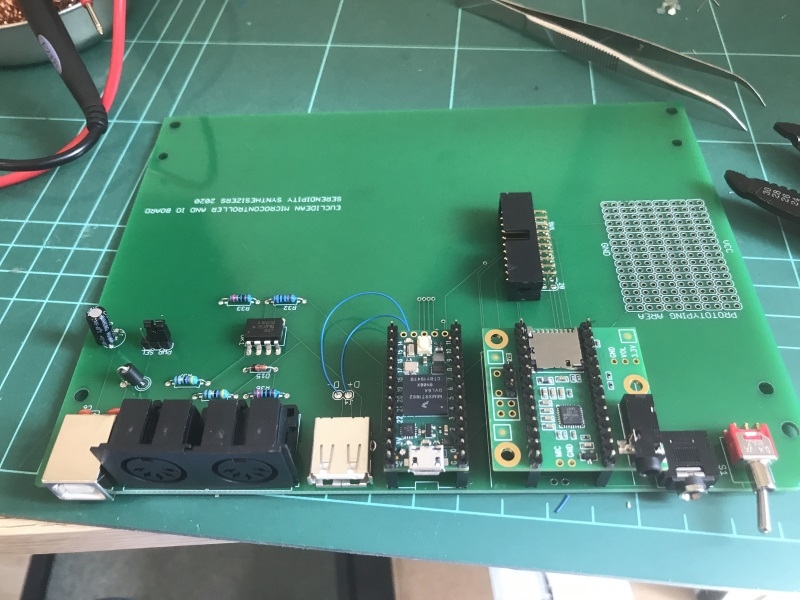
Step 9: Place the Teensy and Teensy Audio Shield into their sockets to complete the lower board. The prototyping area provides a line of ground holes, a line of 3.3V holes, and multiple other 2.54mm holes, and could be particularly useful for providing additional controls connected to the extra pins on a Teensy 4.1
Building the Upper Board
Follow these steps to construct The EUCLIDEAN upper (controller) board.
Step 1: Solder the PB86 switches — take care with the LED polarity (the ground pin is on the right-hand side for all diodes except the two LED switches where the inner two pins are ground)
Step 2: Solder the switches and rotary controls, using the panel to ensure that the diode height is correct
Step 3: Solder the interconnect socket and the diodes, using the lower panel to ensure the diode height is correct
Step 4: Solder the LCD pins, add spacers to adjust the height, check alignment and all diode heights. Check all rotary controls turn easily and widen holes if necessary (Optionally add a bypass capacitor to the MUX)
Step 5: Secure the top panel and upper board to the enclosure and add the knobs, Secure the rear panel and lower board to the enclosure
Step 6: Add the connecting cable, then complete the enclosure
Operation
The Euclidean features two independent primary oscillators supporting various waveshapes, each associated with a sub-oscillator with a frequency determined by dividing the primary frequency by an integer from 2 to 16. It can perform frequency modulation, pulse width modulation, and quantization.
The Euclidean uses an AD (attack-decay) envelope, can perform LFO (low-frequency oscillation) with multiple waveshapes, has a resonant low-pass filter with (positive and negative) envelope and LFO modulation, includes Chorus, Flanger, Delay effects, three independent "Euclidean Rhythm" generators, two independent 4-note sequencers with each driving one of the oscillators and various combinations of rhythm events.
There are +/-24 semitone steps for each sequencer. The Euclidean also supports MIDI and Serial integration.
Demo of presets
Making a patch
MIDI keyboard integration
The Specifications
- Two unison primary voices (detunable - light, medium, heavy)
- Waveshapes: Sine, Triangle, Square, Sawtooth, Variable Width Pulse (Triangle, Square, and Sawtooth waves are bandwidth limited for anti-aliasing)
- There are two unison sub-voices that have their frequency determined by dividing the primary frequency by an integer from 2 to 16
- Sub-oscillator waveshapes: Sine, Triangle, Square, Sawtooth
- Independent level control of each oscillator (and toggle to mute)
- Optionally quantize the frequency to any: 12-note chromatic scale, 8-note diatonic major or minor scale, 5-note pentatonic major or minor scale, 8-note just intonation major or minor scale, 8-note Pythagorean major or minor scale.
- Transposable +/- 24 semitones via a panel control, or arbitrarily via a MIDI keyboard.
- Optionally modulate any: oscillator frequency, pulse width, filter cut-off, within the waveshapes, Sine, Triangle, Square, Sawtooth, Reverse Sawtooth, Sample and Hold
- Low-pass resonant filter
- Adjustable cut-off frequency
- Adjustable resonance
- Positive and negative adjustable envelope response
- There are three independent AD envelopes, one for both oscillator groups, and one for the filter all with common settings
- When being played manually, the envelope becomes ASR (Advanced Sampling Recorder)
- Effect presets (slow/medium/fast) Chorus, Flanger, Delay, Chorus with Delay, Rhythm
- Three independent "Euclidean Rhythm" generators, set the number of main beats, and the bar length for each (maximum bar length is 32, tempo ranges from 30bpm to 1200bpm)
- Sequencers
- Two independent 4-note sequencers
- Specify offset for each step from -24 to +24 semitones
- Apply to main frequency, sub-frequency divisor, or both (when applied to the sub-frequency divider, the offset is divided by 3, i.e., from -8 to +8)
- Sequencer 1 drives oscillator 1, and sequencer 2 drives oscillator 2
- The sequencers can be set to progress on a beat from any of the 3 rhythms, offbeats, or both.
- The sequencer play mode has three states:
- Run: Progress as specified according to the rhythm
- Hold: Play and hold a single step, useful for individual oscillator tuning
- Pause: Repeat the current step until pressed again, useful for joint oscillator tuning
- Presets
- Up to 64 unique presets can be saved on an SD card
- MIDI
- If any sequencer is inactive (either because stopped or not set to advance) then the corresponding oscillator (and sub-oscillator) will play according to an incoming MIDI note.
- If both sequencers are active, played MIDI notes transpose the sequences.
- COMING SOON: incoming/outgoing MIDI clock
- Serial connection
- A serial connection allows some control from a computer
- Presets can be queried and restored from backup using serial commands
Links
- Full bill of materials required
- GitHub Repository
- My Website
- The Euclidean build guide
- Using the Arduino IDE to program a Teensy
- More Synth Tutorials by Ken
Want to learn more about synthesizers and terminology? Check out this tutorial from Andertons Want to learn more about my synthesizer? Check out my website
Here's a link to the current repository. Please email Core Electronics if you have any requests.
This is still very much a work in progress, but I'm really happy having reached a milestone where it is so usable and fun!
Ken :-)

