The idea for this project came when a friend of mine flew over from Western Australia to visit, and during his stopover in Adelaide, he did what any adult would do; visit the airport novelty store and buy some random stuff. It was pretty much all junk, except for this big green dome button which played a different, comic voice saying ‘YES’ every time you pressed it. Simple, but, it entertained us on the drive from Sydney Airport to Newcastle.
Being a maker, I immediately thought of how cool it would be if you could load your own sounds onto it, and make it a little louder too. So, the next day, I grabbed a big dome button along with some other bits and pieces and started making my own Dome Sound FX Button.
Components Used
It’s a fairly adaptable project, so you can use parts that you may have lying around, however, I used:
- Adafruit Audio FX Board Mini 2MB
- Mono 2.5W Amplifier
- 3W 4Ohm Speaker
- AA Battery Pack (you can use one with a switch, or use a separate switch like I did)
- Slide Switch
- Big Red Dome Pushbutton
Modify Button and Speaker
The first issue I ran into was how to fit the speaker into the button. Because of the trigger mechanism, the dome button extends a far way underneath the dome. I had planned to mount the speaker facing downwards, with some standoffs to lift it off the ground, but doing this would have made the button at least 150mm tall, which isn’t ideal. So, I pulled the whole button apart to work out how best to mount the speaker.
I noticed that the speaker was almost the same diameter as the transparent, Red dome, so I trimmed away the excess metal bracket from the speaker, and as luck would have it, it clipped into place perfectly.
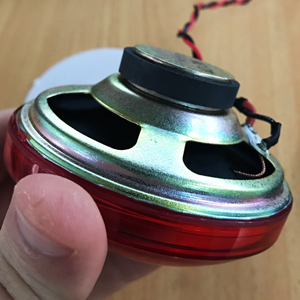
After cutting the clip which holds the switch in place, and epoxying it to the rear of the speaker, the speaker now acted as the trigger mechanism.

Attaching the top of the dome to it made for the perfect button top, with the sound coming out from the dome. The only thing required was to carefully drill some holes in the dome to allow sound to properly vent out.

Wire and Test Boards
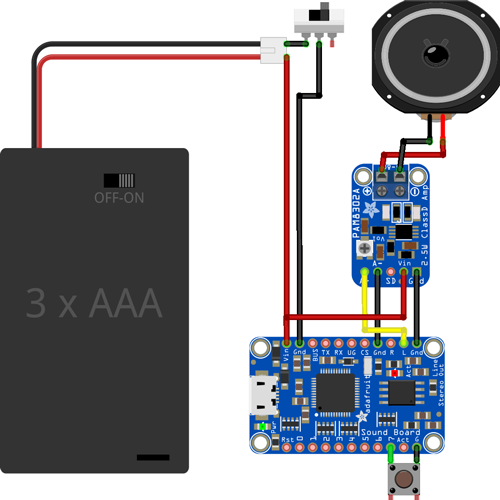
Whilst it may seem like I’m working backwards, I wanted to work out how to fit anything together before I started on the wiring. The Adafruit Sound Board had all of the features I wanted in it, including the ability to sequence files from a single trigger channel which is the goal. It doesn’t have a built-in amplifier, so the 2.5W mono amp (also from Adafruit) was a perfect choice. I used USB power for testing, so power to the amp board had to tap from the ‘BUS’ pad, but once a battery box was wired in, it got soldered to the ‘Vin’ pin.
The connections required for the entire circuit are shown below:
Design and Print Collar
This part was mostly for aesthetic value. Whilst it would have been functional without it, the giant gap left by adding the speaker underneath the dome didn’t look great, and also left it a bit unstable. The easy solution was to design and print a collar to ensure that everything was securely held in place, and also fill the empty space. It actually took a couple of prints to get the dimensions 100% right, due to the tolerances that had to be factored in. But on the 3rd iteration, I got it exactly right. The print file is attached at the bottom if you wish to use it in your own project.

The speaker and dome were clipped together and then epoxied to the collar to create the complete top mechanism.
Re-wire and Assemble
Having proven everything worked, I cleaned up the wiring, using solid-core wire to hold the amplifier board in place to the Sound FX board, and then used some standoffs to secure the Sound FX board to the button.

I glued the battery pack to the underside of the housing and then wired up the power switch to it, which was deliberately left floating, so I could mount it to the final bottom enclosure.
Record sound packs
One thing I wanted to do as part of the project was record a sound pack of the various phrases and sayings that are often thrown around in the Core Electronics warehouse. If you’ve wondered what it’s like to work at Core, just download the sample pack, and find out for yourself! You can grab these sounds from the project download folder. Simply add the audio files into the Sound FX Board folder and you're good to go.
The initial recordings are a little rough, so I'll be updating them and hopefully adding some cool new sound packs at some point. You can also create your own by following the naming conventions that Adafruit mentions here.
Design Housing
Once everything was secured to the button and working as intended, all that was left to do was design and print a case for the bottom half of the switch to make it a complete project. A hole for a toggle power switch was added to help conserve the battery life of the project, even when nothing is playing.

Finished!
All that was left was to mount the button and finalise all of the wiring, and on the cap went! I pushed the dimensions of the battery box a little too much, which meant the button was pressing up against it. I drilled out new notches for the enclosure to lock into, and it solved the problem (too much hassle to reprint when two drill holes can fix it).

You can see the USB port is still available for loading new sounds up, which is pretty important. And here it is, all finished. It's a pretty simple, but fun project. Whilst it looks basic as a finished project, there was a lot of cutting, modifying, and messing with the original dome button and speaker to get everything to sit nicely and look neat/compact.


