Serial communication is the process of communicating between electronic devices one bit at a time. Serial means one after the other, so we think of serial communications as transferring data one bit at a time, one bit after the other. A bit is either a Zero or One and a byte is a collection of 8 bits.

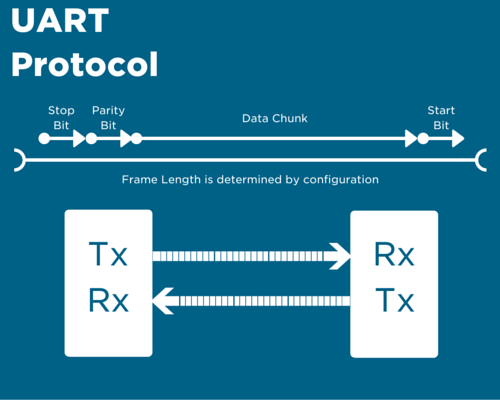
We have used a synchronous method of data transfer in our SPI tutorial. Now we are looking at the UART which is a piece of hardware that takes away the clock and sends the data at a preset speed. This process requires extra data to be sent in lieu of the reliability that a clock provides. The extra data we send are all mechanisms to ensure error-free data transfers, and they are:
- Data Bits - This is the actual information we send, can be 5-9 bits long.
- Synchronization bits - These are the start and stop bits transferred with each chunk of data. They let the receiver know that data is coming and when it has finished transmitting.
- Parity Bits - Parity bits are determined using odd or even logic after adding each 1 from the data chunk. It is a method of error checking that slows your data transfer and you will need a method to resend incorrect data.
- Baud Rate - The baud rate is the speed at which both devices agree to send and receive data at. Think of this as a clock signal that you sent and forget. It is measured in bits per second.
When connecting devices using UARTs the Transfer pin of one device will connect to the Receive pin of the other and vice versa. This is pretty logical when you think about it. We are going to use the USB port on our Arduino to communicate with the Serial Monitor within the Arduino IDE.
Serial functions with the Arduino Uno
If you haven’t already done so, grab one of our kits and plug your Arduino into your PC. That's all you need to get going with this tutorial!
Much alike the SPI tutorial, we can use a built-in library to program our Arduino's serial functions. These functions are available without specifically including the library in the opening of your sketch.
The first tool we will be using is the Serial.begin(BAUD RATE VALUE). Remembering that the Baud Rate is a measurement of data transferred over time, bps in particular (bits per second). We can use any value for baud rate in this example as we are going to configure both devices. I'm going to use the value of 9600 here because it's a standard value.
That command initializes our serial communications, now we want to do 2 more things:
1. Listen for any data being transferred from the Arduino
2. Print that data inside our Serial Monitor.
The Code
//define our incoming data as an integer
//this will correspond to a ASCII value
int incomingdata = 0;

void setup() {
  //Start serial communications using baud rate of 9600
  Serial.begin(9600);
}
void loop() {
  //Only write data to serial monitor if data is received
  if (Serial.available() > 0)
  {
    //assign the value being read over serial to the incomingdata variable
    incomingdata = Serial.read();
    //Print the value you entered back to the screen, char()
    //enables you to print the character not the ASCII value
    //stored for the entered value
    Serial.print(char(incomingdata));
  }

}
Verify your code, upload it to your board and wait until it is complete.
Then click the Serial Monitor button in the top right of your Arduino IDE.
You will have a text box at the top of the screen with a send button at the end of the line, then a big white space with nothing in it.
Type something into the text box and your Arduino should say it back to you, that's what we call an Echo, the computer is outputting what you input.
Congratulations, you now have a basic understanding of how we send data to and fro with Arduino!


