This is going to be easier than you thought (or at least much easier than I thought)! Today we will create a Raspberry Pi 4 Model B UPS PiJuice System that will be completely powered by a Solar Panel. It's coming up to winter over here so I thought what better time to try to get this to happen before it completely sets in. We're going green here at Core!
So this guide will teach you exactly how to utilise solar panels on your next Raspberry Pi project to go portable and renewable. With the right solar panel, weather and battery you can create a project that will never stop running. But it is important to manage expectations when using solar panels. A couple of rainy days can throw your remote project into disarray and Raspberry Pis are power-hungry devices. This guide will be using a Raspberry Pi 4 Model B but keep in mind for remote projects where the extra processing power is not required (like a DIY Wildlife Camera project) would work better with a less power-hungry board like a Raspberry Pi Zero.
Below is the contents of the guide
- What You Will Need
- Connecting PiJuice HAT and PiJuice Solar Panels to Raspberry Pi 4 Model B
- Best PiJuice Settings for Solar Power and Utilising Different Battery Profiles
- What Battery Should I Use
- What Size Solar Panel Should I Use
If you happen to be holding a Raspberry Pi board and not quite sure what it is? Then check out this guide Raspberry Pi Generations to identify it. Every Raspberry Pi Board can be powered by the Sun, you just need to find the right one for your project. Here is a number of potential Solar Panels that can be used with Raspberry Pi Boards. One of the swell aspects of the PiJuice HAT is that it can easily work with different battery types (the PiJuice Solar Panels supports both Li-Ion or Li-Po batteries) and sizes. Linked here is information on how big of a battery you should use depending on your Raspberry Pi, what it is doing and the amount of time you require for it to function. Also here are two fantastic guides, one will get you up to speed on the terminology of Li-Po Batteries and another will teach you how best to conserve battery life when building IoT projects. Here is a more advanced guide on how to save power on your Raspberry Pi by disabling features.
As always if you have any questions, queries or things to add please let us know your thoughts!
What You Will Need
This has to be the simplest way to get up and running with a solar-powered system and a Raspberry Pi. Below is a list of what you will need.
- Raspberry Pi 4 Model B: Worth noting PiJuice HAT and Solar Panels will work heaps of other Raspberry Boards as well.
- PiJuice UPS HAT With Included Nylon Screws
- SD Card with Raspberry Pi OS
- PiJuice Solar Panel: I have decided to hook up the largest one available which can provide 40 Watts of energy. Keep in mind a Raspberry Pi 4 Model B pulls 3.4 Watts at Idle, so on a sunny day, this is overkill.
- LiPo or Li-Ion Battery: For this, I use the 1820mAh battery that comes attached with the PiJuice HAT, however, you can attach many different batteries, click here or scroll down the page for a list of potential batteries. This means you can incorporate a very large battery into your system for example utilising a 12000mAh battery which will run an idling Raspberry Pi Zero for ~67 Hours.

Only required for PiJuice settings such as safe shut-down at certain power or if a different battery is used creating a new battery profile.
- Micro-HDMI to HDMI Cord and Monitor
- Power Supply Via USB-C
- Keyboard and Mouse
Connecting PiJuice Hat and PiJuice Solar Panels to Raspberry Pi 4 Model B
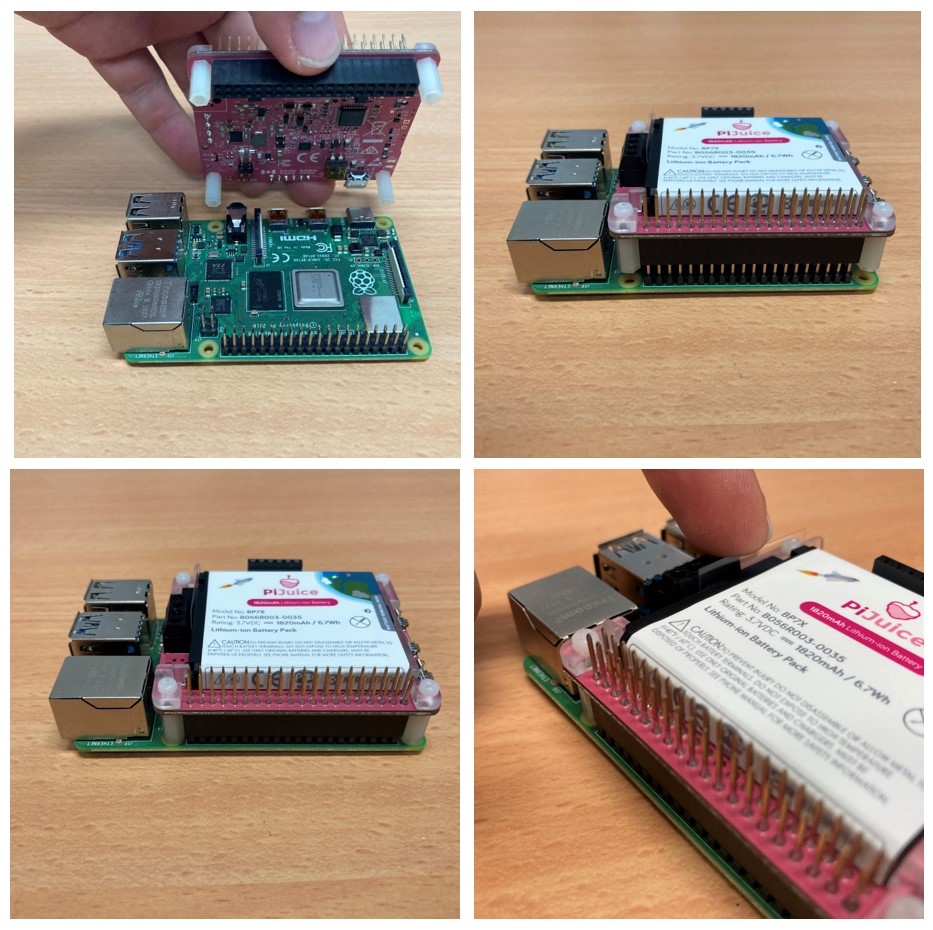
The first part of this process will seem very familiar to the UPS Raspberry Pi with PiJuice HAT guide as we will be installing the PiJuice HAT in the same manner. Make sure to line all the GPIO Pins up correctly and press the two boards together. The stand-offs come pre-assembled with the PiJuice the only thing to watch for is to take out the tiny slip of plastic separating the battery from the connectors and to also to use the four nylon screws supplied for the bottom of the board. See below for an image demonstrating this process and pointing out the tiny slip of plastic that you should remove.
Now we will connect the Solar Panels to the Raspberry Pi. This is so easy it blows my mind. Literally, we are going to take the Micro-USB side and plug it directly into the power management board (the PiJuice HAT) and the USB side directly into the PiJuice Solar Panel. If you are using a different solar panel there may be different connectors and systems required to hook up the Raspberry Pi to the Solar Panel. A great reference point to check out what connector you have can be found here and a very cool guide on using Solar LiPo Chargers and how Solar Panels work found here. But that all seems too complicated when the Brits have taken the time to make it so easy for us with this PiJuice System. See below for the system all hooked up and ready to go.


Once this is done you have succeeded in creating your Solar Powered Raspberry Pi 4 Model B Board. It is that easy! No faffing around with extra componentry. So slide in that micro-SD card with Raspberry Pi OS (link here to a tutorial on how to flash a Micro-SD with Raspberry Pi OS) and then press the button indicated in the picture below. So if you put the solar panel in the sun right now and keep the system on it will go right ahead and function as it should. The sun will literally start charging the battery and the PiJuice will power the Raspberry Pi. Astonishing.

Also, this won't be explored deeply in this tutorial but for those who will and want to know the process of physically connecting a new battery to the PiJuice system the best guide to learning exactly how to do this can be found here. Keep in mind you will also need to adjust the PiJuice Settings by altering the battery profile so the system is aware of this different battery and optimised appropriately. Below you can see a different battery connected to the PiJuice system (note that you must remove the default 1820mAh battery to do this).

Best PiJuice Settings for Solar Power and Utilising Different Battery Profiles
Now that we have connected all the components we will alter some settings of the PiJuice HAT so that we can get the best out of our Solar Powered System. As it stands right now the system will continue until it runs out of electricity. This puts the micro-SD card at risk of being corrupted as the system is not shutting down safely so let us add a safeguard using the inbuilt PiJuice settings.
The easiest way to get started is by plugging in a mouse, keyboard and monitor. Then turning the system on you will be welcomed by that familiar Raspberry Pi OS background. Now we can install the PiJuice Settings (if you haven't already) to Raspberry Pi OS. For a really in-depth step-by-step process of Installing PiJuice Software to Raspberry Pi OS check out this guide. The gist of it is to power up your Raspberry Pi like normal with it connected to a monitor, open up Raspberry Pi OS, connect the system to the internet, click on the Raspberry Terminal button to open the Console and type the following into the terminal.
sudo apt-get install pijuice-gui
Then once you press enter it will run an installer that will take less than 5 minutes to complete. Then once you safely restart the system you will be able to find the PiJuice settings in two separate locations as you can see below.

Clicking on one of these buttons to open up the PiJuice Settings Menu lets now set it up to switch off automatically once it gets to 10% power. This we can do in the System Task Tab, see the image below, by ticking the Minimum charge and then typing in 10 as the Threshold amount.

So if your devices ever goes underneath 10% of charge the system will turn itself off automatically. So if there is a day or two without sun or for whatever reason the Raspberry Pi will be able to shut down safely remotely. But say there was a sunny day and we wanted to have the system come back alive (for instance if this was a remotely set up birdwatching camera that we would only check on once a month) then we can incorporate a wakeup on charge. This is done in a similar manner by selecting the tick on the Wakeup on charge setting and then adding a trigger level, lets say for this at 90% it will turn itself back on. Then making sure to click Apply these settings are now locked in. Brilliant.
Also if you have installed a different battery take the time to change the battery profile so that you can have optimal functionality. This can be done in the PiJuice HAT Configuration Window and then navigating to the Battery Tab which you can see below.

This is a great guide to follow as it goes through the process of connecting the wires correctly and changing the battery profile which can be found in the PiJuice Settings. The following lithium polymer batteries sizes all have profiles already set up for PiJuice however you can easily create custom profiles to suit different battery sizes.
- 12000mAh
- 5000mAh
- 1200mAh
- 1000mAh (Pi Zero)
- 600mAh
- 500mAh
We recommend this or one of the other batteries as seen below for the Pijuice.
Or for a smaller Pijuice Zero battery see below.
What Size Battery Should I Use
Now it can quickly become complicated figuring out what the best battery solution is for you. The best easy and most readily understood resource that I have found is the Official PiJuice Battery Discharge Time Calculator. This will hugely help you decide what battery to use depending on your Raspberry Pi, what it is doing and the amount of time you require for it to function. Also of very high value is this guide which delves into the terminology of these batteries so you absolutely choose the best LiPo Battery for your next project.

What Size Solar Panel Should I Use
This panel I have attached here is a 40 Watt panel which is definitely overkill on a sunny day as at Idle the Raspberry Pi 4 Model B draws 2.8 - 3.4 Watts. And this is the most hungry of all Raspberry Pi Boards. This fact also means it is not the best choice for small, battery-powered, portable applications. Therefore unless you really need that extra processing oomph you would be better of using a Raspberry Pi Zero for portable low-power applications. Definitely worth checking out are two fantastic guides, this one will teach you how best to conserve battery life when building IoT projects and this is a more advanced guide on how to save power on your Raspberry Pi Microprocessors by disabling features.
Lets see how much solar power over a day is needed to keep ahead of the power draw by doing some quick maths. We know that this Raspberry Pi 4 Model B going is drawing 3.4 Watts when it runs in idle so we need that consistent 3.4 Watts output if we had 24 hours of clear sunlight. Let us assume we only get 6 hours of strong sunlight, thus the panel will need to put out 4 times as much power to the battery during those 6 hours of sunlight. So the power required to be generated by the solar panel and given to the Battery is 3.4 Watts x 4 = 13.6 Watts. This big PiJuice Solar Panel has the theoretical capacity to produce 40 Watts of power so even if we only get half of that we will still be above the 13.6 Watt budget needed to keep ahead of the power draw. Sweet. This is the kind of napkin engineering that keeps the world spinning and is always excellent to do for a sanity check.
To simplify the maths further:
The energy we require = 3.4 Watts * 24 Hours of Running Time = 82 W⋅h
We have 6 Hours to harvest energy
Therefore Energy we can obtain = 40 Watts (Capacity of PiJuice Solar Panel) * 6 Hours of Sunlight = 240 W⋅h
Thus this Solar Panel goes above and beyond our needs (almost 3 times the amount required)
It is important to know that solar panels will work on cloudy days but will be less efficient than their max value and if they are not pointed directly at the sun they will decrease their efficiency further. PiJuice offers four different types of solar panels that retain the ease of use and only differ in Watt power, see below for a list of the available ones and an image of the PiJuice 22 Watt Solar Panel.


