A radio transceiver is a device that can both transmit and receive radio signals, making it the perfect tool for communication on the go and remote projects! The PiicoDev Transceiver™ is a 915MHz radio that can send short messages up to 100m. What you do with those messages is up to you! Perhaps you're interested in collecting data from a remote weather station or controlling a distant piece of hardware.
Contents
- Hardware
- Setup Thonny
- Allow multiple instances of Thonny
- Download/Install PiicoDev Modules
- Transmit and Receive
- Groups and Addresses
- Multiple Transceivers on the same PiicoDev Bus
- Maximising Performance
- Conclusion
- Resources
- Project Ideas
This guide will walk through connecting a PiicoDev Transceiver to a dev. board and sending/receiving simple messages. We'll transmit some data and decide what to do with it on the other end to control some real hardware. To begin, select your dev. board below.
Hardware
We have a couple of options with how to set up the hardware for this guide.
- Option 1: Two of the same dev. board: This is perhaps the simplest approach. Select your dev board below and assemble two Transceivers. The programming setup will be the same for both dev. boards.
- Option 2: Two different dev. boards: This is a great way to demonstrate how the PiicoDev Transceiver makes it easy to send data between different dev boards. It's also a good option if you're working with a Raspberry Pi, as these require a lot of hardware to setup. Having a second, simpler dev. board can simplify the hardware setup.
- Option 3: One dev.board connected to two Transceivers: Great for when you only want to experiment on one dev. board. Check further down this guide for the Multiple Transceivers on the Same PiicoDev Bus section. The other examples in this guide can be used on a single dev. board too - they'll just require a little rework to combine Transmitter/Receiver code into the same script.
To set up a Raspberry Pi Pico you will need:
- A Raspberry Pi Pico (with Soldered Headers) or Pico W (with Soldered Headers)
- A PiicoDev Transceiver
- A PiicoDev Expansion Board for Raspberry Pi Pico
- A PiicoDev Cable
- (Optional) A PiicoDev Platform will keep everything mounted securely.
Plug your Pico into the expansion board. Make sure it is plugged in the correct orientation - Pin 0 on the expansion board should be to the left of the Pico's USB connector.
Connect your Transceiver to the expansion board with a PiicoDev Cable.

To setup a Raspberry Pi with a Transceiver you'll need:
- A Raspberry Pi single board computer (Pictured: Raspberry Pi 4 Model B)
- A PiicoDev Transceiver
- A PiicoDev Adapter for Raspberry Pi
- A PiicoDev Cable (100mm or longer is best for Raspberry Pi)
- (Optional) A PiicoDev Platform will keep everything mounted securely.
Mount the Adapter onto your Pi's GPIO. Make sure it is plugged in the correct orientation - An arrow on the Adapter will point to the Pi's Ethernet connector (on a Pi 3 the Ethernet connector and USB ports are swapped.)
Connect your Transceiver to the Adapter with a PiicoDev Cable.

To set up a micro:bit with a Transceiver you'll need:
- A micro:bit v2
- A PiicoDev Transceiver
- A PiicoDev Adapter for micro:bit
- A PiicoDev Cable
- (Optional) A PiicoDev Platform will keep everything mounted securely.
Plug your micro:bit into the Adapter, making sure the buttons on the micro:bit are facing up.
Connect your Transceiver to the Adapter with a PiicoDev Cable.

Make sure all the ID switches on your Transceiver(s) are OFF before applying power.
![]()
Setup Thonny
Select your dev board from the tabs above to get ready for programming with Thonny for the first time.
If you have already programmed with PiicoDev modules before, there's probably no need to follow these steps again.
Let's get set up with scripting in Thonny for the Raspberry Pi Pico.
We'll install Thonny, configure for Pico and write our first script. To follow along you'll need:
Install Thonny
If you're working on a Raspberry Pi 4, you're in luck - Thonny comes pre-installed. For those on another operating system, download Thonny here and run the installer.
Once the installer finishes, run Thonny.
Set up Thonny
Hold the BOOTSEL button on your Pico, and connect your Pico to your computer via USB.
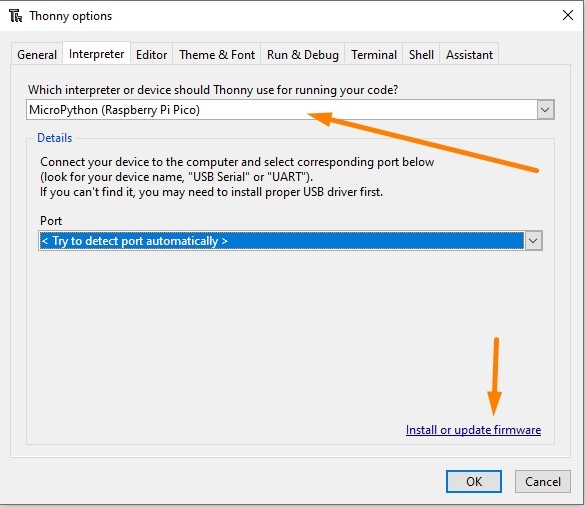
Go to Run > Select interpreter and choose MicroPython (Raspberry Pi Pico).
It's also a good idea to install or update firmware. This will update your Pico with the latest version of MicroPython, or install MicroPython if it wasn't already.
REPL interface (Shell)
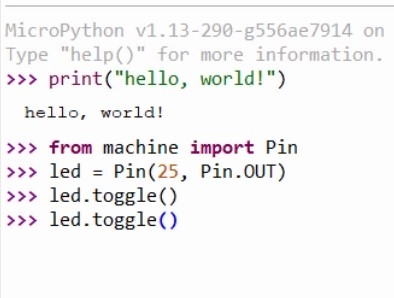
We can immediately start executing code in the REPL - Enter this code in the shell tab: print("Hello, World!")
The command will be sent to your Pico, which will execute the command and display back the message.
We can also take control of the on-board LED by executing the following code:
from machine import Pin
led = Pin(25, Pin.OUT)
led.toggle()
This code will toggle the LED. If you keep executing led.toggle() the LED will keep changing state.

Writing a Script
Create a new script with File > New and paste in the following code:
from machine import Pin
from time import sleep
led = Pin(25, Pin.OUT)
n = 0;
while True:
    led.toggle()
    print("13 x {} = {}".format(n, 13*n)) # print the thirteen-times table
    n = n + 1
    sleep(0.5)
Save the script - you will be prompted to save to your computer OR the pico. Select save to Pico and name the file main.py
Return to the REPL and press Ctrl+D (or use the Stop/Restart button) to restart your Pico. The LED should flash at a steady rate and the shell should begin printing multiples of thirteen.

Installing a Package
Packages are reusable pieces of code that another programmer has written for a common task, such as interfacing with a specific piece of hardware. Thonny has support for installing micropython packages from the Python Package Index - aka 'PyPI' directly onto the Raspberry Pi Pico.
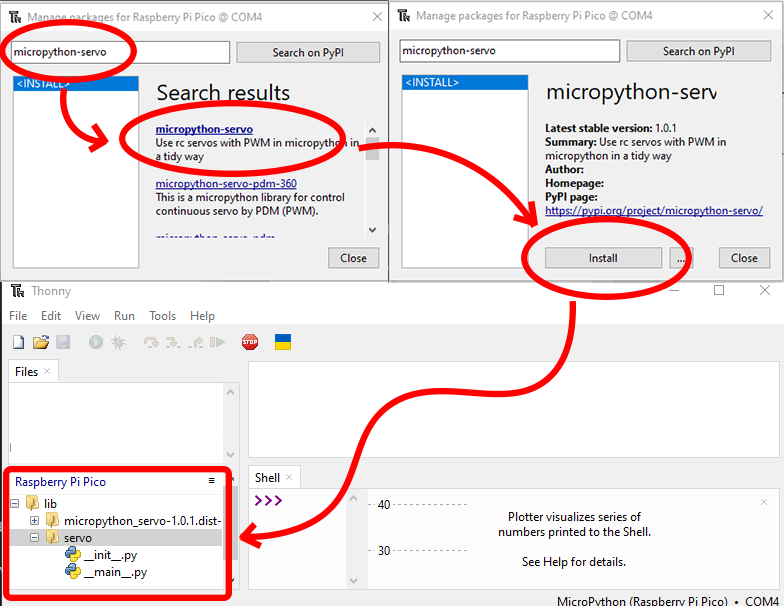
To install a package, ensure the Pico is plugged in and go to Tools > Manage Packages, which will show the Manage Packages dialog.
Enter the name of the package you would like to install into the search bar and click 'Search on PyPI'.
In the search results list, click the title of the package you would like to install. A title that's in bold simply indicates a direct search match on the text you entered in the search bar.
The Manage Packages dialog will show an overview of the package you have clicked. Click Install to install the package on your Pico.
You can confirm the package has been installed by checking the 'Raspberry Pi Pico' section of the File View in Thonny. The view should show a new folder named 'lib', and inside this folder will be one or more folders containing the metadata and source code of the library you just installed.
Conclusion
We've installed Thonny and uploaded scripts to our Raspberry Pi Pico - if you have any questions feel free to start the conversation below, or open a topic in our forums - we're full time makers and happy to help!
Good news! Thonny comes pre-installed with Raspberry Pi OS. However, to work with PiicoDev we need to enable I2C communications as follows:
- Power on your Raspberry Pi.
- Open the Preferences > Raspberry Pi Configuration, select the Interfaces tab
- Ensure I2C is Enabled
You only need to do this step for your first PiicoDev project - from here on you probably won't have to repeat this step when using PiicoDev hardware.

Let's get set up with scripting in Thonny for the Micro:bit. We'll install Thonny, configure for Micro:bit, and write our first script.
All you'll need to follow along is a Micro:bit v2 GO kit
Contents
- Install Thonny
- Set up Thonny
- REPL interface
- Writing a Script
- Useful Tips
- Uploading and Downloading Files
Install Thonny
Download Thonny here and run the installer.
Once the installer finishes, run Thonny.
Set up Thonny
Connect your Micro:bit V2 to your computer with the USB cable.

Open Thonny, and in the menu bar find Run > Select interpreter and choose MicroPython (BBC micro:bit)
It's also a good idea to install or update firmware. This will update your micro:bit with the latest version of MicroPython, or install MicroPython if it wasn't already.

Make sure the Files pane and Plotter are visible by selecting them in View > Files, and View > Plotter.
REPL interface (Shell)
Click the red STOP button to restart the MicroPython on your micro:bit if necessary. The Shell tab should display a block of text that indicates MicroPython is running:

We can immediately start executing code in the REPL - Enter this code in the shell tab: print("Hello, World!")
The command will be sent to your micro:bit, which will execute the command and display back the message - nice!
Next, we can also take control of the on-board speaker by executing the following code:
from microbit import *
import audio
audio.play(Sound.HAPPY)
This code will play a happy tone from the micro:bit's speaker! If you the LED. If you keep executing audio.play(Sound.HAPPY), the tone will repeat.

Writing a Script
The REPL is great for test-driving some new commands and performing short experiments - the real power is in scripting though.
Create a new script with File > New and paste in the following code:
from microbit import *
import audio

print("Hello!")

multiple = 1 # initialise the counter

while True:
    if button_a.was_pressed(): # get the next multiple of the thirteen
        result = multiple * 13 # Calculate the result
        print("13 times " + str(multiple) + " is " + str(result)) # print the multiplication
        multiple = multiple + 1 # increment the multiple

    if button_b.was_pressed(): # Say Hello
        display.show(Image.HAPPY)
        audio.play(Sound.HAPPY)
        display.clear()

    sleep(10) # a 10 millisecond delay
Save the script - you will be prompted to save to your computer OR the micro:bit. Select save to micro:bit and name the file main.py
Return to the REPL and press Ctrl+D to restart your micro:bit. If something went wrong, use the Stop/Restart button, then Ctrl+D.
Now, when we press the A button, the Shell will print the next multiple of 13, or if we press the B-button, our micro:bit gives us a smile and a hello sound.

Notice the plot is also showing some lines, and they're colour-coded to numbers in the print statement! In my case:
- The Blue line is the constant 13,
- The Orange Line is the multiple variable that increases slowly, and
- The Red line is the result variable, which increases really quickly.
Useful Tips
- You can stop a running script by selecting the Shell window and pressing Ctrl+C. This is useful if we want to make changes to the file(s) stored on the micro:bit.
- Reboot your micro:bit (or other MicroPython device) by selecting the Shell window and pressing Ctrl+D
- If something goes wrong, you can always click the red STOP button in the menu bar
Uploading and Downloading Files
We've been working with a file stored directly on the micro:bit - if you'd like to keep a copy on your computer, right-click the main.py file and select the 'download' option. Similarly, you can always upload code to your micro:bit by right-clicking files on your computer and selecting the upload button.

Conclusion
We've installed Thonny and uploaded our first script to our micro:bit. The script includes branches depending on which button is pressed and can generate audio tones and perform basic arithmetic. Now we can write scripts, move them between micro:bit and computer, or test code interactively using the REPL.
If you have any questions feel free to start the conversation below or open a topic in our forums - we're full-time makers and happy to help!
Let's get set up with scripting in Thonny for the Micro:bit. We'll install Thonny, configure for Micro:bit, and write our first script.
All you'll need to follow along is a Micro:bit v2 GO kit
Contents
- Install Thonny
- Set up Thonny
- REPL interface
- Writing a Script
- Useful Tips
- Uploading and Downloading Files
Install Thonny
Download Thonny here and run the installer.
Once the installer finishes, run Thonny.
Set up Thonny
Connect your Micro:bit V2 to your computer with the USB cable.
Open Thonny, and in the menu bar find Run > Select interpreter and choose MicroPython (BBC micro:bit)
It's also a good idea to install or update firmware. This will update your micro:bit with the latest version of MicroPython, or install MicroPython if it wasn't already.
Make sure the Files pane and Plotter are visible by selecting them in View > Files, and View > Plotter.
REPL interface (Shell)
Click the red STOP button to restart the MicroPython on your micro:bit if necessary. The Shell tab should display a block of text that indicates MicroPython is running:
We can immediately start executing code in the REPL - Enter this code in the shell tab: print("Hello, World!")
The command will be sent to your micro:bit, which will execute the command and display back the message - nice!
Next, we can also take control of the on-board speaker by executing the following code:
from microbit import *
import audio
audio.play(Sound.HAPPY)
This code will play a happy tone from the micro:bit's speaker! If you the LED. If you keep executing audio.play(Sound.HAPPY), the tone will repeat.
Writing a Script
The REPL is great for test-driving some new commands and performing short experiments - the real power is in scripting though.
Create a new script with File > New and paste in the following code:
from microbit import *
import audio

print("Hello!")

multiple = 1 # initialise the counter

while True:
    if button_a.was_pressed(): # get the next multiple of the thirteen
        result = multiple * 13 # Calculate the result
        print("13 times " + str(multiple) + " is " + str(result)) # print the multiplication
        multiple = multiple + 1 # increment the multiple

    if button_b.was_pressed(): # Say Hello
        display.show(Image.HAPPY)
        audio.play(Sound.HAPPY)
        display.clear()

    sleep(10) # a 10 millisecond delay
Save the script - you will be prompted to save to your computer OR the micro:bit. Select save to micro:bit and name the file main.py
Return to the REPL and press Ctrl+D to restart your micro:bit. If something went wrong, use the Stop/Restart button, then Ctrl+D.
Now, when we press the A button, the Shell will print the next multiple of 13, or if we press the B-button, our micro:bit gives us a smile and a hello sound.
Notice the plot is also showing some lines, and they're colour-coded to numbers in the print statement! In my case:
- The Blue line is the constant 13,
- The Orange Line is the multiple variable that increases slowly, and
- The Red line is the result variable, which increases really quickly.
Useful Tips
- You can stop a running script by selecting the Shell window and pressing Ctrl+C. This is useful if we want to make changes to the file(s) stored on the micro:bit.
- Reboot your micro:bit (or other MicroPython device) by selecting the Shell window and pressing Ctrl+D
- If something goes wrong, you can always click the red STOP button in the menu bar
Uploading and Downloading Files
We've been working with a file stored directly on the micro:bit - if you'd like to keep a copy on your computer, right-click the main.py file and select the 'download' option. Similarly, you can always upload code to your micro:bit by right-clicking files on your computer and selecting the upload button.
Conclusion
We've installed Thonny and uploaded our first script to our micro:bit. The script includes branches depending on which button is pressed and can generate audio tones and perform basic arithmetic. Now we can write scripts, move them between micro:bit and computer, or test code interactively using the REPL.
If you have any questions feel free to start the conversation below or open a topic in our forums - we're full-time makers and happy to help!
Allow multiple Instances of Thonny
By default you can only have one Thonny instance running at a time. Working with the Transceiver is much easier if we allow multiple instances of Thonny. This way you can open eg. two Thonny windows, and connect each to a different dev. board. In this case, we'll dedicate one window to each the transmitting and receiving dev. board.
- Click Tools > Options...
- Under the General tab, uncheck Allow only single Thonny instance

Download / Install PiicoDev Modules
To work with PiicoDev hardware, we need to download some drivers. The drivers provide all the functions to easily connect and communicate with PiicoDev hardware. Select your dev board from the options above.
We will need these files to work with the PiicoDev Transceiver:
- Save the following files to your preferred coding directory - In this tutorial, we save to My Documents > PiicoDev.
- Download the PiicoDev Unified Library: PiicoDev_Unified.py (right-click, "save link as").
- Download the device module: PiicoDev_Transceiver.py (right-click, "save link as")
- Upload the files to your Pico. This process was covered in the Setup Thonny section.
The PiicoDev Unified Library is responsible for communicating with PiicoDev hardware, and the device module contains functions for driving specific PiicoDev devices.
We will now install/upgrade the PiicoDev python module for Thonny. This module contains all the drivers to work with all current PiicoDev hardware. Even if you have already installed the PiicoDev modules before, it's still worth upgrading to the latest version if one is available.
First, run Thonny by clicking the:
- Pi Start Menu
- Programming
- Thonny IDE

We need to set up a virtual environment to install the PiicoDev module into. This only needs to be done once as Thonny will remember an environment you have already made. If you are unsure if you have already set one up, you can always create a new one by following these steps.
To set up a virtual environment, click on run > configure interpreter, to open up the interpreter tab.

In this window, we can create a new virtual environment in the bottom right. A notification window will first pop up, just click OK.

In this window, we are going to create a new empty folder in our Home Directory which will be the location of our virtual environment. To do so follow these steps:
- Select the Home tab on the left-hand side of the window.
- Click the Create Folder button in the top right.
- Enter the name of the new folder. You can call it what you want, but we will call ours "myenv". Once you have written the name, click Create next to it.
- Click OK in the bottom left.

Thonny will then set up your virtual environment and when it has finished, it will return to the Interpreter tab. Click OK, and you will have successfully set up the environment.
Note: the Python Executable path now points to the environment we just created.
Remember, you only need to do this once as the next time you open Thonny it will use this environment.

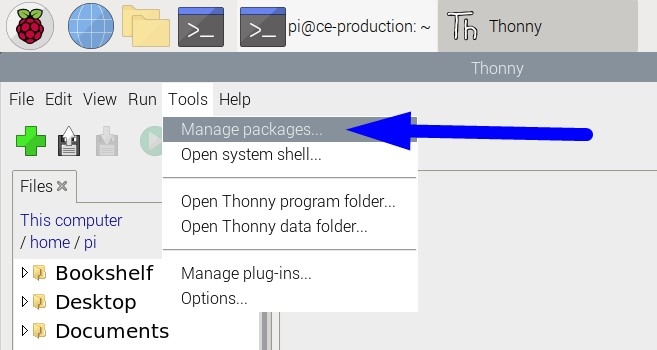
Next, open the package manager. From within Thonny click Tools > Manage Packages
Enter "piicodev" and click "Search on PyPI"

Finally, Install PiicoDev. If you already have PiicoDev installed, there may be an Upgrade button instead, to upgrade to a newer version.
With the PiicoDev module installed we are now ready to begin programming with PiicoDev hardware.

We will need these files to work with the PiicoDev Transceiver:
- Save the following files to your preferred coding directory - In this tutorial, we save to My Documents > PiicoDev.
- Download the PiicoDev Unified Library: PiicoDev_Unified.py (right-click, "save link as").
- Download the device module: PiicoDev_Transceiver.py (right-click, "save link as")
- Upload the files to your micro:bit. This process was covered in the Setup Thonny section.
The PiicoDev Unified Library is responsible for communicating with PiicoDev hardware, and the device module contains functions for driving specific PiicoDev devices.
Transmit and Receive
Transmitting
Use the .send() method to transmit data. send() accepts strings, values, and (string,value) tuples. The following are all valid ways to use send()
radio.send("Hello, World!")          # send a string up to 59 characters long
radio.send(123)                      # send an integer or floating point number
radio.send( ("my number", 3.14159) ) # send labelled data as a tuple in the form: ("String label", numeric data)
Receiving
Check for new messages using the .receive() method which returns True when a new message is received. The message can be read from the .message attribute. For example, you can print any received data with the following snippet:
if radio.receive():
        print(radio.message)
.message will adopt the type of whatever data type was sent (string, number or labelled data).
Example - Transmit and Receive Data
The following example transmits different kinds of data to a receiver. Make sure your receiver is running the receiver code before running the transmitter code. Your receiver ought to display the different incoming messages in the shell.
Transmitter Code: Transmits three different message types
# Demonstrate how to use the send() command
# send() will accept strings, values, and "named values" which
# are string,value pairs.

from PiicoDev_Transceiver import PiicoDev_Transceiver
from PiicoDev_Unified import sleep_ms

radio = PiicoDev_Transceiver()

# Text messages
radio.send("Hello, World!")
sleep_ms(1000)

# Numbers (integer or floating point)
radio.send(123)
sleep_ms(1000)

# Named Values
named_data = ('temperature[degC]', 25.0)
radio.send(named_data)
sleep_ms(100)

named_data = ('humidity[%]', 60.0)
radio.send(named_data)
Receiver Code: Prints all received messages to the shell
# Listen for LED control messages
# Valid messages set the state of the on-board LED

from PiicoDev_Transceiver import PiicoDev_Transceiver
from PiicoDev_Unified import sleep_ms

radio = PiicoDev_Transceiver()

while True:
    if radio.receive():
        message = radio.message
        print(message)
    sleep_ms(50)
Remix - Remote Control
Let's create a simple remote controller! We'll set up the transmitter to periodically send On/Off control messages. The receiver will listen for valid messages and update the state of the Transceiver's on-board LED.
Transmitter Code:
# Send LED control messages to a listening receiver

from PiicoDev_Transceiver import PiicoDev_Transceiver
from PiicoDev_Unified import sleep_ms

radio = PiicoDev_Transceiver()

state = True
while True:
    if state:
        radio.send('LED:ON')
    else:
        radio.send('LED:OFF')
    state = not state
    sleep_ms(1000)
Receiver Code:
# Listen for LED control messages
# Valid messages set the state of the on-board LED

from PiicoDev_Transceiver import PiicoDev_Transceiver
from PiicoDev_Unified import sleep_ms

radio = PiicoDev_Transceiver()

while True:
    if radio.receive():
        message = radio.message
        print(message)

        if message == 'LED:ON': radio.led = True
        if message == 'LED:OFF': radio.led = False
    sleep_ms(50)
Groups and Addresses
For projects with more than two Transceivers, you may want to manage radio traffic using groups and addresses.
Transceivers can be configured with a unique radio_address (0->127, default 0) parameter during initialisation. To send a private message to a specific Transceiver, include its address when calling the .send() method. When the radio_address argument is not included, .send() broadcasts to address 0, which all Transceivers listen to.

Send a private message to a specific Transceiver (within the same group) by including its address in .send()
A group is a collection of PiicoDev Transceivers that may communicate. The PiicoDev Transceiver will only ever send/receive messages to/from Transceivers within its group. The group parameter is a number 0->255 and is set during initialisation (default: 0).

Six PiicoDev Transceivers are shown divided into two groups. Messages may only be sent within a group, they will not cross between groups.
The following example shows:
- how to initialise a PiicoDev Transceiver within a specific group (
group=2) and with a specific address (radio_address=1) - how to send a private message within a group (to
address=3)
from PiicoDev_Transceiver import PiicoDev_Transceiver
from PiicoDev_Unified import sleep_ms

radio = PiicoDev_Transceiver(group=2, radio_address=1) # Initialise this Transceiver in Group:2, as Radio Address 1

radio.send("This is a broadcast to everyone in group two")

sleep_ms(50)

radio.send("whisper to address three", address=3) # within my group!
Multiple Transceivers on the Same PiicoDev Bus
It's possible to connect multiple PiicoDev Transceivers to the same PiicoDev bus. You may want to do this to avoid setting up a second dev. board, or to create some kind of bridge/repeater between two Transceiver groups. In this example we'll set up two Transceivers on the same bus.
Begin by setting up unique IDs - this differentiates the Transceivers. In the initialisation code, we will use the id argument to differentiate the transceivers. id is a list that encodes the ID switch positions; 1=ON and 0=OFF. Use a fine pen or similar instrument to set the ID switches as follows:
- The transmitter will have all its ID switches off, and will be initialised with the argument
id=[0,0,0,0] - the receiver will have ID1:ON and the rest off, and will be initialised with the argument
id=[1,0,0,0]

In this example code the transmitter will continuously send new labelled values. The receiver checks for new messages and prints them to the shell. When you run the code it should generate a nice sine wave in the plotter.
# Demonstrate how to use multiple PiicoDev Transceivers on the same bus

from PiicoDev_Transceiver import PiicoDev_Transceiver
from PiicoDev_Unified import sleep_ms
from math import sin

# Initialise two separate radios
transmitter = PiicoDev_Transceiver(id=[0,0,0,0]) # each radio needs a unique ID switch setting
receiver    = PiicoDev_Transceiver(id=[1,0,0,0])

x = 0 # generates a sine wave

while True:
    # TRANSMIT a new value from one Transceiver
    y = sin(x)                           # generate a new number
    transmitter.send( ('sine wave', y) ) # send the number
    x += 0.2                             # increment the control variable

    sleep_ms(50)

    # RECEIVE any incoming messages and print
    if receiver.receive():
        message = receiver.message
        print(message)

The receiver prints all received messages to the shell, generating a sine wave in the plotter.
The following table describes the actual I2C addresses that are selected by the ID switches. Advanced users may prefer to initialise the module with an explicit address, rather than the ID switch argument. It is also possible to define a custom address in user-code by using the .setI2Caddr() method. Check the Micropython/Python Library and API documentation for more information.

Maximising Performance
From our field tests we've found the radio works well outdoors up to 100m, and indoors to 30m. Radio signals can be interfered with by metal objects and other electronics. For best performance you should keep metal away from each Transceiver's antenna. Other obstructions like walls, buildings and trees will affect the maximum range you can expect.
Over-the-air datarate can impact maximum range. You can trade off data rate for some extension in range. Data rate is set at initialisation by setting the speed argument to 1, 2 or 3. For example, the following code initialises the Transceiver with the slowest data rate, which should give the maximum range.
radio = PiicoDev_Transceiver(speed=1)The following table shows valid options for the speed argument.
| speed= | Rate (kbps) | Description |
| 1 | 9.8 | Slowest, longer range |
| 2 | 115.2 | The default setting. Balanced speed/range performance |
| 3 | 300 | Fastest, shorter range |
Conclusion
Once you can send and receive data the world is your oyster! We've seen some simple examples with enormous potential - the LED remote controller example may form the foundations for a much more powerful project. Turning and LED on and off isn't too different from controlling an irrigation system or commanding a robot arm. At the end of the day it's all just information being transported from one point to another.
Check out the project ideas we've featured below if you'd like some more inspiration. Until next time, happy making!
Resources
This guide has taken every care to document the PiicoDev Transceiver to be useful for most makers. If you really want to look under the hood and explore the hardware and software, we've provided these additional resources.
- Hardware Repo for the PiicoDev Transceiver PCB
- Schematic
- MicroPython/Python Library and API documentation - Covers advanced library features implemented on the Transceiver that, for brevity, are not included in this guide.
Project Ideas
We mentioned a few projects in the video for this guide. Here's the code we used to create those demos!
Combine some additional PiicoDev hardware with an off-the-shelf Robot Arm Kit to create a radio-controlled Robot Arm!

This project requires
- 2x Dev. Boards and suitable PiicoDev adapters
- 2x PiicoDev Transceivers
- 3x PiicoDev Slide Potentiometers
- 1x PiicoDev Servo Driver
- 1x 3DOF Robot Arm Kit
The transmitter reads the value from each potentiometer, packs the data into a data message and sends the message to the receiver. The receiver unpacks the data message and interprets the values as angles to set for each servo in the robot arm.
This project uses the more advanced .send_bytes() and .receive_bytes() methods that give you maximum control over how you structure message payloads. Here, they're used along with pack() and unpack() to cram all three potentiometer values into a single message. At the time of writing, these methods are not compatible with .send() and receive().
Transmitter Code
from PiicoDev_Unified import sleep_ms
from PiicoDev_Transceiver import PiicoDev_Transceiver
from PiicoDev_Potentiometer import PiicoDev_Potentiometer
from struct import pack

pot_claw = PiicoDev_Potentiometer(id=[0,1,0,0],minimum=43, maximum=110)
pot_luff = PiicoDev_Potentiometer(id=[1,0,0,0],minimum=0, maximum=180)
pot_slew = PiicoDev_Potentiometer(id=[0,0,0,0],minimum=10, maximum=170)

radio = PiicoDev_Transceiver()

while True:

    data = pack('>fff', pot_slew.value, pot_luff.value, pot_claw.value)
    radio.send_bytes(data)

    sleep_ms(20)
Receiver Code
from PiicoDev_Unified import sleep_ms
from PiicoDev_Transceiver import PiicoDev_Transceiver
from PiicoDev_Servo import PiicoDev_Servo, PiicoDev_Servo_Driver
from struct import unpack

controller = PiicoDev_Servo_Driver()
radio = PiicoDev_Transceiver()

claw = PiicoDev_Servo(controller, 3, min_us=600, max_us=2500)
luff = PiicoDev_Servo(controller, 2, min_us=600, max_us=2500)
slew = PiicoDev_Servo(controller, 1, min_us=600, max_us=2500)

while True:
    if radio.receive_bytes():
        # unpack structured data message (3 floating point numbers)
        angle_slew, angle_luff, angle_claw = unpack('>fff', radio.received_bytes)
        claw.angle = angle_claw
        luff.angle = angle_luff
        slew.angle = angle_slew

        print('{:3.0f} {:3.0f} {:3.0f}'.format(slew.angle, luff.angle, claw.angle))

    sleep_ms(5)
A classic remote data-gathering project! Here we set up a transmitter outdoors to broadcast atmospheric data: Temperature, Barometric Pressure and Relative Humidity.
Our wireless receiver allows us to keep an eye on the weather from the comfort of indoors.
|
A PiicoDev Transceiver connected to a PiicoDev Atmospheric Sensor. Dev-board not shown. The Atmospheric Sensor samples temperature, barometric pressure, and humidity. |
A PiicoDev Transceiver connected to a PiicoDev OLED Module. Dev-board not shown. Three separate measurements are displayed. |


This project requires:
- 2x Dev. Boards and Adapters
- 2x PiicoDev Transceivers
- 1x PiicoDev Atmospheric Sensor BME280
- 1x PiicoDev OLED Module
- 4x PiicoDev Cables
- Driver files relevant to each PiicoDev module used. Check the guides for each module.
Transmitter Code:
# Weather Station Project - Transmitter
# Collect atmospheric data from a PiicoDev Atmospheric Sensor (BME280) and
# broadcast labelled values: Temperaure, Barometric Pressure, Relative Humidity
#
# Required PiicoDev Modules:
#   • PiicoDev Atmospheric Sensor BME280
#   • PiicoDev Transceiver

from PiicoDev_Transceiver import PiicoDev_Transceiver
from PiicoDev_BME280 import PiicoDev_BME280
from PiicoDev_Unified import sleep_ms

radio = PiicoDev_Transceiver()
weather = PiicoDev_BME280()

while True:
    tempC, presPa, humRH = weather.values() # read all data from the sensor
    pres_hPa = presPa / 100 # convert air pressure [Pascals -> hPa] (aka [mbar], if you prefer)
    print("{:5.2f} °C  {:7.2f} hPa  {:2.0f} %RH".format(tempC, pres_hPa, humRH))

    # Transmit all the data
    radio.send( ('temperature[degC]', tempC) )
    sleep_ms(200)
    radio.send( ('pressure[hPa]', pres_hPa) )
    sleep_ms(200)
    radio.send( ('humidity[%]', humRH) )
    sleep_ms(10000)
Receiver Code:
# Weather Station Project - Receiver
# Receive atmospheric data and present on a display
#
# Required PiicoDev Modules:
#   • PiicoDev OLED Module
#   • PiicoDev Transceiver


from PiicoDev_Transceiver import PiicoDev_Transceiver
from PiicoDev_SSD1306 import create_PiicoDev_SSD1306
from PiicoDev_Unified import sleep_ms

radio = PiicoDev_Transceiver()
oled = create_PiicoDev_SSD1306()

oled.text('hello', 10,10)
oled.show()
sleep_ms(500)


tempC = 0.0
pres_hPa = 0.0
humRH = 0.0

loop_count = 0

while True:
    # Task 1: Receive and sort any new data
    if radio.receive():
        m = radio.message
        print(radio.message)
        if radio.message[0] == "temperature[degC]":
            tempC = radio.message[1]

        if radio.message[0] == "pressure[hPa]":
            pres_hPa = radio.message[1]

        if radio.message[0] == "humidity[%]":
            humRH = radio.message[1]

    # Task 2: Periodically update the display on a much slower period
    if loop_count >= 200:
        loop_count = 0

        oled.fill(0)
        temperature_string = str(round(tempC,1))
        pressure_string = str(round(pres_hPa,2))
        humidity_string = str(round(humRH))

        oled.text('Weather Station', 1,0)
        oled.text(temperature_string + ' degC', 10,25)
        oled.text(pressure_string + ' hPa', 10,35)
        oled.text(humidity_string + ' % humidity', 10,45)
        oled.show()

    loop_count += 1
    sleep_ms(50)
Did you know certain species of fireflies will spontaneously synchronise their flashes? How cool is that!? This project re-creates the firefly synchronisation effect using the on-board LED of the PiicoDev Radio. There's special code included for micro:bits that will take advantage of their brilliant 5x5 LED display for a much bigger light source.
General version
This version of the project uses the Transceiver's onboard LED to represent the firefly flash. It works on Raspberry Pi Pico and Micro:bit. ticks_ms() is not compatible with Raspbery Pi but can be replaced with time.monotonic()
# Simulate the natural phenomenon of synchronised fireflies
# Run this code on multiple dev-boards. The Transceiver's LED will blink steadily
# Each LED will gradually synchronise with other "fireflies" in the group.
# This effect is achieved by sending a timestamp of when *this* firefly is blinking
# Other fireflies listen for the timestamp and adjust their blink timing.


from PiicoDev_Transceiver import PiicoDev_Transceiver
from PiicoDev_Unified import sleep_ms
from time import ticks_ms
from random import randrange

radio = PiicoDev_Transceiver()

duration = 1000
period = 3000
last_flash = randrange(0, period)
state = False


def tune_flash(ref):
    global last_flash, state
    now = ticks_ms()
    err = ref - (now - last_flash)
    if abs(err) > 50:
        if state is True: # I'm ahead of another firefly
            last_flash -= 0.2 * err
        if state is False: # I'm lagging behind another firefly
            last_flash += 0.1 * err

while True:
    if radio.receive():
        message = radio.message
        print(message)
        tune_flash(message)

    now = ticks_ms()
    if state is False and now - last_flash > period:
        radio.led = True
        state = True
        last_flash = now
        # Wait some time before sending the timestamp (prevents RF collisions)
        wait_time = randrange(0, duration)
        sleep_ms(wait_time)
        radio.send(wait_time)

    if state is True and now - last_flash > duration:
        radio.led = False
        state = False

    sleep_ms(50)
Micro:bit V2 version
This version of the project uses the micro:bit's 5x5 LED display for a more impressive flash.
# Alternative Firefly project, specifically for micro:bit
# Simulate the natural phenomenon of synchronised fireflies
# Run this code on multiple dev-boards. The micro:bit's LED Display will blink steadily
# Each display will gradually synchronise with other "fireflies" in the group.
# This effect is achieved by sending a timestamp of when *this* firefly is blinking
# Other fireflies listen for the timestamp and adjust their blink timing.

from microbit import display
from PiicoDev_Transceiver import PiicoDev_Transceiver
from PiicoDev_Unified import sleep_ms
from time import ticks_ms
from random import randrange

radio = PiicoDev_Transceiver()
display.on()

duration = 1000
period = 3000
last_flash = randrange(0, period)
state = False


def tune_flash(ref):
    global last_flash, state
    now = ticks_ms()
    err = ref - (now - last_flash)
    if abs(err) > 25:
        if state is True: # I'm ahead of another firefly
            last_flash -= 0.2 * err
        if state is False: # I'm lagging behind another firefly
            last_flash += 0.1 * err


def update_display(state):
    if state is True:
        for x in range(5):
            for y in range(5):
                display.set_pixel(x,y,9)
    else:
        display.clear()


while True:
    if radio.receive():
        message = radio.message
        tune_flash(message)

    now = ticks_ms()
    if state is False and now - last_flash > period:
        state = True
        last_flash = now
        update_display(state)

        # Wait some time before sending the timestamp (prevents RF collisions)
        wait_time = randrange(0, round(0.5*duration))
        sleep_ms(wait_time)
        radio.send(wait_time)

    if state is True and now - last_flash > duration:
        state = False
        update_display(state)

    sleep_ms(50)

