It has finally happened, they figured it out! The new frontier of Colour Electronic Paper is here and I'm very impressed. People have been demanding this ever since the first E-Paper readers hit the market in the noughties. That black and white just wasn't cutting it, we wanted colours and technology has finally caught up! All thanks to Pimoroni.
Plus right now I'd be so bold as to call this a hidden gem. These screens have all the benefits of an electronic paper device, including excellent battery life and perfect visibility in sunlight, but finally in full colour! Once you display an image to the screen it will stay there for ages, up to weeks, completely unpowered. To be clear these screens can produce seven-block colours; Blue, Green, Red, White, Yellow, Orange, and Black. In combination with dithering, the method used by computers to approximate a colour from a mixture of other colours when the required colour is not available, this Electronic Ink display can produce basically all the colours!
This will be a guide specifically on the Inky Impression 5.7" (7 Colour ePaper/eInk HAT, 600x448 Pixels) by Pimoroni. Pimoroni has a little brother version too, an Inky Impression 4" (7 Colour ePaper/eInk HAT, 600x400 pixels), and now an even larger one at 7.3 inches! (800x480 Pixels). Everything explained here will be applicable for both these screens. See the contents of this guide below.
- Colourful Picture Examples and Technology Overview
- What You Need
- Hardware Set-Up
- Installing Software to Raspberry Pi OS
- Displaying Images and Clearing Using Example Scripts
- Displaying a Webpage
- Where to Now (Putting in Photograph Frame, Auto Random Image on Boot Up, and using a Raspberry Pi Zero)
- Downloads and a Note on Colour Accuracy
There is a caveat, however, as the Colour E-Ink technology is currently set up to do full-screen refreshes each time the image changes (no partial refreshes yet, but a little bit of clever software that could be overcome). This means that screen flashing when images changes happen, as well as a long refresh time, is to be expected. All E-Ink displays have this limitation but with more colours comes a longer refresh time. This particular 5.7" screen takes around 15 seconds to do a full refresh. To have an E-Ink Display that is faster at updating and has effective partial refreshing you are better off using a Black and White version. For a behemoth of an E-Ink Display check out the Waveshare 10.3" Black and White E-Ink Display. Nevertheless, just check out some examples of what these 7-Colour E-Ink displays can do below.

Multicolour E-Ink displays are commonly used for signage purposes (like shelf labels that don’t require updates very often). Electronic Paper has never been great as a user interfaces (UI) display where it would need to refresh quickly. Nevertheless, in the right application, E-Ink is really sweet technology, especially now that we have all the colour under the rainbow to play with. As always if you have any questions, queries, or things you'd like me to display on this screen, please let us know your thoughts!
Colourful Picture Examples and Technology Overview
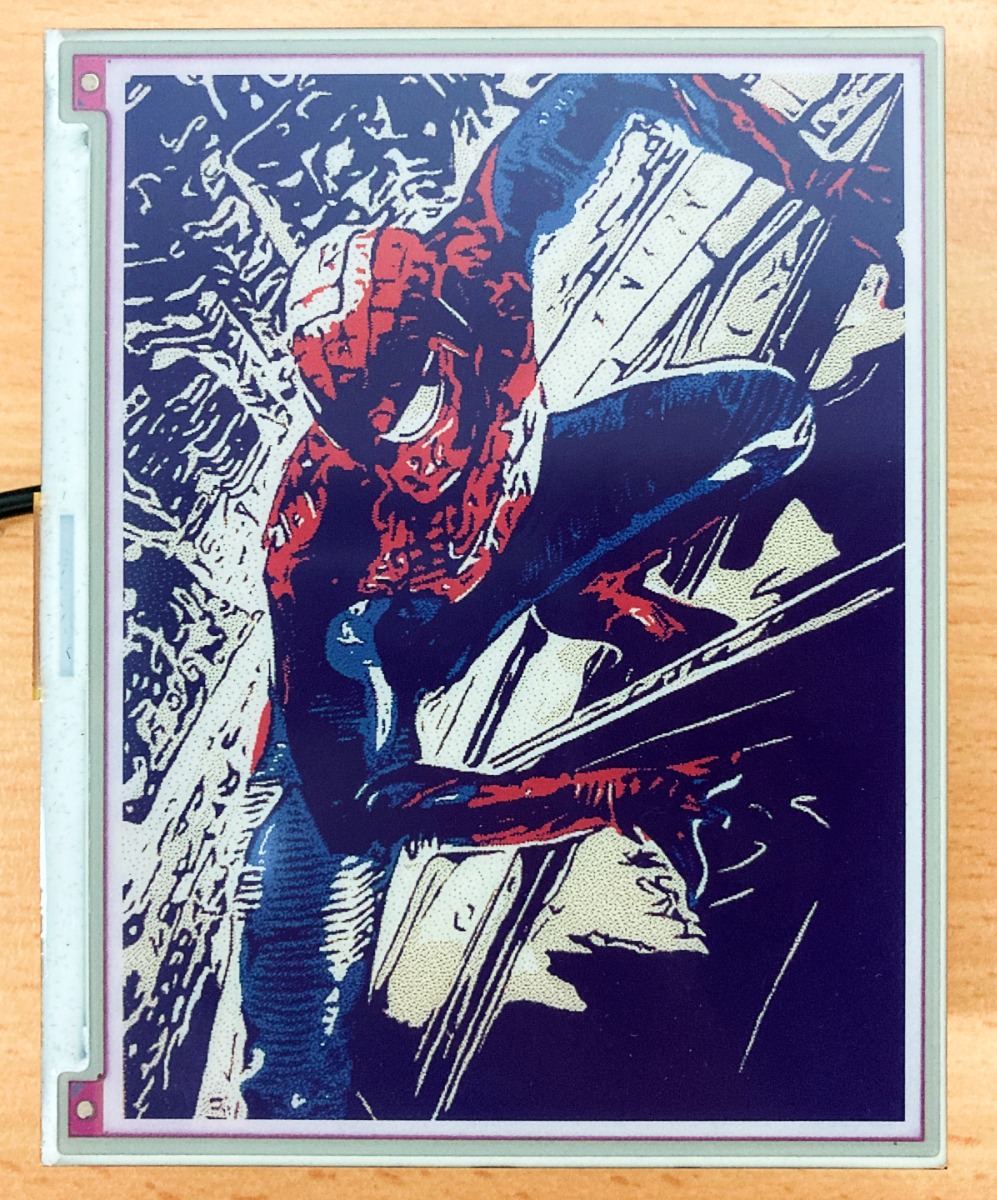
The best introduction to this 7 colour E-Ink Display is a collage of colourful images exhibited by this display. This will also let you see how dithering alters images to get the full range of colours. It will also provide an inclination as to what types of images this screen replicates the best. From my preliminary experiments with this display hand-drawn art looks fantastic. Old film photographs have increased dithering when compared to digitally captured photographs. Watercoloured painting and old posters look fantastic, along with most styles of paintings. Also, if you have a specific image you’d like me to try out with this screen, write up a forum post or the comments below. I'll set it up and show you. These images were all taken with the Pimoroni Board attached on top of a Raspberry Pi 4 Model B placed flat on the table just like the image below. An iPhone SE was used to take photos of the E-Ink display in a well-lit office room. The display is exhibiting a panel from a spiderman comic.
I will include all the images here in the download section below so you can see the original if you desire. The software resizes the images so pixel size is not so important. If the desired image is not the same ratio as the 600x448 display it will resize the desired image to fit the screen. The current Pimoroni example software which displayed all these images will format them to the exact pixel size as the screen. This can lead to weirdly stretched images if not managed.
Below shows a hand-drawn image and a watercolour painting. In the first image of this article has a hand-drawn kitten picture, an old Monoco Race Poster, an Analogue colour photo of the 1969 Tour De France, a Digital image of Jonathan Rea racing his 2019 Kawasaki Race bike and a digitally created skyscape are shown. Hopefully, this is a wide enough selection so you can get a feel for what images this screen excels at reproducing. Right-click any image and open it into a new window to see it at full size.

The technology inside these is remarkable. Not only are they very pretty displays they are also very power-efficient displays. If you send an image to it, it will stay there for ages. Up to weeks unpowered with very little deterioration in quality. This all has to do with the technology making these screens operate and how very different they are from LCD displays. To get a grasp on what is going on inside E-Ink Paper, imagine 1000s of tiny oil-filled bubbles all pushed (crammed) together and lined up on a flat surface. These tiny oil-filled bubbles have inside them many positively or negatively charged tiny particles which each have colours. Then depending on the current flowing above or below these oil filled bubbles certain particles are drawn up or down. When the particles are drawn to the top of the oil filled bubble we can then see their colour displayed on the E-INK screen. Cut all power to the screen and those bubbles are going to keep displaying the same colour as the particle won’t move. It takes some serious vibrations to have any degradation to the desired picture. In the image below is the evolution of these oil bubbles, from simple Black and white, three colours, higher resolution/contrast black and white, to the 7 Colour E-Ink technology, the ACeP oil bubbles.

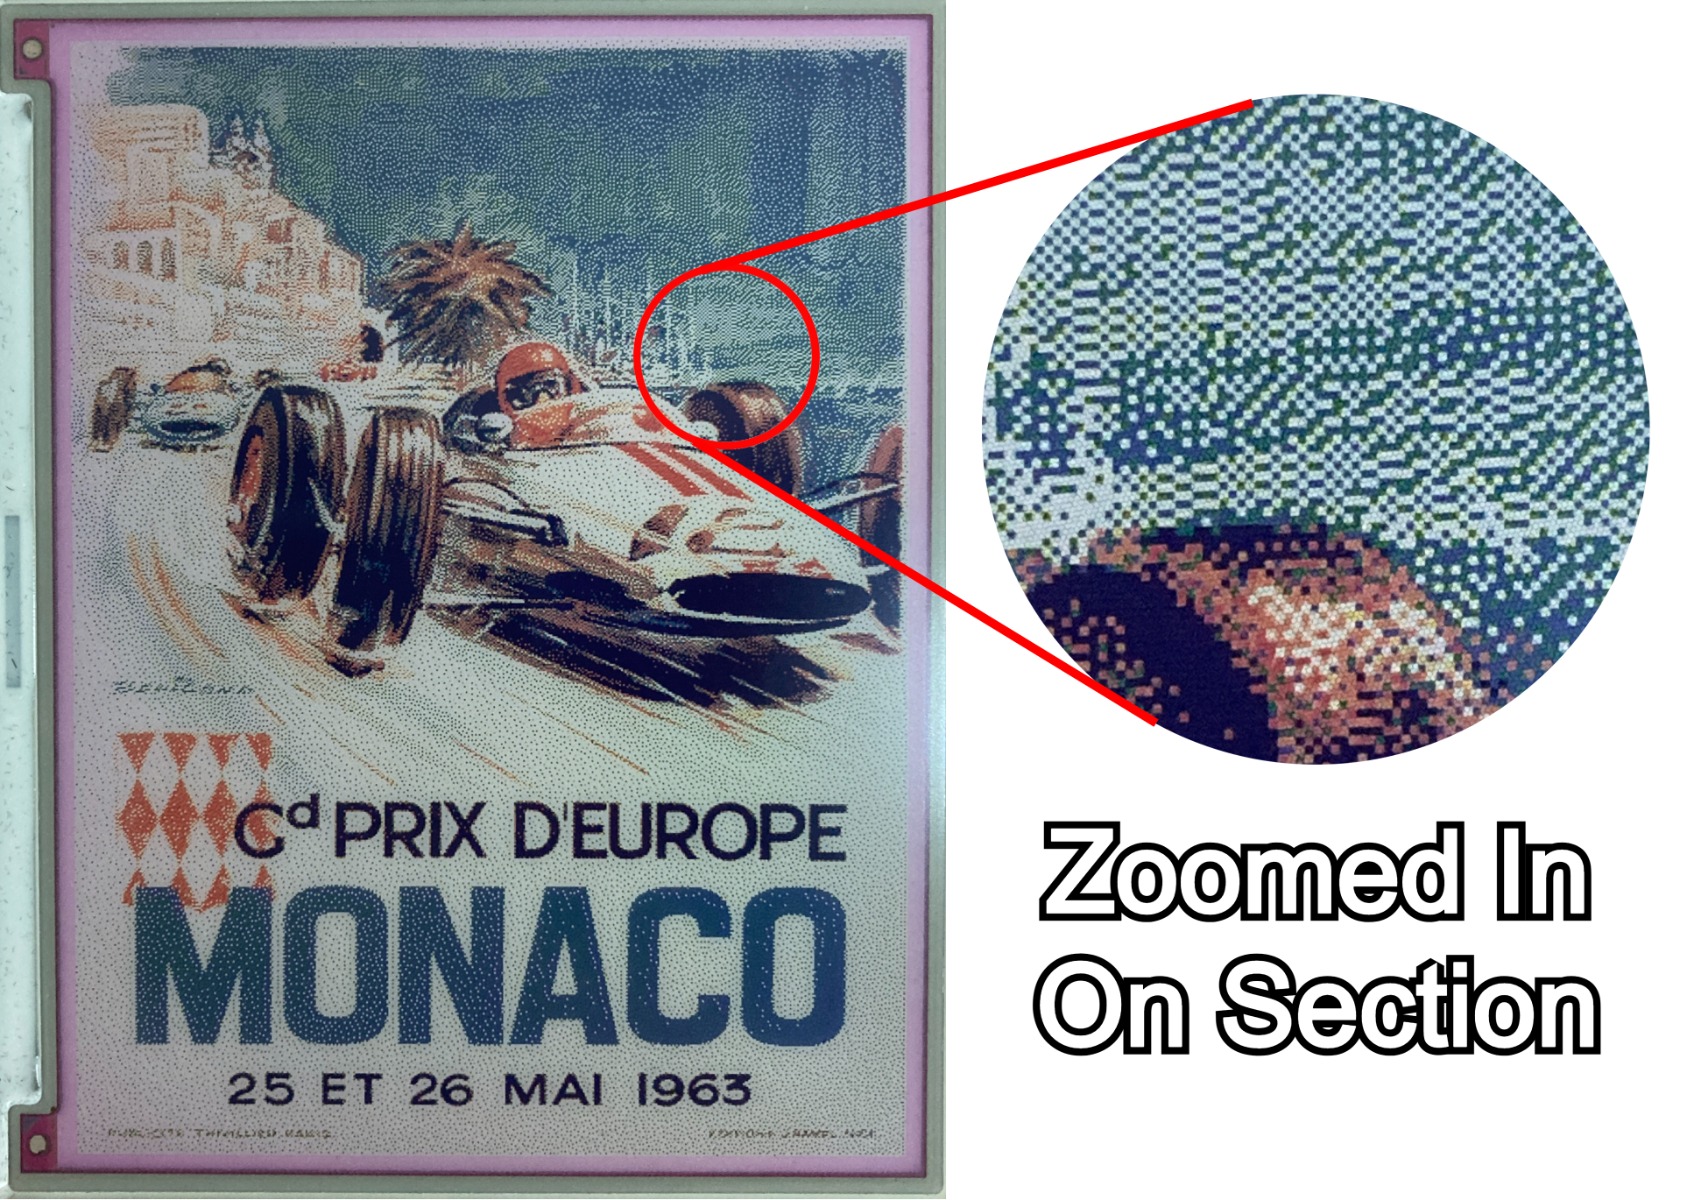
Now more colours mean longer refresh time with more full-screen flashes when images are changed. This is what needs to happen to get all those different coloured particles in the correct place. That is the only considerable drawback of these screens and this is just how it is with the current multiple coloured E-Ink technology. For those curious as to what the screen looks like really close up, check the below image, as it will provide you with an idea of the top of the oil capsules all pushed up together with their colourful particles showing.
What You Need
Below is everything you need to set up your Raspberry Pi 4 Model B with the Pimoroni Inky Impression 5.7" (7 Colour ePaper/eInk) HAT. A HAT is an anagram for Hardware Attached on Top, it refers to boards that easily plug directly on top of and improve the capabilities of the target board.
- A Raspberry Pi Palm-Sized Computer (in my case I have used a Raspberry Pi 4 Model B 2GB but this display is perfect for an earlier lower-spec Pi like the Raspberry Pi 3 or Raspberry Pi Zero)
- Inky Impression 5.7" (7 colour ePaper/eInk HAT)
- Micro SD Card flashed with Raspberry Pi OS
- 2x20 Socket Riser Header for Raspberry Pi HATs and Bonnets
- Power Supply
- Mouse and Keyboard
Hardware Set-Up
This is all about putting the two boards together. During the installation process, I would recommend keeping the screen protector that comes in stock with the screen on the Pimoroni 7Ink display screen. The front panel is glass. It can get scratched and bumps can crack it. The E-Ink Panel comes pre-assembled with female connections for any board with the standard 2x20 GPIO pin footprint like the Raspberry Pi, Google Coral, and NVIDIA Jetson. If your board does not have male 2x20 GPIO pins it will require GPIO Pins to be soldered or Hammer Headered onto the board.
Also, Raspberry Pi Zeros won't require stand-offs or any extra header tomfoolery. This is particularly desirable if you are going for a height that is as sleek as possible). If you are using a Raspberry Pi 4 Model B you will need to add an Extended GPIO 2x20 Socket Riser Header. Otherwise, because the USB and Ethernet connectors are too tall, you won't be able to connect to the GPIO pins. Use the screw-down standoffs and fasten the back of the board onto the standoffs with screws (that are all supplied with the Pimoroni Screen). Doing so will create a very stable package that doesn't rely on the GPIO for mechanical strength. If you are just temporarily putting the board in place for some testing you can forgo the fasteners as you can see I have in the build image below. When you are pushing the boards together do so carefully and by pressing evenly on all corners of the board. The front of the screen is glass do be careful.

With the above complete, take the time to insert the micro-SD card and, Baddaboom, you are good to go. Just connect up your Raspberry Pi as a desktop computer and you’ll be done with hardware assembly. See this happening in the image below, also if that is too fast a jump for you check out this guide here where I dive deep into the process of connecting up a Raspberry Pi as a desktop computer.

Installing software to Raspberry Pi OS
To make your life with this screen the best possible let's download the software that is already built by Pimoroni to support it. As you have set up the hardware to run as a desktop computer with power to the system you should be welcomed by the Raspberry Pi Desktop. Open up the Terminal window by clicking on the black button on the top left of the screen, you can see exactly where that location is in the image below. Once here type and enter the below, if prompted press Y and Enter on your keyboard to further install all the packages and example scripts.
curl https://get.pimoroni.com/inky | bash

Once complete this script will have enabled SPI (the connection method this E-Ink screen connects to the Raspberry Pi Board), installed all the drivers for Pimoroni E-Paper boards, and downloaded some very useful examples scripts. From here on out we can run these Example scripts through terminal commands. For all the Examples scripts we will use Terminal Command to activate and run them.
Troubleshooting. If you are unable to run that single terminal command because it returns an error like | curl failed to verify the legitimacy of the server and therefore could not establish a secure connection to it | I have the fix. You will need to go through this installation process by installing the Inky packages directly from Pimoroni’s Github page. This happened to me the second time because the Pimoroni Curl Servers were down. Open up a new terminal window exactly the same. Type and enter the following three lines into it, one by one, doing this will look a lot like the image below.
git clone https://github.com/pimoroni/inky
cd inky
sudo ./install.sh

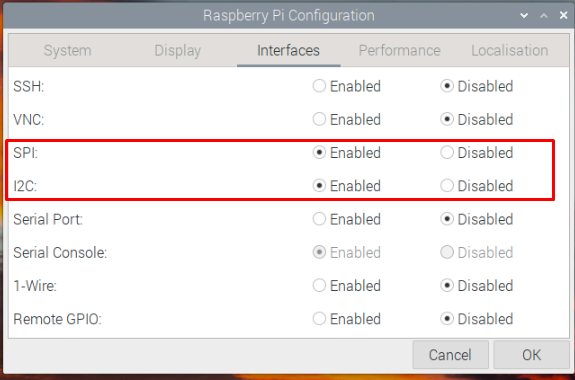
You will also need to enable I2C and SPI (these are communication methods used by circuit boards, you can learn a lot more about these in this and linked guides). To change these settings you can find them in the Raspberry Pi Configuration Menu. This can be accessed by clicking on the top left Raspberry Pi symbol and hovering over the | Preferences | options. See this process occurring in the image below. You can also access this Menu directly using a new terminal window by typing and entering the following into it | sudo raspi-config |.
Displaying Images and Clearing Using the Example Scripts
Here is how to display a simple image with file name | Art.jpeg |. Open up the Terminal window by clicking on the black button on the top left of the screen. With that open make sure you have an image called | Art.jpeg | in the folder | /home/pi/Pimoroni/inky/examples/7color |. This is the folder that images will be searched for, if you only have the image saved to the desktop, the picture won't be found, and the following won't work. Type and enter the below two lines. The first line focuses the Terminal onto the download location of the | image.py | example python script. The second line will run that python script with the Python Programming Language and select the image named | Art.jpeg |. Note that different file formats or names will work too, just alter the second line appropriately.
cd /home/pi/Pimoroni/inky/examples/7color
python3 image.py Art.jpg

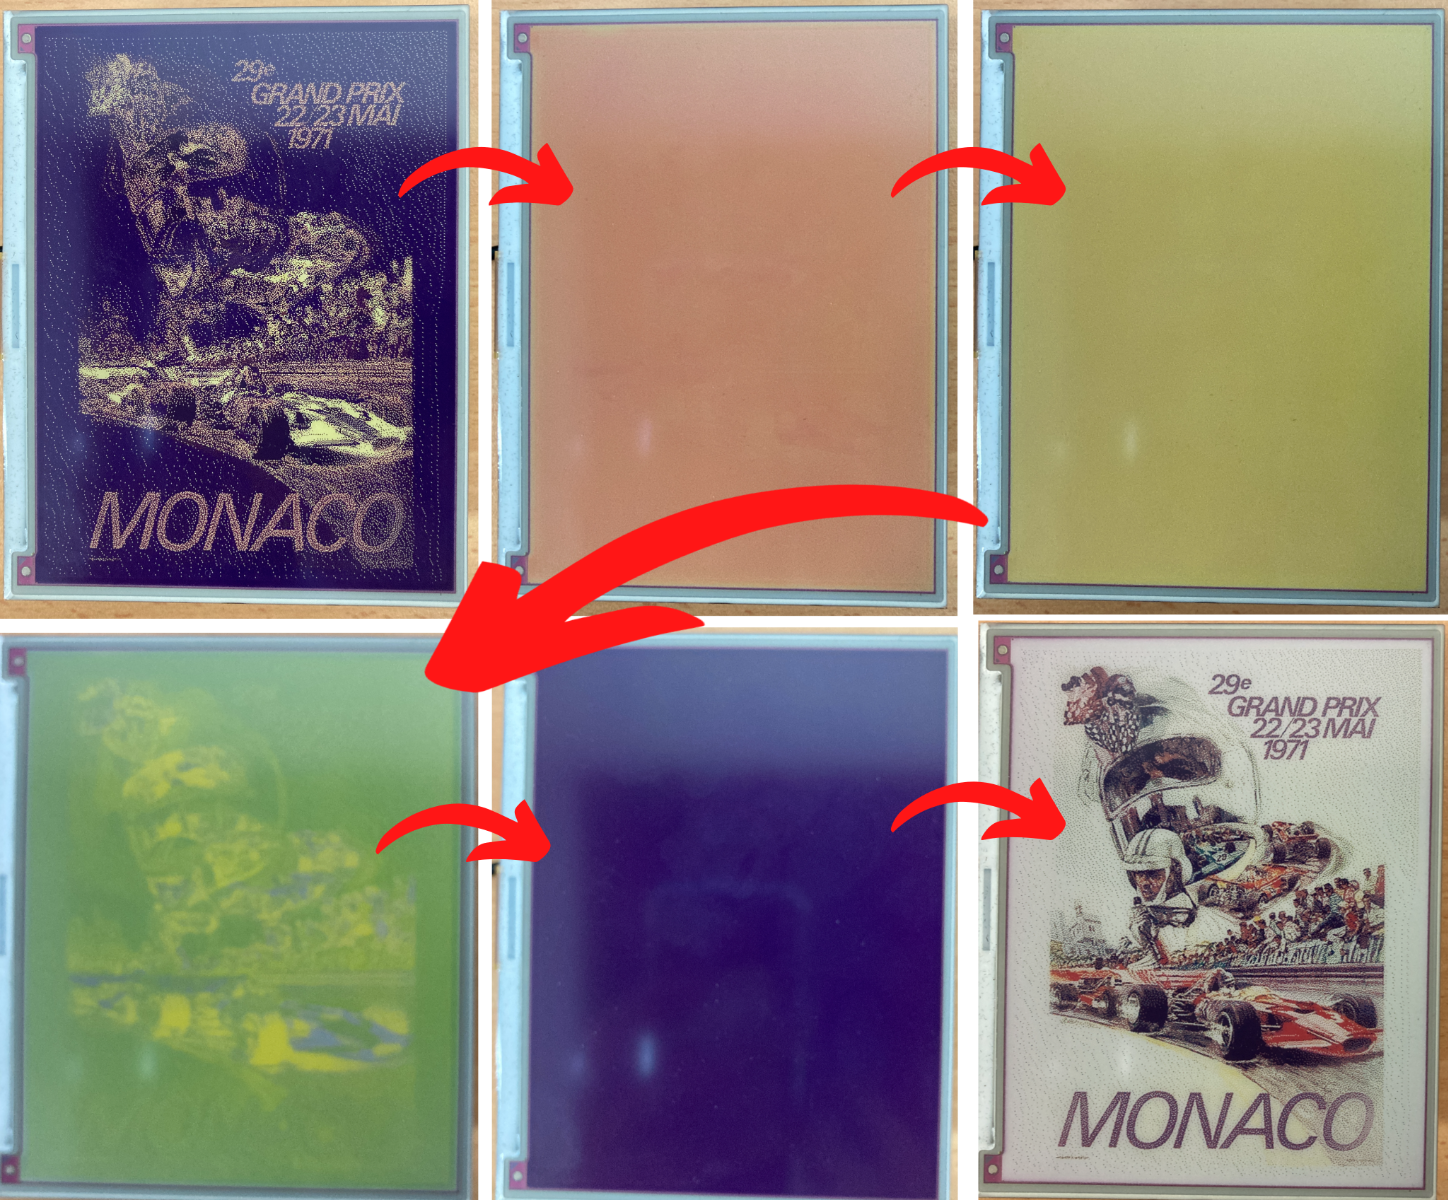
As soon as you type enter on the above terminal command you will notice your screen go through a number of total page refreshes to get all the coloured particles where they need to be. You can see this in the image below. This will take up to 15 seconds to complete.
Worth noting is also how to clear that image. If you don’t clear the image and instead keep telling it to do new images, over and over again, you can have serious ghosting problems. This will look like a faint remnant of the previously displayed image. Keep doing it and you will end up with a permanent ghosted image on the display. It is good practice to run a clean between each image refresh. Pimoroni has kindly created an example script that will do just that. Type and enter the two lines below, one by one, into a new terminal window. Doing so will run the clear the display of any images.
cd home/pi/Pimoroni/inky/examples/7color
python3 clear.py

You can alter the Saturation from 0 to 1. Making it higher saturation will make the colours pop better. To alter the saturation file open up the Python Script | image.py | with Thonny IDE by right-clicking the script's icon. Having done that scroll down just a little until you see the variable named saturation. Adjust to your heart's content, the default is 0.5 and you can adjust that value from | 0 to 1 |. Play around with the saturation levels to get exactly what you want for your specific image.

Below are some examples of the same image being exhibited with different levels of saturation. Those images provide a good understanding. The actual driver doing the colour changes for this 7 Colour E-Ink display is called Inky UC8159. You will be able to see it in the folder structure as it was downloaded with the Pimoroni Package that we installed. Dive in there to edit it if you want.

Displaying a Webpage Example
There are other great Pimoroni examples like the one for displaying a webpage. It can be run in very similar ways as before and found in a similar location, just one folder deeper. Run the script by typing and entering the below. This script will then take a screenshot of the target website and then display it onto the electronic ink display. Type and enter the following to do just this.
cd /home/pi/Pimoroni/inky/examples/7color/html
./html.sh hello-world.html

As soon as it runs it will save what it sees on the HTML page | hello-world.html | as a screenshot image and then displays that image onto your Electronic Paper display. Literally, if you can make a webpage out of your project then you can show it on a 7-colour Electronic Paper Display. It is that easy.
Where to Now (Putting in Photograph Frame, Auto Random Image on Boot Up, and using a Raspberry Pi Zero)
Below is an image of how I have set up the Pimoroni Display inside a pretty picture frame. I can control what image goes to it hands-free and remotely, as I have provided the local network details and enabled SSH and VNC. If I want to add more images to the folder in the Raspberry Pi I can do it via my phone, using the RaspController App - Link to Guide. Then through SSH, I can order the Raspberry Pi to run the | image.py | script focusing it on my desired picture. I have set up a script using CronTAB (linked is a guide all about this) so that it will run a particular python script every time the system boots up. This python script tells the system to pick and display a random image (more than 10 choices currently) that I have saved inside the same folder as the previous scripts.

Once I have all the images I want to be displayed, I then just turn on or off the Raspberry PI (which I have set to Read-Only Mode so that way I cannot corrupt the SD card from sudden power removal - Link to Guide). And it will flick on and off once a day using a Vintage Click 24 Hour Mechanical Timer I picked up at a garage sale. A new, beautiful, full color electronic ink image to be surprised by every day! Below is an image showing exactly what is written in the Randomizer Python Script as well as exactly how to make it Run on Boot every time, if I was being nitpicky I would add a | clear.py | cycle before running the display next image. If any text is too small right-click the image and open it with a new tab, that way you can zoom right in. As this is the Where to Now section I won't go ultra-deep into this but everything you need is down below.

To make this screen fit really well, I 3D Printed a frame mount out of Black Ultimaker PLA. I have the STL for the frame mount that I used in the download section below. I purchased the frame from the local antique store, if you searching for a frame find one with a big back area so that way you can cram in the electronics. This system could be made using a battery but due to the power-hungry nature of Raspberry Pi single-board computers, I simply have a stealthy USB cord coming out of the frame in one of the corners. Keep in mind you can always remove the cord or hide it in the case once the picture has changed. For this use case, I wanted a smaller form factor of all the electronics. To achieve this I used a Raspberry Pi Zero instead of the Raspberry Pi 4 Model B. I directly connected the Pi Zero into the screen, without stand-offs and just swapped the Micro-SD (which I had added the above code and images into it) across, see the internals below. This is a literal brain transplant but without any gross-ness.

I would also like to take advantage of those four buttons that are attached to the screen. Simply setting it up so I can press a button on the screen that will run the randomizer script or make a particular image be selected (if you are not in the mood for a particular picture) would be a breeze to set up. In fact, attached in the download section below is a script called | Randomizer.py |. Whenever that script is running if you press any of the buttons on the back of the screen it will change the displayed image to a randomly selected one. Also please note here my inability to accept color as the correct spelling of colour. In the future, I will change the downloaded folder name to be more easily readable but out of respect to the amazing team at Pimoroni, I have kept it the same for this tutorial.
Now I'm using this screen mainly as an Art piece display however you could definitely use it for more important, schedule keeping purposes. Just check out the above video to see the setup displaying the Weekly Tasks to do scheduler. I truly cannot wait to get a screen exactly like this but poster-sized. It would just be magic.
Downloads and a Note on Colour Accuracy
Now I haven't run into any issues with the colour representation however if you live in a particularly hot or cold climate this is worth knowing. As oil has different viscosity depending on the temperature. Thus the colour fidelity of the screen will become muted when refreshed at low temperatures. The team at Pimoroni got the best results from this display when refreshing it at an ambient room temperature, if the screen is very cold you might find that the colours are less vibrant.
The STL file for the screen mount is in the link below. This will be useful as an inspiration tool but you will likely need to modify it for your particular frame. If printing it make sure the side facing outwards from the frame is printed directly onto the build platform. The way the surface finish will be nicer. Also when 3D slicing the file, sink the model lower in the Z-axis so only two layers are actually printed. That way the result is effectively seamless between the screen and the mount.

